安装系统
Vega 出厂时已经安装好了系统,您可以直接使用。如果您的设备无法启动,或者需要升级固件,才需要手动安装系统。
使用 TFTP 方式更新系统
通过 TFTP 方式更新系统,需要通过串口登陆到 Vega 的 Bootloader(U-boot) 中进行操作。要烧录的固件需放在装有 TFTP 服务器电脑或设备中。
下载系统镜像
可以烧录的镜像有三个,分别是 Bootloader,Kernel 和 System,您可以从以下链接下载这三个文件: https://github.com/milkv-vega/vega-buildroot-sdk/releases/
Bootloader:  freeloader.bin
Kernel:      kernel.bin
System:      ubifs.img
您也可以使用您自己通过 vega-buildroot-sdk 编译生成的以上三个镜像文件来更新系统。
下载之后,将三个文件放到 TFTP 服务目录下。不同电脑系统中安装 TFTP 服务的方法这里不做说明,请自行搜索,最终要保证能够在 Vega 所在的局域网中正常读取到电脑 TFTP 服务目录中的文件。
连接串口
参考 入门指南-串口 中的信息连接串口。
连接网线
通过网��线将 Vega 8个 RJ45 网口中的1个接入到 TFTP 服务电脑所在的局域网中。
进入 Bootloader
Vega 插入 DC 12V 电源开机,在串口终端内看到如下提示后,迅速输入 asd 三个字母,进入到 Bootloader 的命令行中:
In:    console
Out:   console
Err:   console
Net:   xy1000_eth
Press asd to abort autoboot in 2 seconds
=>
出现 => 说明已成功进入 Bootloader 的命令行。
如果串口无输出,可能是 Bootloader 已无法正常启动,需要先按后面章节使用 USB-JTAG 的方式重新烧录 Bootloader 后再尝试。
配置网络
为 Vega 分配一个 IP 地址,注意不要与局域网中的其他设备冲突,假设您的局域网网段为 192.168.1.x:
=> setenv ipaddr 192.168.1.234
设置 TFTP 服务端的IP地址,假设您的 TFTP 服务器 IP 地址为 192.168.1.10
=> setenv serverip 192.168.1.10
检查是否能够访问到 TFTP 服务地址:
=> ping 192.168.1.10
Using xy1000_eth device
host 192.168.1.10 is alive
看到返回的信息为 host 192.168.1.10 is alive 说明可以正常访问到 TFTP 服务器,如果不通,请检查 TFTP 服务器的配置。
烧录镜像
-
烧录 Bootloader (freeloader.bin)
执行命令:
run updatefreeloader返回信息如下:
=> run updatefreeloader
Using xy1000_eth device
TFTP from server 192.168.1.10; our IP address is 192.168.1.234
Filename 'freeloader.bin'.
Load address: 0x42000000
Loading: #################################################################
         #######
         2.2 MiB/s
done
Bytes transferred = 1048976 (100190 hex)
tftp ok
SF: Detected w25q32 with page size 256 Bytes, erase size 4 KiB, total 4 MiB
SF: 1048576 bytes @ 0x0 Erased: OK
device 0 offset 0x0, size 0x100000
SF: 1048576 bytes @ 0x0 Written: OK
=>
烧录完 Bootloader 后需要断电后重新上电,再进入 Bootloader 命令行,按上述流程重新配置 TFTP IP。
-
烧录 Kernel (kernel.bin)
执行命令:
run updateos_nand返回信息如下:
=> run updateos_nand
Using xy1000_eth device
TFTP from server 192.168.1.10; our IP address is 192.168.1.234
Filename 'kernel.bin'.
Load address: 0x42000000
Loading: #################################################################
         #################################################################
         #################################################################
         #################################################
         2.3 MiB/s
done
Bytes transferred = 3574597 (368b45 hex)
tftp ok
SF: Detected w25q32 with page size 256 Bytes, erase size 4 KiB, total 4 MiB

NAND erase.part: device 0 offset 0x0, size 0x400000
Erasing at 0x3e0000 -- 100% complete.
OK

NAND write: device 0 offset 0x0, size 0x400000
4194304 bytes written: OK
=>
不需要重启,继续烧录 System 镜像。
-
烧录 System (ubifs.img)
执行命令:
run updateubifs_boot返回信息如下:
=> run updateubifs_boot
Using xy1000_eth device
TFTP from server 192.168.1.10; our IP address is 192.168.1.234
Filename 'ubifs.img'.
Load address: 0x48300000
Loading: #################################################################
         #################################################################
         #################################################################
         #################################################################
         #################################################################
         #################################################################
         #################################################################
         #################################################################
         #################################################################
         #################################################################
         #################################################################
         #################################################################
         #################################################################
         #################################################################
         #################################################################
         #################################################################
         #################################################################
         #################################################################
         #################################################################
         #################################################################
         #################################################################
         ############################
         2.5 MiB/s
done
Bytes transferred = 20443136 (137f000 hex)
tftp ok
SF: Detected w25q32 with page size 256 Bytes, erase size 4 KiB, total 4 MiB

NAND erase.part: device 0 offset 0x1800000, size 0x2800000
Erasing at 0x3fe0000 -- 100% complete.
OK
ubi0: detaching mtd7
ubi0: mtd7 is detached
ubi0: attaching mtd7
ubi0: scanning is finished
ubi0: empty MTD device detected
ubi0: attached mtd7 (name "ubifs_nand", size 40 MiB)
ubi0: PEB size: 131072 bytes (128 KiB), LEB size: 126976 bytes
ubi0: min./max. I/O unit sizes: 2048/2048, sub-page size 2048
ubi0: VID header offset: 2048 (aligned 2048), data offset: 4096
ubi0: good PEBs: 320, bad PEBs: 0, corrupted PEBs: 0
ubi0: user volume: 0, internal volumes: 1, max. volumes count: 128
ubi0: max/mean erase counter: 0/0, WL threshold: 4096, image sequence number: 0
ubi0: available PEBs: 296, total reserved PEBs: 24, PEBs reserved for bad PEB handling: 20
No size specified -> Using max size (37584896)
Creating dynamic volume ubifs of size 37584896
26214400 bytes written to volume ubifs
=>
至此,三个镜像烧录完成,断电后重新上电,即可正常使用。
使用 USB-JTAG 方式安装 Bootloader
如果您的 Vega 设备无法正常启动,且通过串口无法进入到 U-boot 界面,此时需要使用 USB-JTAG 方式重新安装 Bootloader。安装好 Bootloader 之后,开机通过串口进入到 U-boot ,再使用上述 TFTP 的方式来更新系统镜像。
Vega 已经内置了 USB-JTAG 硬件模块,您无须单独购买 JTAG 烧录器。
以下安装步骤在 Ubuntu 22.04 系统中进行。
检查 JTAG 设备
首先,Vega 不需要上电,直接使用 USB 数据线将 Vega 的 Type-C 口连接到 Ubuntu 系统的电脑上。
在 Ubuntu 系统使用命令查看是否已经识别到了 USB-JTAG 硬件设备(芯片为FT2232):
$ lsusb
Bus 001 Device 013: ID 0403:6010 Future Technology Devices International, Ltd FT2232C/D/H Dual UART/FIFO IC
再确认 dev 下是否生成了 ttyUSB 设备:
$ ls /dev/ttyUSB*
/dev/ttyUSB0  /dev/ttyUSB1
ttyUSB0 和 ttyUSB1 是 FT2232 芯片生成的两个设备,分别用于串口调试和 JTAG 烧录。
配置 USB 设备权限
以上生成的 /dev/ttyUSB0 和 /dev/ttyUSB1 设备默认需要 root 权限,为方便后续操作,我们先进行权限配置。
新建 udev 规则文件:
sudo touch /etc/udev/rules.d/50-ttyusb.rules
编辑该文件,增加如下内容:
SUBSYSTEMS=="usb", ATTRS{idVendor}=="0403", ATTRS{idProduct}=="6010", GROUP="users", MODE="0666"
重行执行 udev 规则,使之生效:
sudo udevadm control --reload-rules
下载所需工具
git clone https://github.com/milkv-vega/vega-jtag-burn.git
烧录
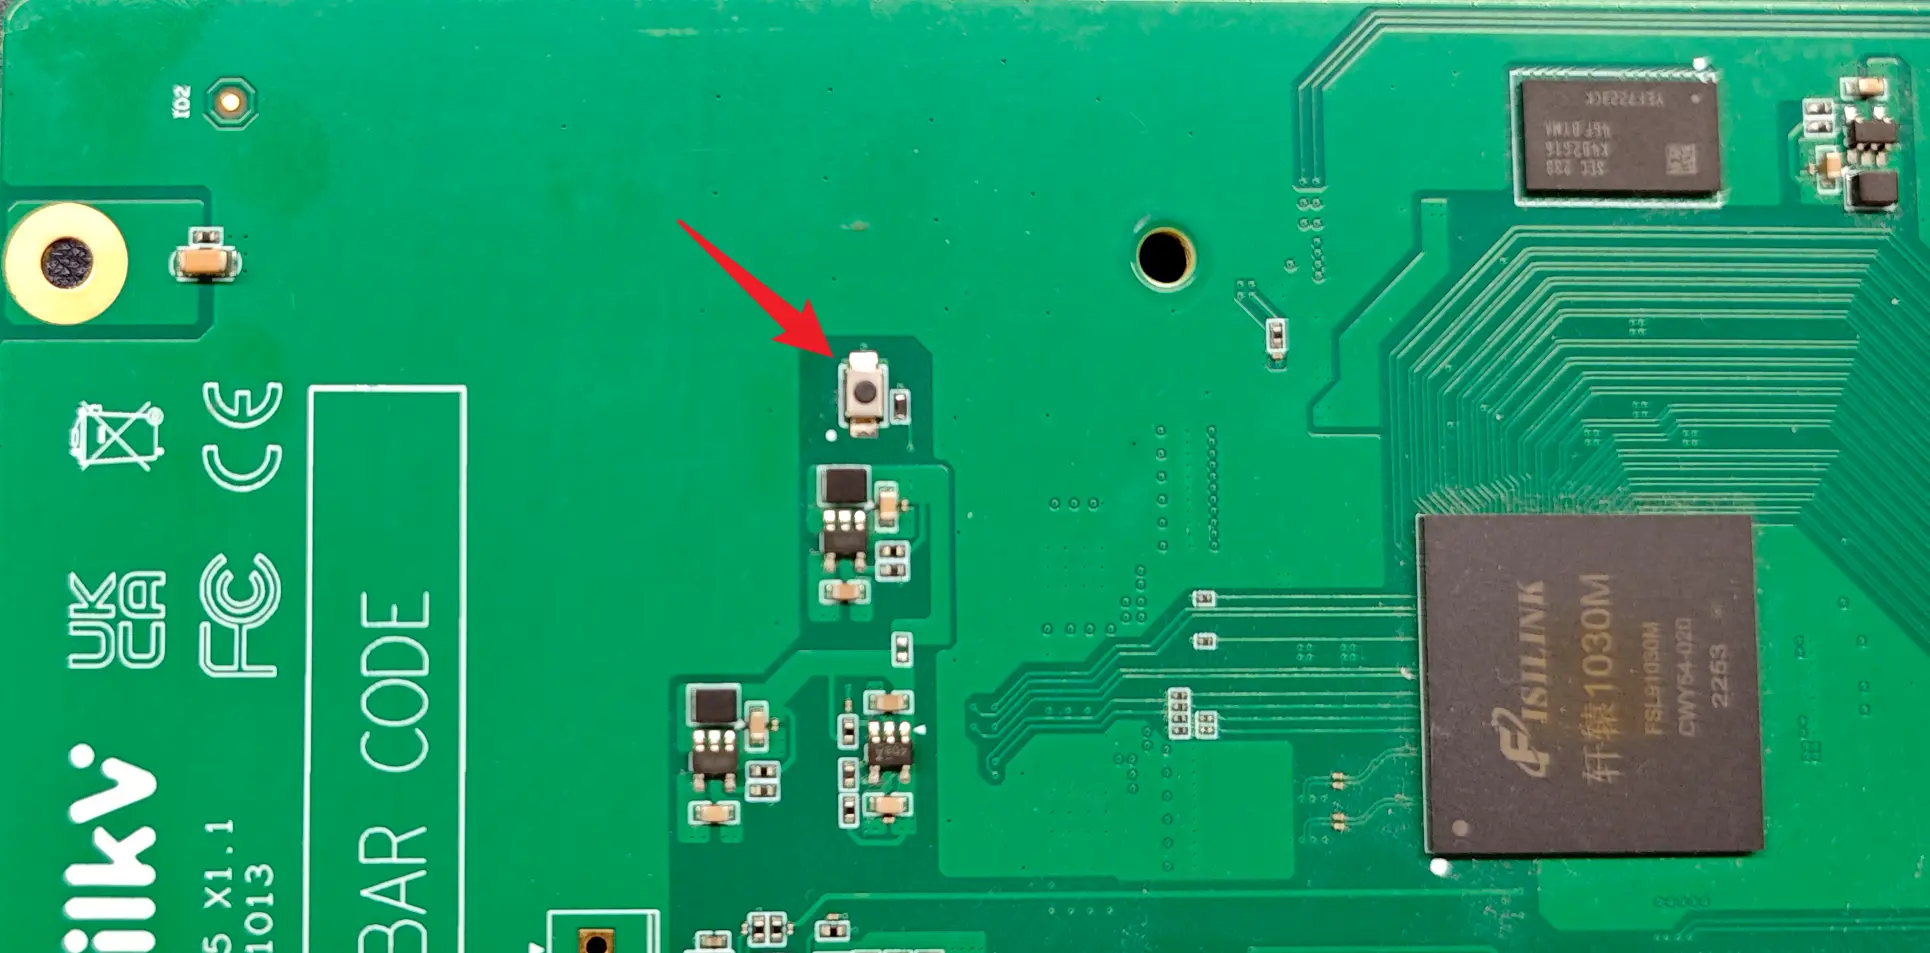
按住 Vega 主板上的 Recovery 键,再接入 DC 12V 电源绐 Vega 上电,3秒后可以松开 Recovery 键,此时 Vega 会进入烧录模式。
需要在 Ubuntu 22.04 电脑上打开两个终端,都进入到上面下载的 vega-jtag-burn 目录中。
在第1个终端中运行命令 ./openocd_202212/bin/openocd -f openocd_vega.cfg。
执行命令后的信息如下:
$ ./openocd_202212/bin/openocd -f openocd_vega.cfg
Open On-Chip Debugger 0.11.0+dev-02424-g787e48e66 (2022-12-29-08:49)
Licensed under GNU GPL v2
For bug reports, read
	http://openocd.org/doc/doxygen/bugs.html
DEPRECATED! use 'adapter speed' not 'adapter_khz'
DEPRECATED! use 'adapter driver' not 'interface'
DEPRECATED! use 'ftdi vid_pid' not 'ftdi_vid_pid'
DEPRECATED! use 'ftdi oscan1_mode' not 'ftdi_oscan1_mode'
DEPRECATED! use 'ftdi channel' not 'ftdi_channel'
DEPRECATED! use 'ftdi layout_init' not 'ftdi_layout_init'
DEPRECATED! use 'ftdi layout_signal' not 'ftdi_layout_signal'
DEPRECATED! use 'ftdi layout_signal' not 'ftdi_layout_signal'
DEPRECATED! use 'ftdi layout_signal' not 'ftdi_layout_signal'
DEPRECATED! use 'ftdi layout_signal' not 'ftdi_layout_signal'
DEPRECATED! use 'ftdi layout_signal' not 'ftdi_layout_signal'
DEPRECATED! use 'ftdi layout_signal' not 'ftdi_layout_signal'
Info : Using libusb driver
Info : clock speed 1000 kHz
Info : JTAG tap: riscv.cpu tap/device found: 0x1c607a6d (mfg: 0x536 (Nuclei System Technology Co Ltd), part: 0xc607, ver: 0x1)
Info : [riscv.cpu] datacount=4 progbufsize=8
Info : Examined RISC-V core; found 1 harts
Info :  hart 0: XLEN=64, misa=0x800000000014112d
[riscv.cpu] Target successfully examined.
Info : starting gdb server for riscv.cpu on 3333
Info : Listening on port 3333 for gdb connections
Info : Valid NUSPI on device Nuclei SoC SPI Flash at address 0x20000000 with spictrl regbase at 0x10014000
Info : Nuclei SPI controller version 0x00000001
Info : Found flash device 'win w25q32fv/jv' (ID 0x001640ef)
cleared protection for sectors 0 through 63 on flash bank 0

Info : Listening on port 6666 for tcl connections
Info : Listening on port 4444 for telnet connections
JTAG已进入等待连接状态。
在第2个终端终端中执行 source toolchain_cfg.sh 命令导入工具链:
$ source toolchain_cfg.sh
再执行命令 riscv-nuclei-elf-gdb , 会看到如下信息:
$ riscv-nuclei-elf-gdb
GNU gdb (GDB) 8.3.0.20190516-git
Copyright (C) 2019 Free Software Foundation, Inc.
License GPLv3+: GNU GPL version 3 or later <http://gnu.org/licenses/gpl.html>
This is free software: you are free to change and redistribute it.
There is NO WARRANTY, to the extent permitted by law.
Type "show copying" and "show warranty" for details.
This GDB was configured as "--host=x86_64-pc-linux-gnu --target=riscv-nuclei-elf".
Type "show configuration" for configuration details.
For bug reporting instructions, please see:
<http://www.gnu.org/software/gdb/bugs/>.
Find the GDB manual and other documentation resources online at:
    <http://www.gnu.org/software/gdb/documentation/>.

For help, type "help".
Type "apropos word" to search for commands related to "word".
(gdb)
继续输入命令 target remote localhost:3333 进行连接, 显示信息如下:
(gdb) target remote localhost:3333
Remote debugging using localhost:3333
warning: No executable has been specified and target does not support
determining executable automatically.  Try using the "file" command.
0x00000000200001c0 in ?? ()
(gdb)
此时终端1中日志如下:
Info : accepting 'gdb' connection on tcp/3333
Warn : Prefer GDB command "target extended-remote :3333" instead of "target remote :3333"
在终端2中继续输入命令 load ./freeloader.elf 开始烧录 Bootloader, 烧录过程持续约30秒,看到最后一行 Transfer rate 信息后,说明烧录已完成,日志如下:
(gdb) load ./freeloader.elf
Loading section .text, size 0xfffff lma 0x20000000
Loading section .interp, size 0x21 lma 0x200fffff
Loading section .dynsym, size 0x18 lma 0x20100020
Loading section .dynstr, size 0xb lma 0x20100038
Loading section .hash, size 0x10 lma 0x20100048
Loading section .gnu.hash, size 0x1c lma 0x20100058
Loading section .dynamic, size 0x110 lma 0x20100078
Loading section .got, size 0x8 lma 0x20100188
Start address 0x20000000, load size 1048967
Transfer rate: 41 KB/sec, 14568 bytes/write.
(gdb)
此时输入 quit 命令,退出 (gdb) 命令行。
终端1中的日志如下:
Info : JTAG tap: riscv.cpu tap/device found: 0x1c607a6d (mfg: 0x536 (Nuclei System Technology Co Ltd), part: 0xc607, ver: 0x1)
Info : Padding image section 0 at 0x20100043 with 5 bytes
Info : Padding image section 1 at 0x20100074 with 4 bytes
Info : JTAG tap: riscv.cpu tap/device found: 0x1c607a6d (mfg: 0x536 (Nuclei System Technology Co Ltd), part: 0xc607, ver: 0x1)
在终端1中按 Ctrl+C 键,退出 JTAG 程序。
至此,Bootloader 烧录完成,可以断开 DC 12V 供电,再重新上电,通过串口查看开机日志,并按上述章节中使用 TFTP 方式继续更新系统。


