Installing the System
The Vega comes pre-installed with the operating system and you can use it directly. You will need to manually install the system if your device fails to boot or requires a firmware upgrade.
Update the system via TFTP
Updating the system via TFTP requires logging into the Vega's bootloader (U-boot) via serial port. The firmware to be flashed must be located on a computer or device equipped with a TFTP server.
Download the System Images
There are three image files to flash: the bootloader, kernel, and system image. You can download these three files from the following link: https://github.com/milkv-vega/vega-buildroot-sdk/releases/
Bootloader:  freeloader.bin
Kernel:      kernel.bin
System:      ubifs.img
You can also use the three image files you compiled yourself using vega-buildroot-sdk to update your system.
After downloading them, place the three files in the TFTP server's root directory. Methods for installing the TFTP service on different computer systems are not explained here; please search online for instructions. Ultimately, you must ensure that the files in the computer's TFTP service directory can be read correctly within the local area network where Vega is located.
Connect to the Serial Port
Refer to the information in Setting Up - Serial Console to connect to the serial port.
Connect the Network Cable
Connect one of the Vega's eight RJ45 ports to the local area network of the computer providing the TFTP service via a network cable.
Enter the Bootloader
After powering on the Vega by plugging in a DC 12V power supply and seeing the following prompt in the serial terminal, quickly type asd to enter the Bootloader command line:
In:    console
Out:   console
Err:   console
Net:   xy1000_eth
Press asd to abort autoboot in 2 seconds
=>
The appearance of => indicates that you have successfully entered the Bootloader command line.
If there is no output from the serial port, the bootloader may be unable to start normally. You need to re-flash the bootloader using the USB-JTAG method as described in later chapters before trying again.
Configure the Network
Assign an IP address to Vega, being careful not to conflict with other devices on your local network. Assume your local network segment is 192.168.1.x:
=> setenv ipaddr 192.168.1.234
Configure the IP address of the TFTP server. Let's assume your TFTP server IP address is 192.168.1.10.
=> setenv serverip 192.168.1.10
Check whether the TFTP server is reachable:
=> ping 192.168.1.10
Using xy1000_eth device
host 192.168.1.10 is alive
If you see the returned message host 192.168.1.10 is alive, it means you can access the TFTP server normally. If you cannot access it, please check the TFTP server configuration.
Flash the Images
-
Flashing Bootloader (freeloader.bin)
Execute command:
run updatefreeloaderThe returned information is as follows:
=> run updatefreeloader
Using xy1000_eth device
TFTP from server 192.168.1.10; our IP address is 192.168.1.234
Filename 'freeloader.bin'.
Load address: 0x42000000
Loading: #################################################################
         #######
         2.2 MiB/s
done
Bytes transferred = 1048976 (100190 hex)
tftp ok
SF: Detected w25q32 with page size 256 Bytes, erase size 4 KiB, total 4 MiB
SF: 1048576 bytes @ 0x0 Erased: OK
device 0 offset 0x0, size 0x100000
SF: 1048576 bytes @ 0x0 Written: OK
=>
After flashing the Bootloader, you need to power off and then power on again, then enter the Bootloader command line and reconfigure the TFTP IP according to the above process.
-
Flashing Kernel (kernel.bin)
Execute command:
run updateos_nandThe returned information is as follows:
=> run updateos_nand
Using xy1000_eth device
TFTP from server 192.168.1.10; our IP address is 192.168.1.234
Filename 'kernel.bin'.
Load address: 0x42000000
Loading: #################################################################
         #################################################################
         #################################################################
         #################################################
         2.3 MiB/s
done
Bytes transferred = 3574597 (368b45 hex)
tftp ok
SF: Detected w25q32 with page size 256 Bytes, erase size 4 KiB, total 4 MiB

NAND erase.part: device 0 offset 0x0, size 0x400000
Erasing at 0x3e0000 -- 100% complete.
OK

NAND write: device 0 offset 0x0, size 0x400000
4194304 bytes written: OK
=>
No restart is required; continue flashing the System image.
-
Flashing System (ubifs.img)
Execute command:
run updateubifs_bootThe returned information is as follows:
=> run updateubifs_boot
Using xy1000_eth device
TFTP from server 192.168.1.10; our IP address is 192.168.1.234
Filename 'ubifs.img'.
Load address: 0x48300000
Loading: #################################################################
         #################################################################
         #################################################################
         #################################################################
         #################################################################
         #################################################################
         #################################################################
         #################################################################
         #################################################################
         #################################################################
         #################################################################
         #################################################################
         #################################################################
         #################################################################
         #################################################################
         #################################################################
         #################################################################
         #################################################################
         #################################################################
         #################################################################
         #################################################################
         ############################
         2.5 MiB/s
done
Bytes transferred = 20443136 (137f000 hex)
tftp ok
SF: Detected w25q32 with page size 256 Bytes, erase size 4 KiB, total 4 MiB

NAND erase.part: device 0 offset 0x1800000, size 0x2800000
Erasing at 0x3fe0000 -- 100% complete.
OK
ubi0: detaching mtd7
ubi0: mtd7 is detached
ubi0: attaching mtd7
ubi0: scanning is finished
ubi0: empty MTD device detected
ubi0: attached mtd7 (name "ubifs_nand", size 40 MiB)
ubi0: PEB size: 131072 bytes (128 KiB), LEB size: 126976 bytes
ubi0: min./max. I/O unit sizes: 2048/2048, sub-page size 2048
ubi0: VID header offset: 2048 (aligned 2048), data offset: 4096
ubi0: good PEBs: 320, bad PEBs: 0, corrupted PEBs: 0
ubi0: user volume: 0, internal volumes: 1, max. volumes count: 128
ubi0: max/mean erase counter: 0/0, WL threshold: 4096, image sequence number: 0
ubi0: available PEBs: 296, total reserved PEBs: 24, PEBs reserved for bad PEB handling: 20
No size specified -> Using max size (37584896)
Creating dynamic volume ubifs of size 37584896
26214400 bytes written to volume ubifs
=>
At this point, all three images have been flashed successfully. Power-cycle the device, and the system should boot normally.
Flash the Bootloader Using USB-JTAG
If your Vega device fails to boot normally and you cannot access the bootloader(U-boot) interface via serial port, you need to reinstall the bootloader using the USB-JTAG method. After installing the bootloader, boot into U-boot via serial port and then use the TFTP method described above to update the system image.
Vega has a built-in USB-JTAG hardware module, so you don't need to buy a separate JTAG programmer.
The following installation steps are performed on an Ubuntu 22.04 system.
Check the JTAG Device
First, the Vega does not require power; simply connect its Type-C port to your Ubuntu computer using a USB cable.
Use the command in the Ubuntu system to check if the USB-JTAG hardware device (chip FT2232) has been recognized:
$ lsusb
Bus 001 Device 013: ID 0403:6010 Future Technology Devices International, Ltd FT2232C/D/H Dual UART/FIFO IC
Double-check if a ttyUSB device has been created under dev:
$ ls /dev/ttyUSB*
/dev/ttyUSB0  /dev/ttyUSB1
ttyUSB0 and ttyUSB1 are two devices generated by the FT2232 chip, used for serial port debugging and JTAG programming, respectively.
Configure USB permissions
The /dev/ttyUSB0 and /dev/ttyUSB1 devices generated above require root privileges by default. To facilitate subsequent operations, we will configure the permissions first.
Create a new udev rule file:
sudo touch /etc/udev/rules.d/50-ttyusb.rules
Edit the file and add the following content:
SUBSYSTEMS=="usb", ATTRS{idVendor}=="0403", ATTRS{idProduct}=="6010", GROUP="users", MODE="0666"
Reload the udev rules to apply the changes:
sudo udevadm control --reload-rules
Download the required tools
git clone https://github.com/milkv-vega/vega-jtag-burn.git
Flashing
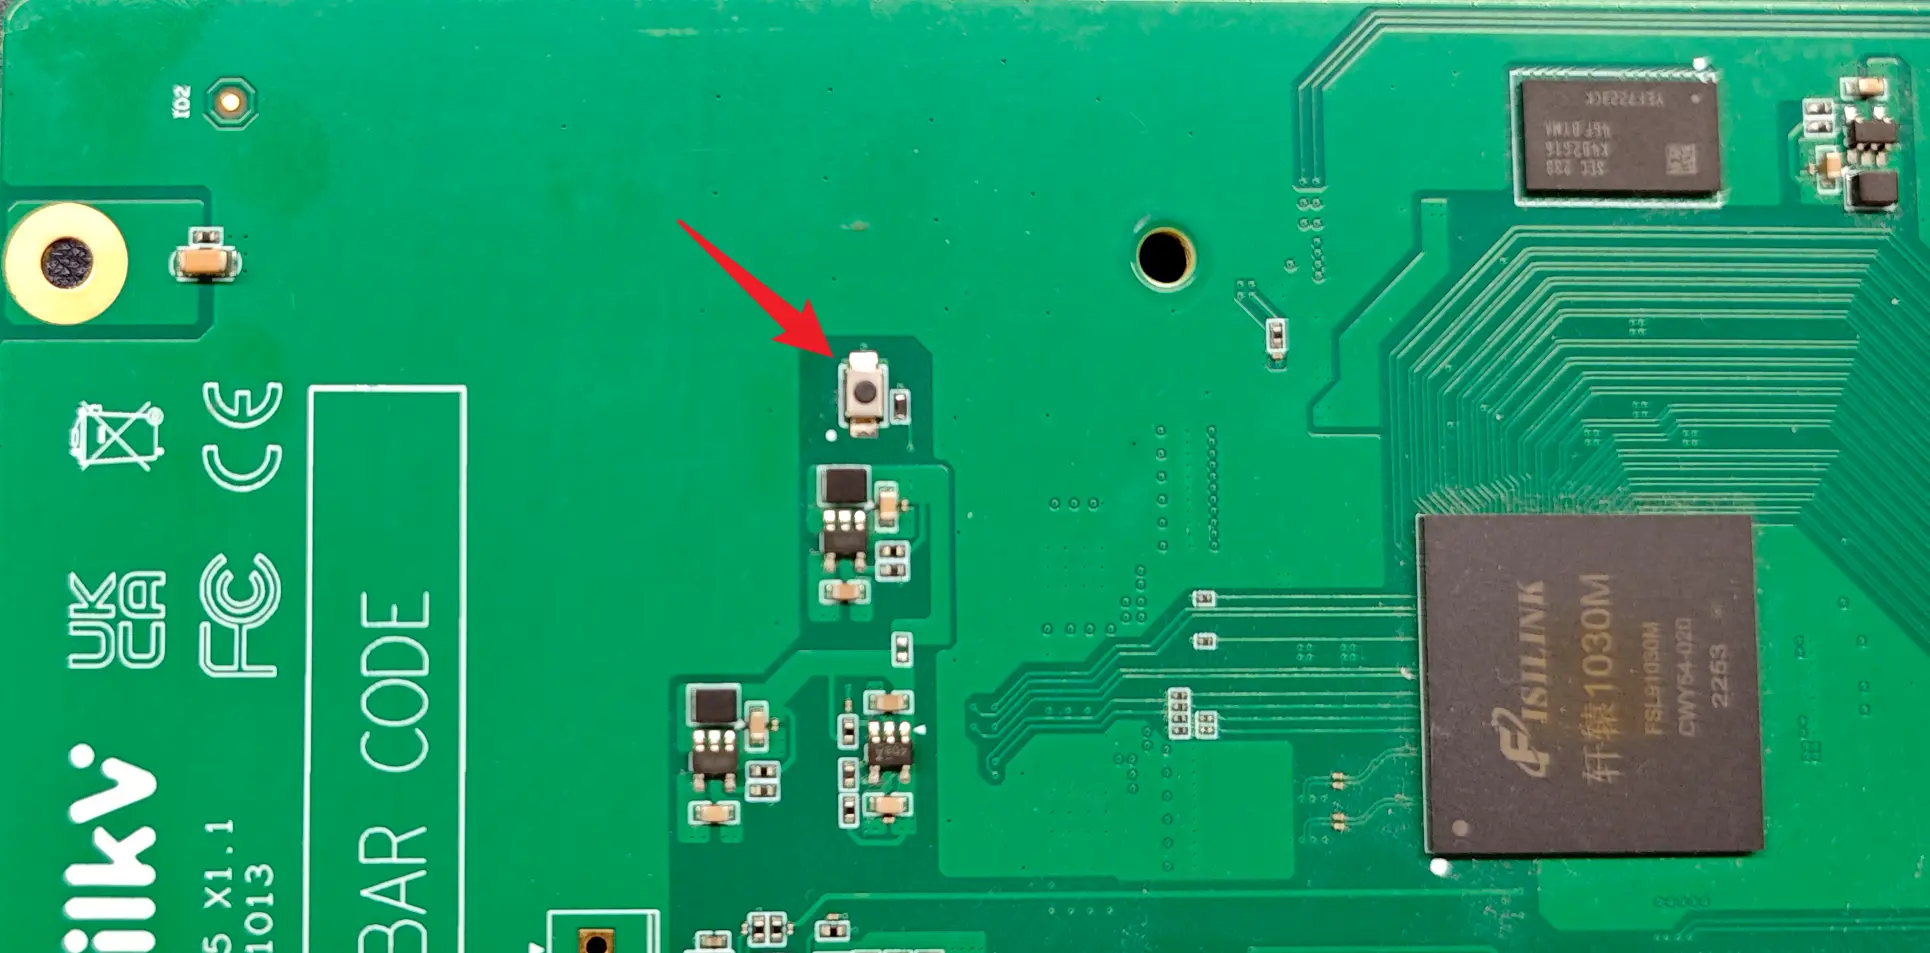
Press and hold the Recovery button on the Vega motherboard, then connect the DC 12V power supply to power on the Vega. After 3 seconds, you can release the Recovery button. At this time, the Vega will enter flashing mode.
You need to open two terminals on your Ubuntu 22.04 computer and navigate to the vega-jtag-burn directory that you downloaded above.
Run the command in Terminal 1 ./openocd_202212/bin/openocd -f openocd_vega.cfg.
The information after executing the command is as follows:
$ ./openocd_202212/bin/openocd -f openocd_vega.cfg
Open On-Chip Debugger 0.11.0+dev-02424-g787e48e66 (2022-12-29-08:49)
Licensed under GNU GPL v2
For bug reports, read
	http://openocd.org/doc/doxygen/bugs.html
DEPRECATED! use 'adapter speed' not 'adapter_khz'
DEPRECATED! use 'adapter driver' not 'interface'
DEPRECATED! use 'ftdi vid_pid' not 'ftdi_vid_pid'
DEPRECATED! use 'ftdi oscan1_mode' not 'ftdi_oscan1_mode'
DEPRECATED! use 'ftdi channel' not 'ftdi_channel'
DEPRECATED! use 'ftdi layout_init' not 'ftdi_layout_init'
DEPRECATED! use 'ftdi layout_signal' not 'ftdi_layout_signal'
DEPRECATED! use 'ftdi layout_signal' not 'ftdi_layout_signal'
DEPRECATED! use 'ftdi layout_signal' not 'ftdi_layout_signal'
DEPRECATED! use 'ftdi layout_signal' not 'ftdi_layout_signal'
DEPRECATED! use 'ftdi layout_signal' not 'ftdi_layout_signal'
DEPRECATED! use 'ftdi layout_signal' not 'ftdi_layout_signal'
Info : Using libusb driver
Info : clock speed 1000 kHz
Info : JTAG tap: riscv.cpu tap/device found: 0x1c607a6d (mfg: 0x536 (Nuclei System Technology Co Ltd), part: 0xc607, ver: 0x1)
Info : [riscv.cpu] datacount=4 progbufsize=8
Info : Examined RISC-V core; found 1 harts
Info :  hart 0: XLEN=64, misa=0x800000000014112d
[riscv.cpu] Target successfully examined.
Info : starting gdb server for riscv.cpu on 3333
Info : Listening on port 3333 for gdb connections
Info : Valid NUSPI on device Nuclei SoC SPI Flash at address 0x20000000 with spictrl regbase at 0x10014000
Info : Nuclei SPI controller version 0x00000001
Info : Found flash device 'win w25q32fv/jv' (ID 0x001640ef)
cleared protection for sectors 0 through 63 on flash bank 0

Info : Listening on port 6666 for tcl connections
Info : Listening on port 4444 for telnet connections
OpenOCD is now waiting for a gdb connection.
In Terminal 2, execute the command source toolchain_cfg.sh to import the toolchain:
$ source toolchain_cfg.sh
Executing the command riscv-nuclei-elf-gdb again will display the following information:
$ riscv-nuclei-elf-gdb
GNU gdb (GDB) 8.3.0.20190516-git
Copyright (C) 2019 Free Software Foundation, Inc.
License GPLv3+: GNU GPL version 3 or later <http://gnu.org/licenses/gpl.html>
This is free software: you are free to change and redistribute it.
There is NO WARRANTY, to the extent permitted by law.
Type "show copying" and "show warranty" for details.
This GDB was configured as "--host=x86_64-pc-linux-gnu --target=riscv-nuclei-elf".
Type "show configuration" for configuration details.
For bug reporting instructions, please see:
<http://www.gnu.org/software/gdb/bugs/>.
Find the GDB manual and other documentation resources online at:
    <http://www.gnu.org/software/gdb/documentation/>.

For help, type "help".
Type "apropos word" to search for commands related to "word".
(gdb)
Continue by entering the command target remote localhost:3333 to connect. The displayed information is as follows:
(gdb) target remote localhost:3333
Remote debugging using localhost:3333
warning: No executable has been specified and target does not support
determining executable automatically.  Try using the "file" command.
0x00000000200001c0 in ?? ()
(gdb)
The log in Terminal 1 at this time is as follows:
Info : accepting 'gdb' connection on tcp/3333
Warn : Prefer GDB command "target extended-remote :3333" instead of "target remote :3333"
In Terminal 2, continue by entering the command load ./freeloader.elf to begin flashing the Bootloader. The flashing process takes approximately 30 seconds. Once you see the last line of Transfer rate information, the flashing is complete. The log is as follows:
(gdb) load ./freeloader.elf
Loading section .text, size 0xfffff lma 0x20000000
Loading section .interp, size 0x21 lma 0x200fffff
Loading section .dynsym, size 0x18 lma 0x20100020
Loading section .dynstr, size 0xb lma 0x20100038
Loading section .hash, size 0x10 lma 0x20100048
Loading section .gnu.hash, size 0x1c lma 0x20100058
Loading section .dynamic, size 0x110 lma 0x20100078
Loading section .got, size 0x8 lma 0x20100188
Start address 0x20000000, load size 1048967
Transfer rate: 41 KB/sec, 14568 bytes/write.
(gdb)
Type the quit command to exit the (gdb) command line.
The log in Terminal 1 is as follows:
Info : JTAG tap: riscv.cpu tap/device found: 0x1c607a6d (mfg: 0x536 (Nuclei System Technology Co Ltd), part: 0xc607, ver: 0x1)
Info : Padding image section 0 at 0x20100043 with 5 bytes
Info : Padding image section 1 at 0x20100074 with 4 bytes
Info : JTAG tap: riscv.cpu tap/device found: 0x1c607a6d (mfg: 0x536 (Nuclei System Technology Co Ltd), part: 0xc607, ver: 0x1)
Press Ctrl+C in Terminal 1 to exit the JTAG program.
At this point, the bootloader has been flashed successfully. You can disconnect the DC 12V power supply, then power it back on, check the boot log via the serial port, and continue updating the system using the TFTP method described in the previous section.


