YOLOv3 Practical Complete Example
This document uses the ENNP SDK to port YOLOv3 to the hardware acceleration module inside the EIC7700 to perform inference with the NPU neural network model. Before referring to this document, please ensure you have set up the required environment by following the ENNP SDK download, EsQuant installation, and EsAAC and EsSimulator tool installation instructions.
This document has been tested on x86 Ubuntu 22.04 with Linux 6.8.0-52-generic.
Model Conversion
Export ONNX Model
-
Clone the official code from GitHub
git clone https://github.com/ultralytics/yolov3.git -
Modify dependency versions Specify torch version as 1.12.0, torchvision version as 0.13.0, and remove comments for onnx and onnx-simplifier
vim requirements.txt
torch==1.12.0
torchvision==0.13.0
onnx>=1.10.0
onnx-simplifier>=0.4.1 -
Install dependencies
cd yolov3
pip3 install -r requirements.txt -
Download the official model
wget https://github.com/ultralytics/yolov3/releases/download/v9.6.0/yolov3.pt -
Export to ONNX
python3 export.py --weights ./yolov3.pt --img-size 416 --simplify --opset 13 --include onnx
Model Pruning
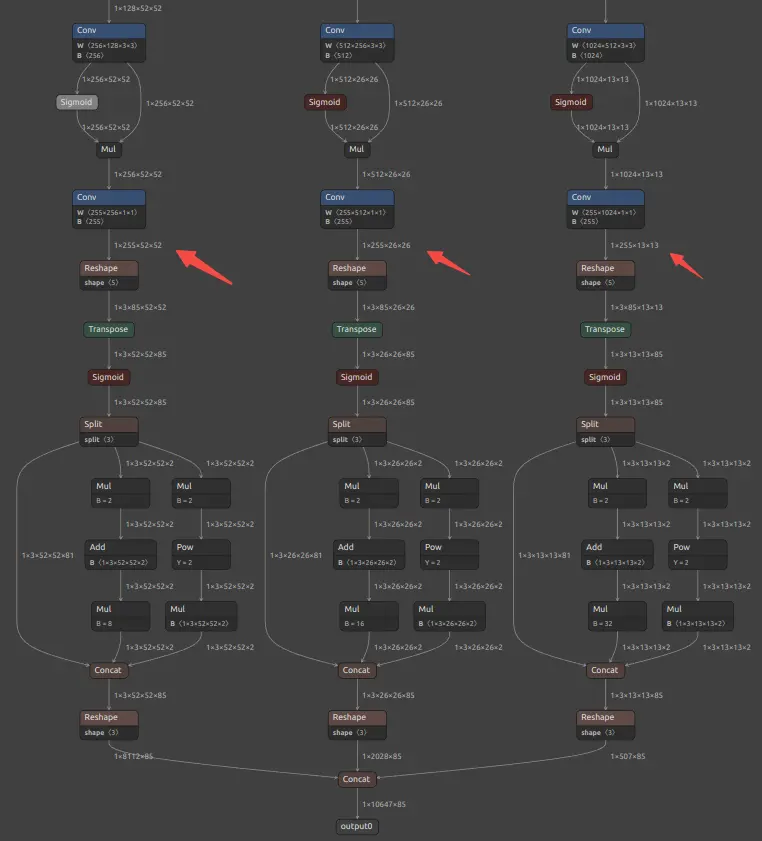
Since the exported model contains some post-processing operations and the quantization tool does not currently support these operations, they need to be pruned. The parts to be pruned are the operations after the convolution layers. You can check these using Netron and update the pruning script with the appropriate input_names and output_names.
- onnx::Shape_406
- onnx::Shape_461
- onnx::Reshape_516
import onnx
input_onnx = "yolov3.onnx"
input_names = ["images"]
output_names = ["onnx::Shape_406", "onnx::Shape_461", "onnx::Reshape_516"]
output_onnx = input_onnx
cut_suffix = "_sim_extract_416_notranspose_noreshape." + input_onnx.split('.')[-1]
new_output_onnx = output_onnx.replace(".onnx", cut_suffix)
print(new_output_onnx)
onnx.utils.extract_model(input_onnx, new_output_onnx, input_names, output_names)
After running this Python script, the pruned model yolov3_sim_extract_416_notranspose_noreshape.onnx will be generated in the current directory.
Model Quantization
Use the EsQuant tool to perform model quantization. This should be done within the EsQuant Docker environment. For more details, refer to the EsQuant model quantization tool.
-
Configure
config.jsonThe
config.jsonfile is provided innn-tools/sample/yolov3/esquant. Below is an example, please refer to it and modify it according to your actual setup.{
"version": "1.3",
"model": {
"model_path": "/workspace/yolov3_sim_extract_416_notranspose_noreshape.onnx",
"save_path": "/workspace/yolov3/",
"images_list": "/workspace/img_list.txt",
"analysis_list": "/workspace/alys_list.txt"
},
"quant": {
"quantized_method": "per_channel",
"quantized_dtype": "int8",
"requant_mode": "mean",
"quantized_algorithm": "at_eic",
"optimization_option": "auto",
"bias_option": "absmax",
"nodes_option1": [],
"nodes_option2": [],
"nodes_i8": [],
"nodes_i16": [],
"mean": [
0, 0, 0
],
"std": [
1, 1, 1
],
"norm": true,
"scale_path": "",
"enable_analyse": true,
"device": "cpu"
},
"preprocess": {
"input_format": "RGB",
"keep_ratio": false,
"resize_shape": [
416,
416
],
"crop_shape": [
416,
416
]
}
} -
Download the coco2017 dataset in EsQuant Docker
The model quantization requires a calibration set. Here we use the coco2017-1000 dataset for calibration. Please download it yourself, and refer to
nn-tools/sample/yolov3/esquantto create theimg_list.txtandalys_list.txtfiles.-
img_list.txt/workspace/coco/val2017_1000/000000095069.jpg
/workspace/coco/val2017_1000/000000499313.jpg
/workspace/coco/val2017_1000/000000579893.jpg
/workspace/coco/val2017_1000/000000023230.jpg
/workspace/coco/val2017_1000/000000162035.jpg
... -
alys_list.txt/workspace/coco/val2017_1000/000000095069.jpg
-
-
Execute Quantization
python3 Example_with_config.py --config_path ./config.json --preprocess_name YoloAfter the quantization is complete, navigate to the
save_pathdirectory defined in theconfig.jsonfile. You should see the generatedworkspace_yolov3_sim_extract_416_notranspose_noreshape.jsonfile, along with the ONNX file after graph fusion and accuracy analysis resultsprecision_accumulate_result.txt,precision_reset_result.txt. -
(Optional) Quantization Model Accuracy Analysis
The accuracy analysis relies on the
precision_accumulate_result.txtandprecision_reset_result.txtfiles generated during the quantization process.precision_accumulate_result.txtcontains the cosine similarity errors between the quantized and floating-point models at each layer.precision_reset_result.txtcontains the cosine similarity errors at each layer with reset inputs.
Sigmoid_240: 0.987436056137085
Mul_241    : 0.9122292399406433
Conv_242   : 0.9125502705574036
Sigmoid_243: 0.9889860153198242
Mul_244    : 0.9188247919082642
Conv_245   : 0.8988267183303833
Sigmoid_246: 0.9783140420913696
Mul_247    : 0.9119919538497925
Conv_248   : 0.997031569480896
First, check the cosine distance (
cos_dist(mean)) for the last operation layer inprecision_accumulate_result.txt. If the value is greater than 95%, it is considered acceptable. If not, checkprecision_reset_result.txt. You need to identify where the precision loss is significant and then modify the layer's datatype toint16in theconfig.jsonfile (do not change the datatype for the first and last operations). After this, re-quantize the model and perform the accuracy analysis again.
(Optional) Prepare Simulation Data
-
Generate GoldenData for simulation
EsGoldenDataGenis used to generate reference data, including input and output feature maps, which can then be used by EsSimulator for verification.Refer to the
config.jsonfile innn-tools/EIC7x_Release_20241230/sample/yolov3/essimulator, and adjust the paths accordingly.python3 -m esquant.es_goldendata_gen.EsGoldenDataManager --config yolov3.json
Model Compilation
To execute quantization models using the EsAAC tool, please complete the process within the EsAAC Docker. For details, refer to EsAAC Model Compilation Tool.
Compile the Model
Compile the model using the saved results obtained from Model Quantization.
./EsAAC --input-model /workspace/yolov3/workspace_yolov3_sim_extract_416_notranspose_noreshape.onnx --quant-stats /workspace/yolov3/workspace_yolov3_sim_extract_416_notranspose_noreshape.json
The compiled model will be saved at /home/eswin/model_files/workspace_yolov3_sim_extract_416_notranspose_noreshape_npu_b1.model.
(Optional) Simulation Verification
Perform basic testing using EsSimulator. You need to specify the model, input, and output parameters. Refer to the earlier section Prepare Simulation Data for data generation.
Note: For models with multiple outputs, the order of the output ofmap may not match the model structure, which could cause errors when running the test program. In such cases, the ofmap order must be specified. EsAAC will generate a model_name.ofmap_order.txt file in the current directory to describe the output ofmap order. The file format is as follows (models with only one output do not need to pay attention to this file):
5    Conv_336_biasadd
6    Conv_292_biasadd
7    Conv_248_biasadd
eswin@83752f68f2ce:~$ ./EsSimulator --model=./model_files/workspace_yolov3_sim_extract_416_notranspose_noreshape_npu_b1.model --input=/workspace/yolov3_sim/input_000000523175.bin --output=/workspace/yolov3_sim/Conv_336_000000523175.bin,/workspace/yolov3_sim/Conv_292_000000523175.bin,/workspace/yolov3_sim/Conv_248_000000523175.bin
EsSimulator version: 0.0.3(Tue Dec 24 17:00:01 2024 +0800).

./model_files/workspace_yolov3_sim_extract_416_notranspose_noreshape_npu_b1.model test successful.
For models using float32 or float16 data, you can set an error tolerance. During data comparison, if both the absolute and relative errors are within the tolerance, the model comparison will be considered correct. Example of setting the tolerance:
./EsSimulator --model=./model_files/workspace_yolov3_sim_extract_416_notranspose_noreshape_npu_b1.model --input=/workspace/yolov3_sim/input_000000523175.bin --output=/workspace/yolov3_sim/Conv_336_000000523175.bin,/workspace/yolov3_sim/Conv_292_000000523175.bin,/workspace/yolov3_sim/Conv_248_000000523175.bin --tolerance=0.008
Model Inference
Use es_run_model in Megrez to verify the model's functionality, accuracy, and performance on hardware.
- Copy the generated model to Megrez.
- Run the model using
es_run_model.
Performance Testing
cd /opt/eswin/bin
sudo ./es_run_model -m /home/debian/npu/workspace_yolov3_sim_extract_416_notranspose_noreshape_npu_b1.model -r 100
----------------------------------------------------------------
   min = 20.7301 ms    max = 24.5066 ms    avg = 20.8355 ms    fps = 47.9949 frame/s
----------------------------------------------------------------
Save Inference Results
The results will be saved in the specified output folder.
sudo ./es_run_model -m /home/debian/npu/workspace_yolov3_sim_extract_416_notranspose_noreshape_npu_b1.model -r 10 -i /home/debian/npu/yolov3_verify/input -o /home/debian/npu/yolov3_verify/npu_output
Accuracy Testing
Copy the data generated from Prepare Simulation Data to Megrez.
-
Create a verification data directory.
Use the simulation data to create the following file structure. For models with multiple outputs, rename and sort the files according to
model_name.ofmap_order.txt.debian@rockos-eswin:~/npu/yolov3_verify$ tree
.
├── input
│ └── input_000000523175.bin
└── output
├── output_0.bin
├── output_1.bin
└── output_2.bin -
Run the verification.
sudo ./es_run_model -m /home/debian/npu/workspace_yolov3_sim_extract_416_notranspose_noreshape_npu_b1.model -r 10 -i /home/debian/npu/yolov3_verify/input -o /home/debian/npu/yolov3_verify/output -v


