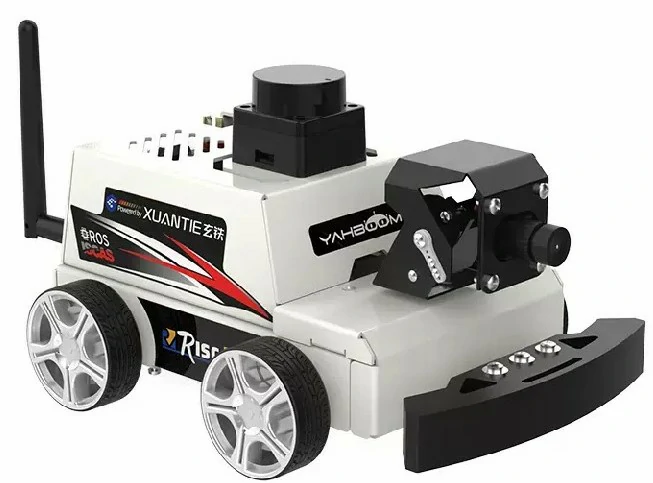
RISC-V ROS Car
Yahboom RISC-V ROS Car is a multifunctional ROS car built on Meles, equipped with laser radar, gimbal camera, handle and other accessories. It is developed with ROS2 and supports SLAM mapping, automatic path planning and obstacle avoidance, gamepad remote control, APP remote control and other functions. It is a good helper for you to learn Meles and ROS.
Overview
The RISC-V ROS Car consists of the following parts:
- TOF LiDAR on top
- 2-DOF camera gimbal
- Milk-V Meles
- MicroROS Control Board
- Chassis 310 Encoder Gear Motor
- 7.4V Battery
- Gamepad and other accessories
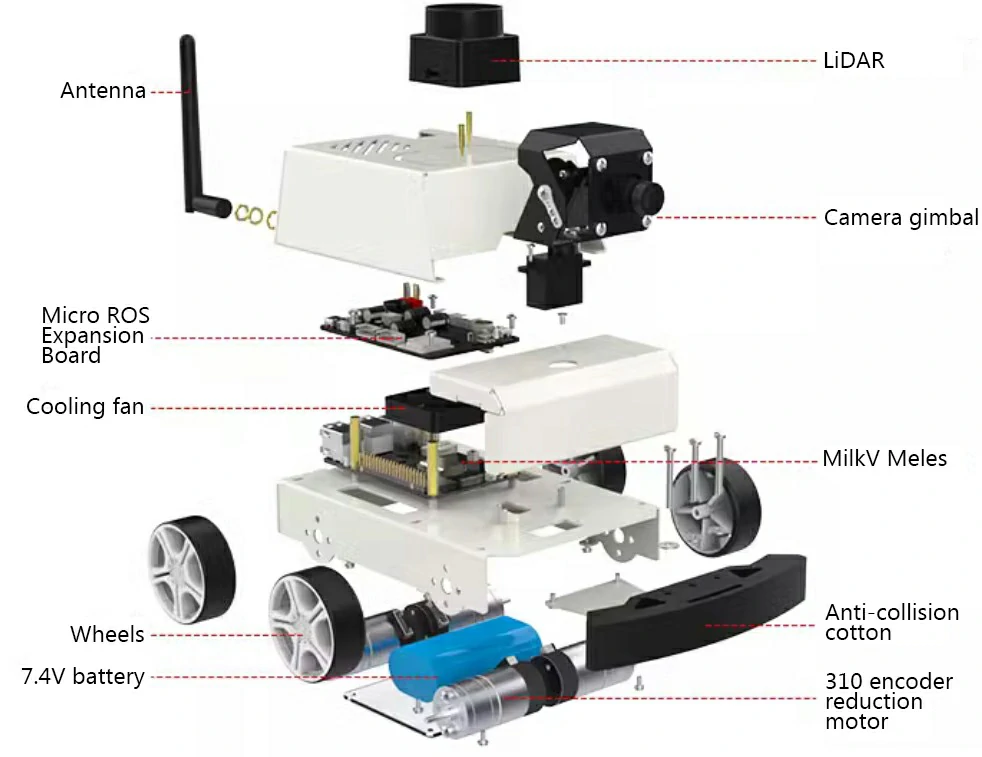
Meles runs the openEuler system with ROS2, connects to the MicroROS control board through the serial port, and transmits sensor and control data such as radar, battery, accelerometer, etc. by subscribing to topics in ROS. You can find more information about openEuler and ROS in OERV. You can check Data Summary for information about the MicroROS control board.
The laser radar model installed on the car is Orbbec MS200, with a sampling frequency of 4500 times per second and a scanning frequency of 7~15Hz. For more information, you can refer to the user manual.
Quick Start
Robot assembly
For the assembly of the robot, please refer to Assembly Video and Assembly Steps。
Before Starting
During the operation of the robot, you may need to observe the status at all times to ensure that the robot is running normally. On the MicroROS control board, there is a blue LED that indicates the operating status of the control board and the battery power. The following are the introductions to the indicator status:
- The indicator light flashes twice every three seconds, indicating that the connection is normal.
- The indicator light flashes once per second (slow flash), indicating that the control board is in configuration mode.
- The indicator light flashes three times every three seconds, indicating that the control panel is currently in test mode.
- The indicator light flashes once every 100 milliseconds (fast flash) and the buzzer beeps, indicating that the battery voltage is low and the robot needs to be charged.
For more information about the MicroROS control board, please refer to Data Summary。
In some of the following steps, you may need to enter your username and password in Meles. The following are the default username and password.
- User Name:openeuler
- Password:123456
In addition, the ROS car will automatically establish a wireless AP after starting up to facilitate your connection.
- SSID:MicroROS_AP
- Password:12345678
First Boot of the Robot
Flip the switch on the MicroROS control board to power on the ROS robot. After powering on, please wait for Meles to start up, which takes about 2-3 minutes.

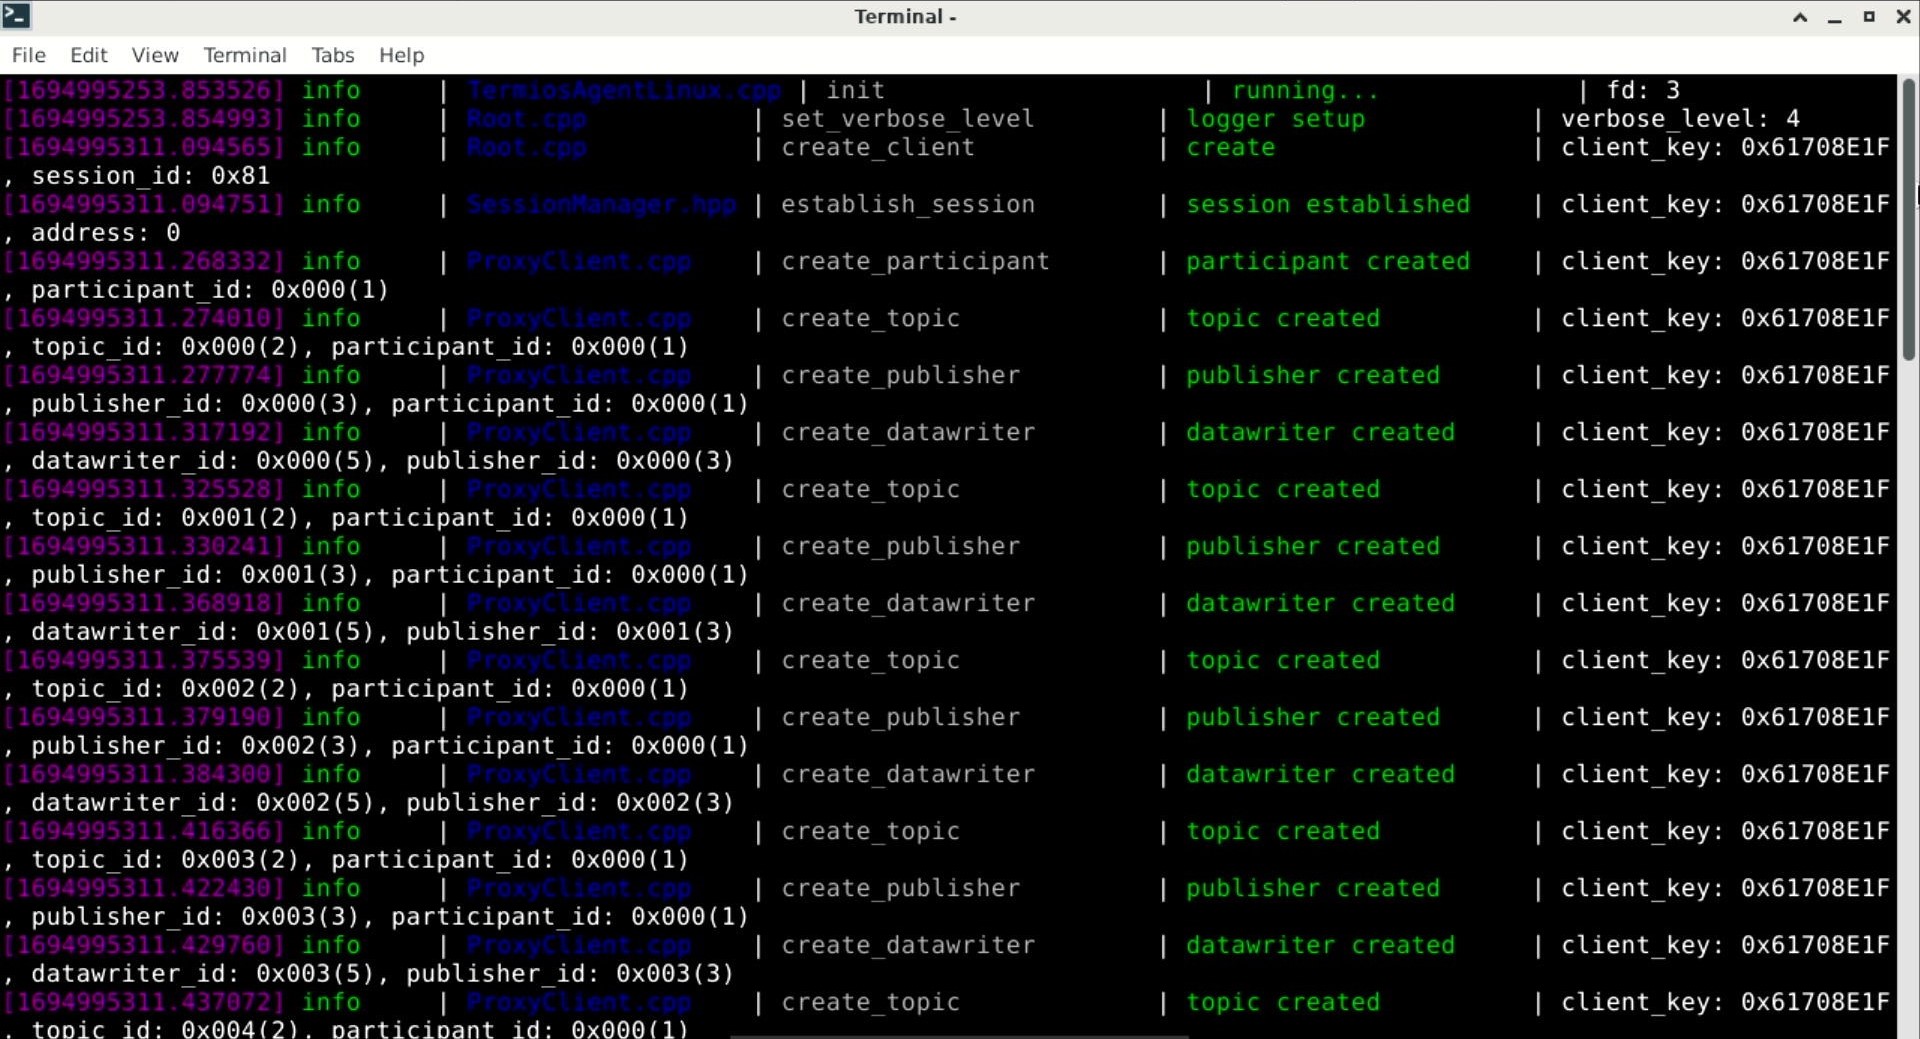
If you have an HDMI monitor plugged into your board, you will see the following three terminals automatically launched on the screen.
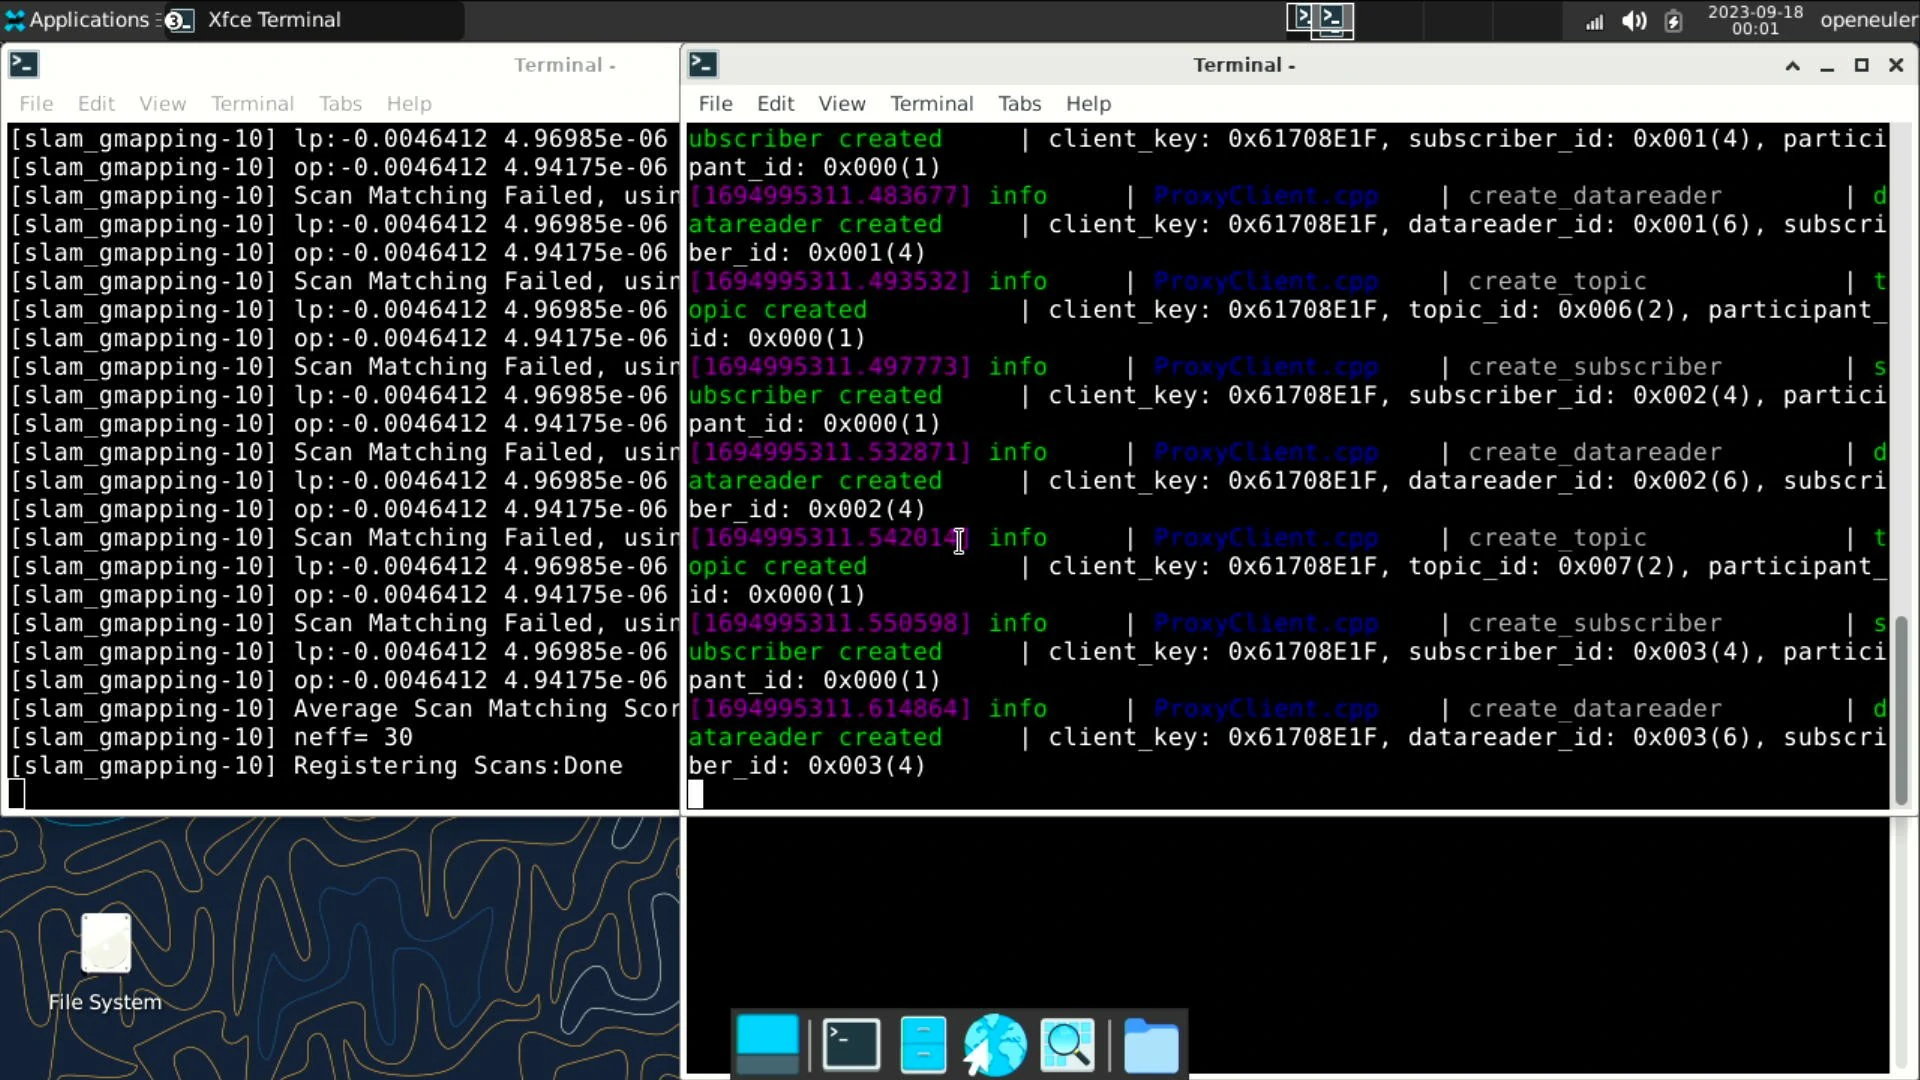
These three terminals run the connection agent, handle control, and map building tasks respectively. The use of these programs will be introduced to you in the following articles.
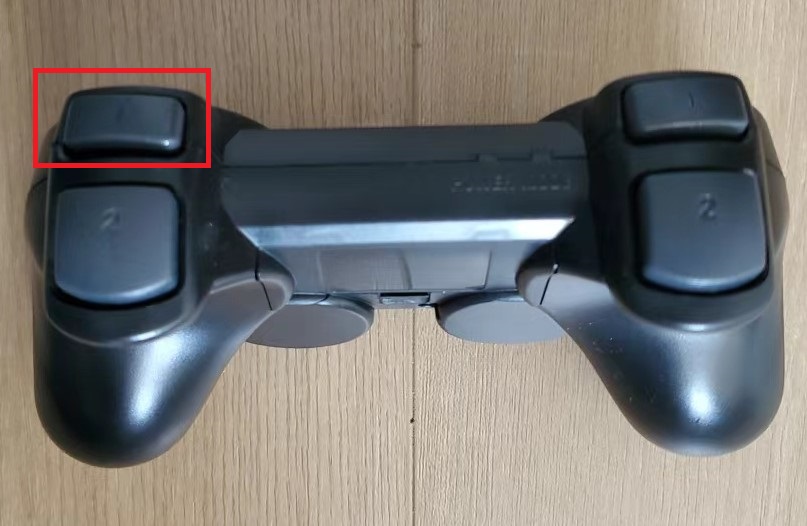
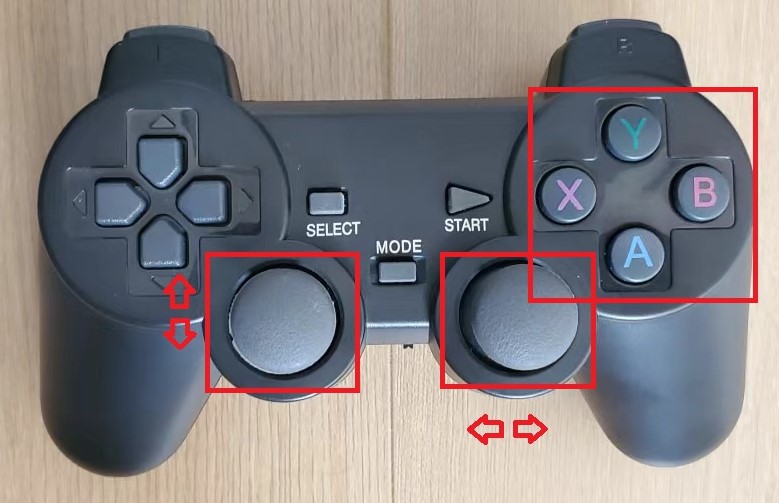
At this time, open the gamepad and press the R1 button to unlock the chassis.
After unlocking the chassis, press the X, Y, A, and B buttons to control the direction of the gimbal, move the left joystick forward and backward to control forward/backward, and move the right joystick left and right to control the car to turn left/right.
If you cannot use the handle to control the car, please refer to the MicroROS board firmware burning section to burn and configure the MicroROS control board.
Using VNC on the ROS Car
In most cases, it may not be convenient for you to connect the ROS car to a monitor. In this case, you can use VNC to remotely connect to the robot desktop to avoid the trouble of using physical peripherals.
First, you need to use SSH or connect a monitor and keyboard to open a terminal to execute commands.
The VNC used by the ROS car is tigervnc, which is installed in the system by default. If you find that your system is not installed, you need to execute sudo yum install tigervnc-server to install it.
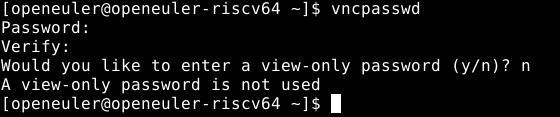
Run the following command to set a password for VNC connection, enter the password twice to confirm, and enter n to disable view-only mode.
vncpasswd
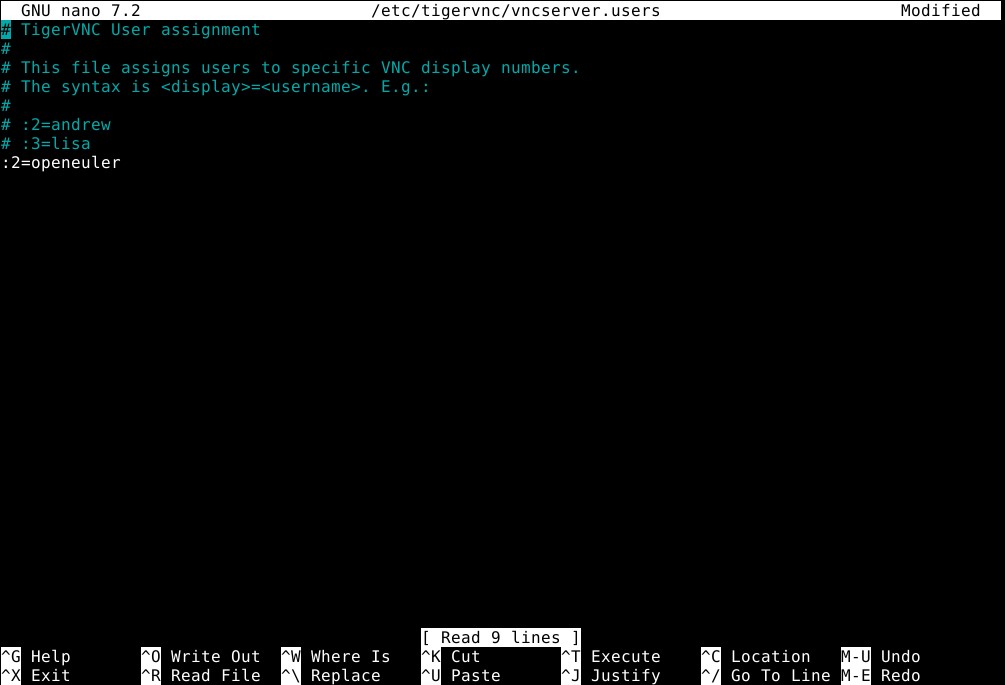
Then add the user and number, execute the following command, and modify :2=openeuler in the file, as shown in the figure below. When you have finished edit, press ctrl + O to save, and ctrl + X to exit.
sudo nano /etc/tigervnc/vncserver.users
Next, add a service for VNC and execute the following command. You may need to enter the password several times during the execution.
# Copy service files
sudo cp /usr/lib/systemd/system/[email protected] /etc/systemd/system/vncserver@:2.service

# Reload systemd
systemctl daemon-reload

# Set the system to start automatically and start the service
systemctl enable vncserver@:2.service
systemctl start vncserver@:2.service
Finally, execute the following command to verify whether VNC is started successfully.
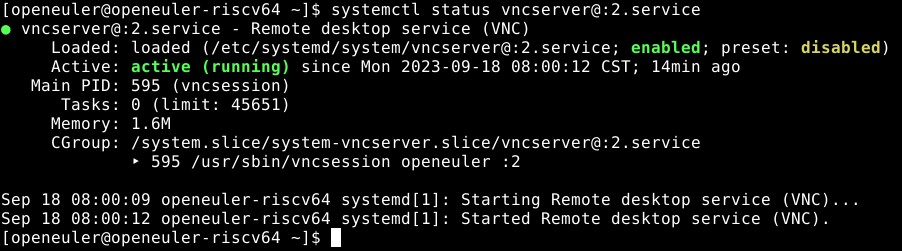
systemctl status vncserver@:2.service
Under normal circumstances, the terminal output is as shown below.
After successful startup, you can use any VNC client to connect to the robot.
The default service port of Tigervnc is 5902, and the default IP address of the ROS car is 10.42.0.1.
When connecting to VNC, please use the correct IP address and port number.
Disable auto-start script
When the robot is turned on, the connection agent, gamepad control, and map building tasks are started by default. If you want to run other tasks manually, you may need to turn off the automatic startup of these software to prevent conflicts between programs.
Using desktop environment
If you use a keyboard, mouse, and monitor, or VNC to operate the ROS car, you can directly use the desktop environment to disable the auto-start script.
Find it in the upper left corner of the desktop Application-Settings-Sessions and Startup.
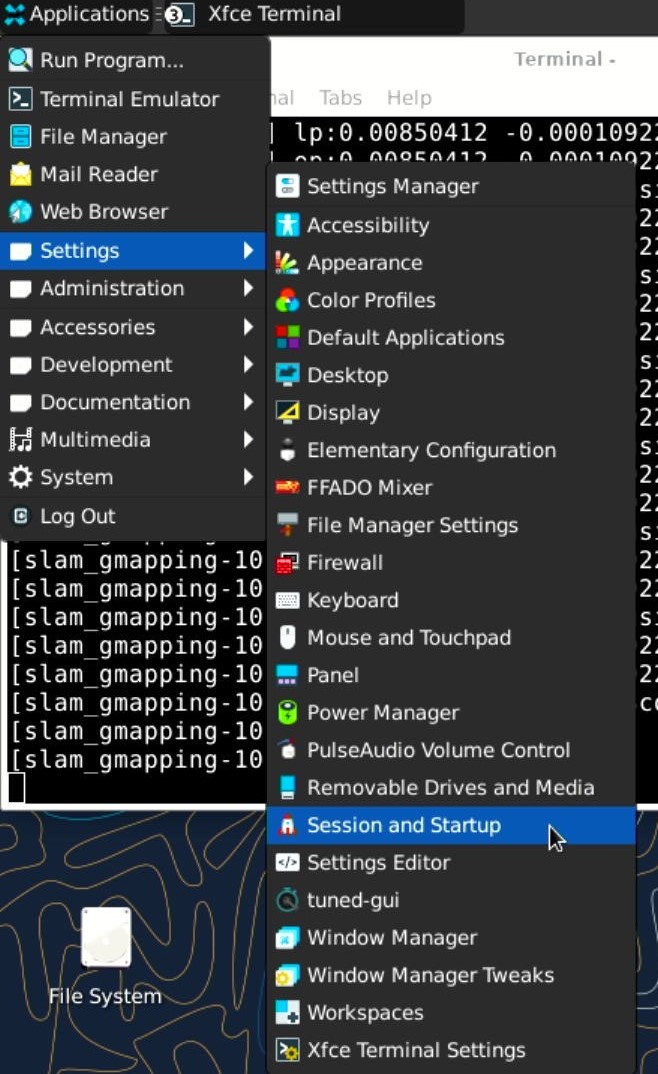
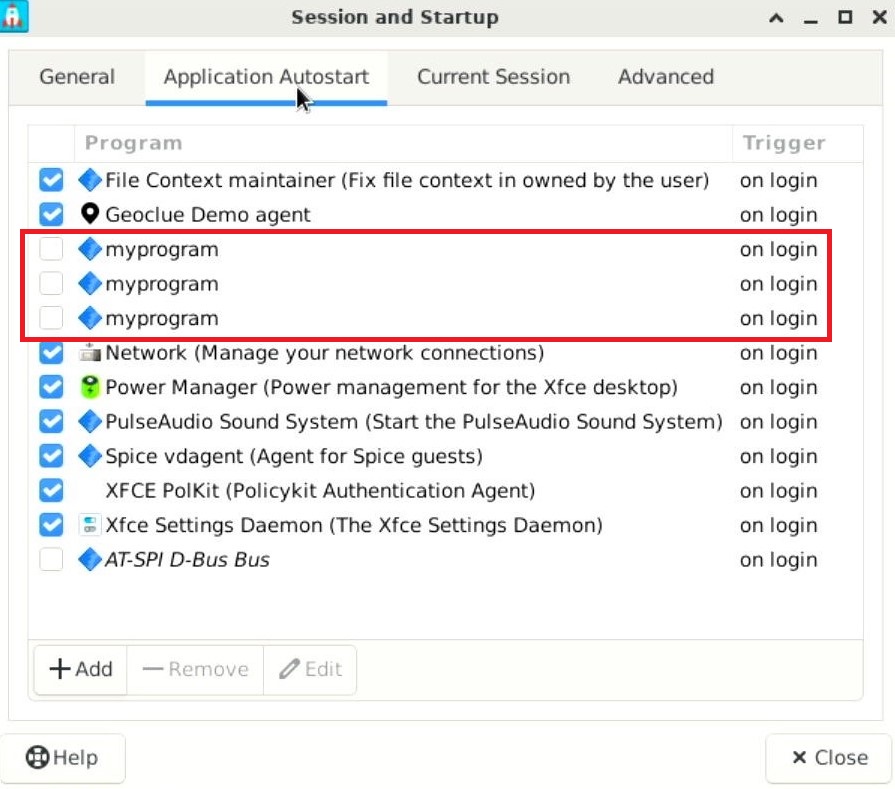
In the opened page, find the Application Autostart tab, where myprogram is the ROS-related startup item. Uncheck the checkbox in front of it to cancel the autostart.
Use command
If you use SSH to operate the ROS car, or it is inconvenient for you to enter the desktop environment, you can use commands to disabled the auto-start script.
First, execute the following command to enter the directory where the startup items are stored and list the files in it.
cd .config/autostart/
ls
Under normal circumstances, you can see the following three files.

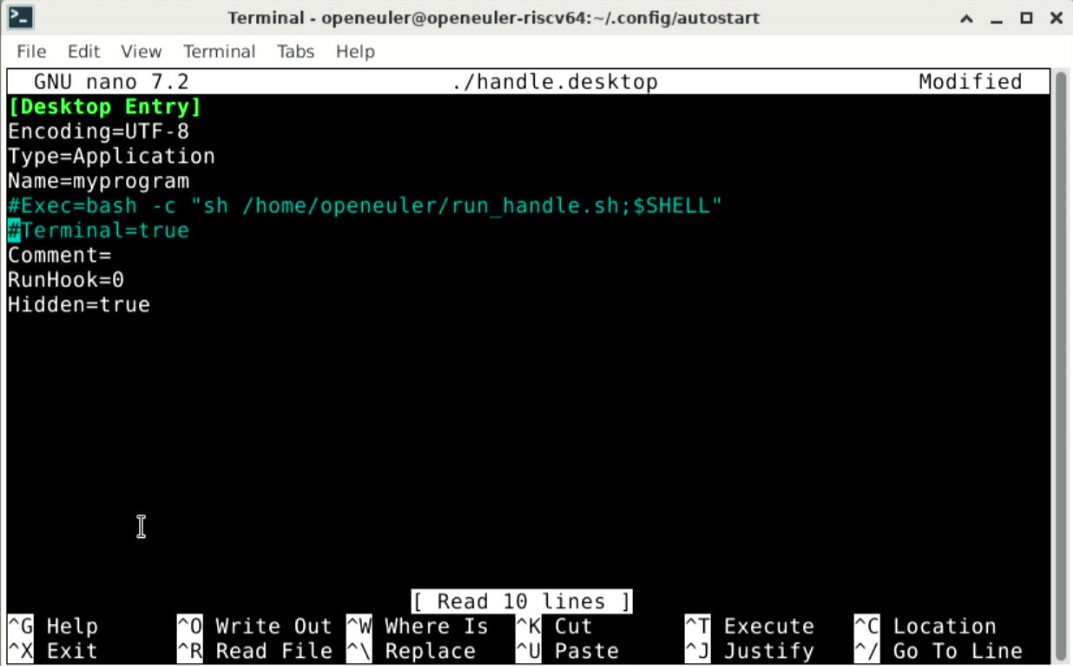
Take handle.desktop as an example. If you need to disable this startup item, you need to execute
sudo nano ./handle.desktop
Then add comments at the beginning of lines 5 and 6 of the file, and press ctrl + O to save, and ctrl + X to exit.
Gamepad and keyboard control
If you need to manually enable gamepad or keyboard control, first you need to open the agent program and connect to the agent, execute the following command
sh ~/start_agent.sh
If the program is stuck at the first two lines after you start the agent, press the reset button on the MicroROS controllor to connect to the agent.
Gamepad Control
Open two terminals and execute the following commands.
Terminal 1:
ros2 run joy joy_node
Terminal 2:
ros2 run yahboomcar_ctrl yahboom_joy
After the above code runs successfully, press the R1 key to unlock the chassis.
After unlocking the chassis, press the X, Y, A, and B buttons to control the direction of the gimbal, move the left joystick forward and backward to control forward/backward, move the right joystick left and right to control the car to turn left/right, and press the Start button to control the buzzer beep.
Keyboard Control
Open a terminal and execute the following command to use keyboard control.
ros2 run yahboomcar_ctrl yahboom_keyboard
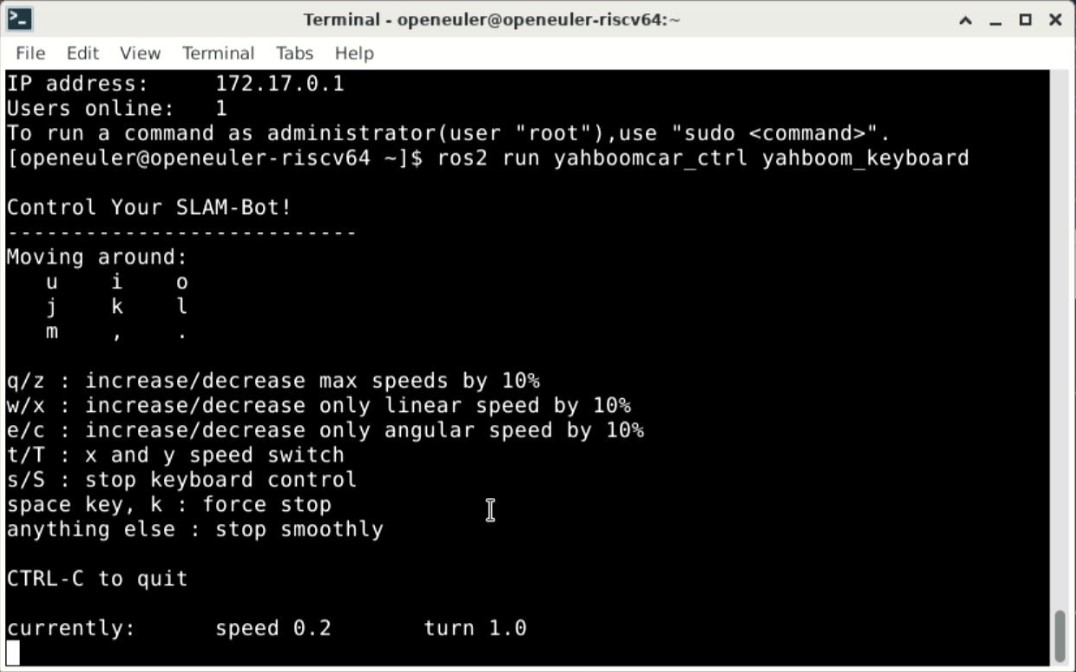
After the keyboard-control node is opened, use the u, i, o, j, k, l, m , ,, . keys to control the forward, backward and turning movements of the car chassis.
APP Control
Please first download the apk file from APP Download link. Currently, it only supports Android phones.
If you have closed the three programs that are automatically started by the system, you need to open three terminals in Meles and execute the following three commands respectively to start the map building and agent programs.
sh ~/start_agent.sh
ros2 launch yahboomcar_bringup yahboomcar_bringup_launch.py
ros2 launch yahboomcar_nav map_gmapping_app_launch.xml
If there are only 3-4 lines of log output in the terminal after executing the first line of command sh ~/start_agent.sh, please press the reset button on the MicroROS control board.
After the APP is downloaded and installed, please connect to the car's WiFi first and turn off the mobile network connection on your phone.
- SSID:MicroROS_AP
- Password:12345678
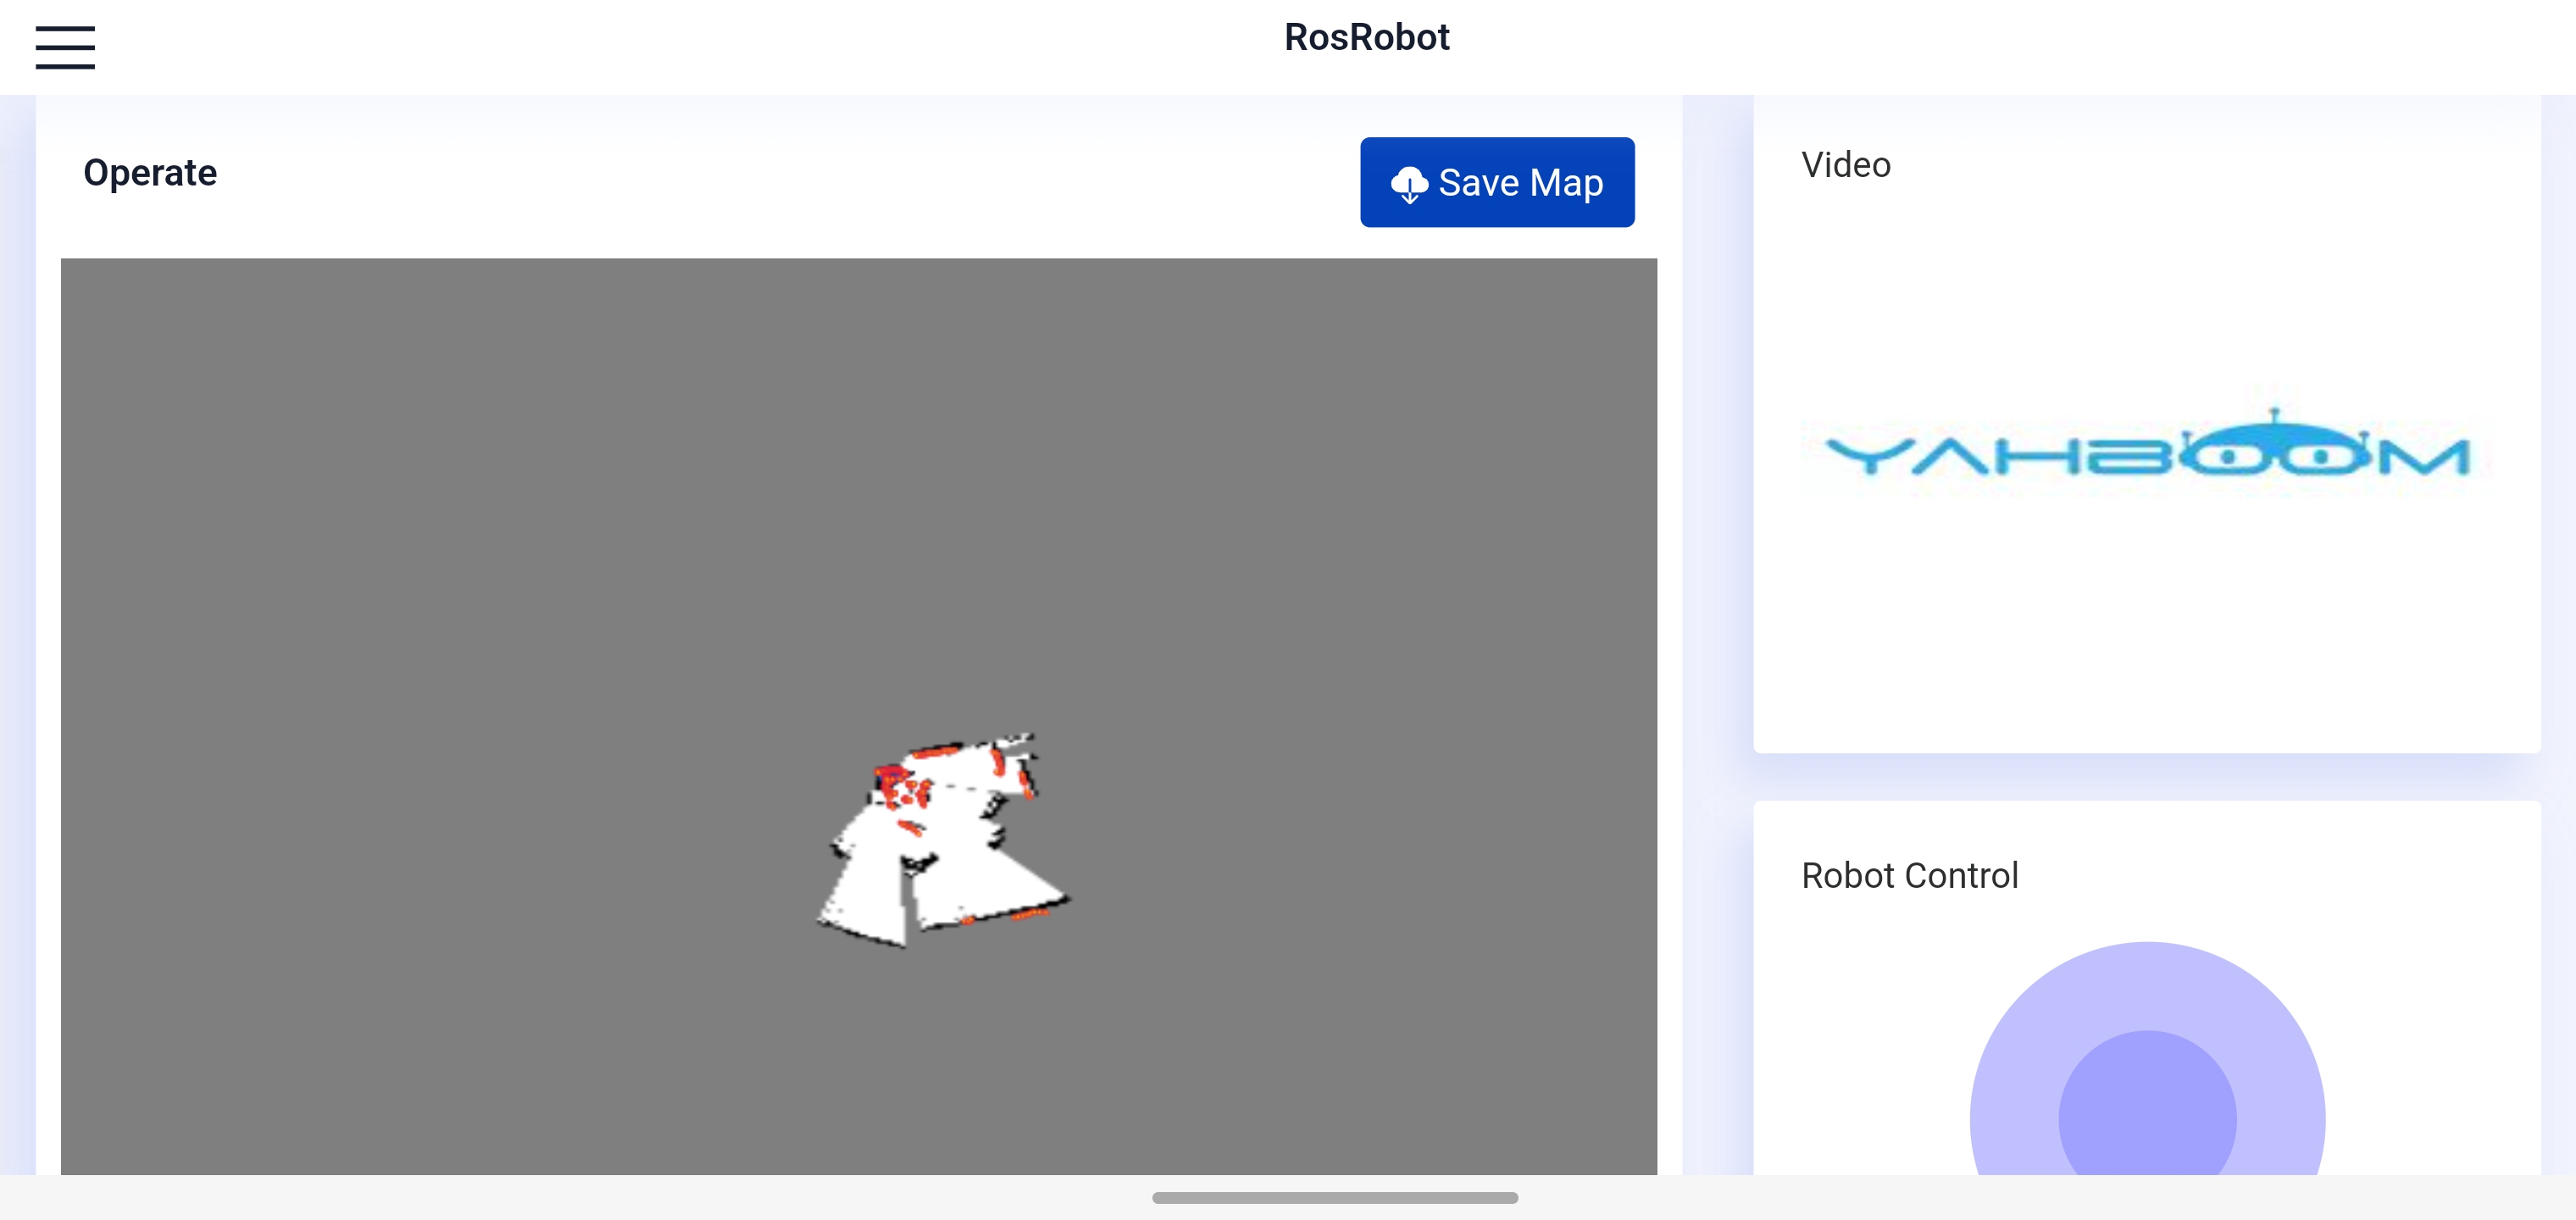
After the connection is complete, open the APP, enter the address 10.42.0.1 in the IP address bar, and click the Connect button in the lower right corner.
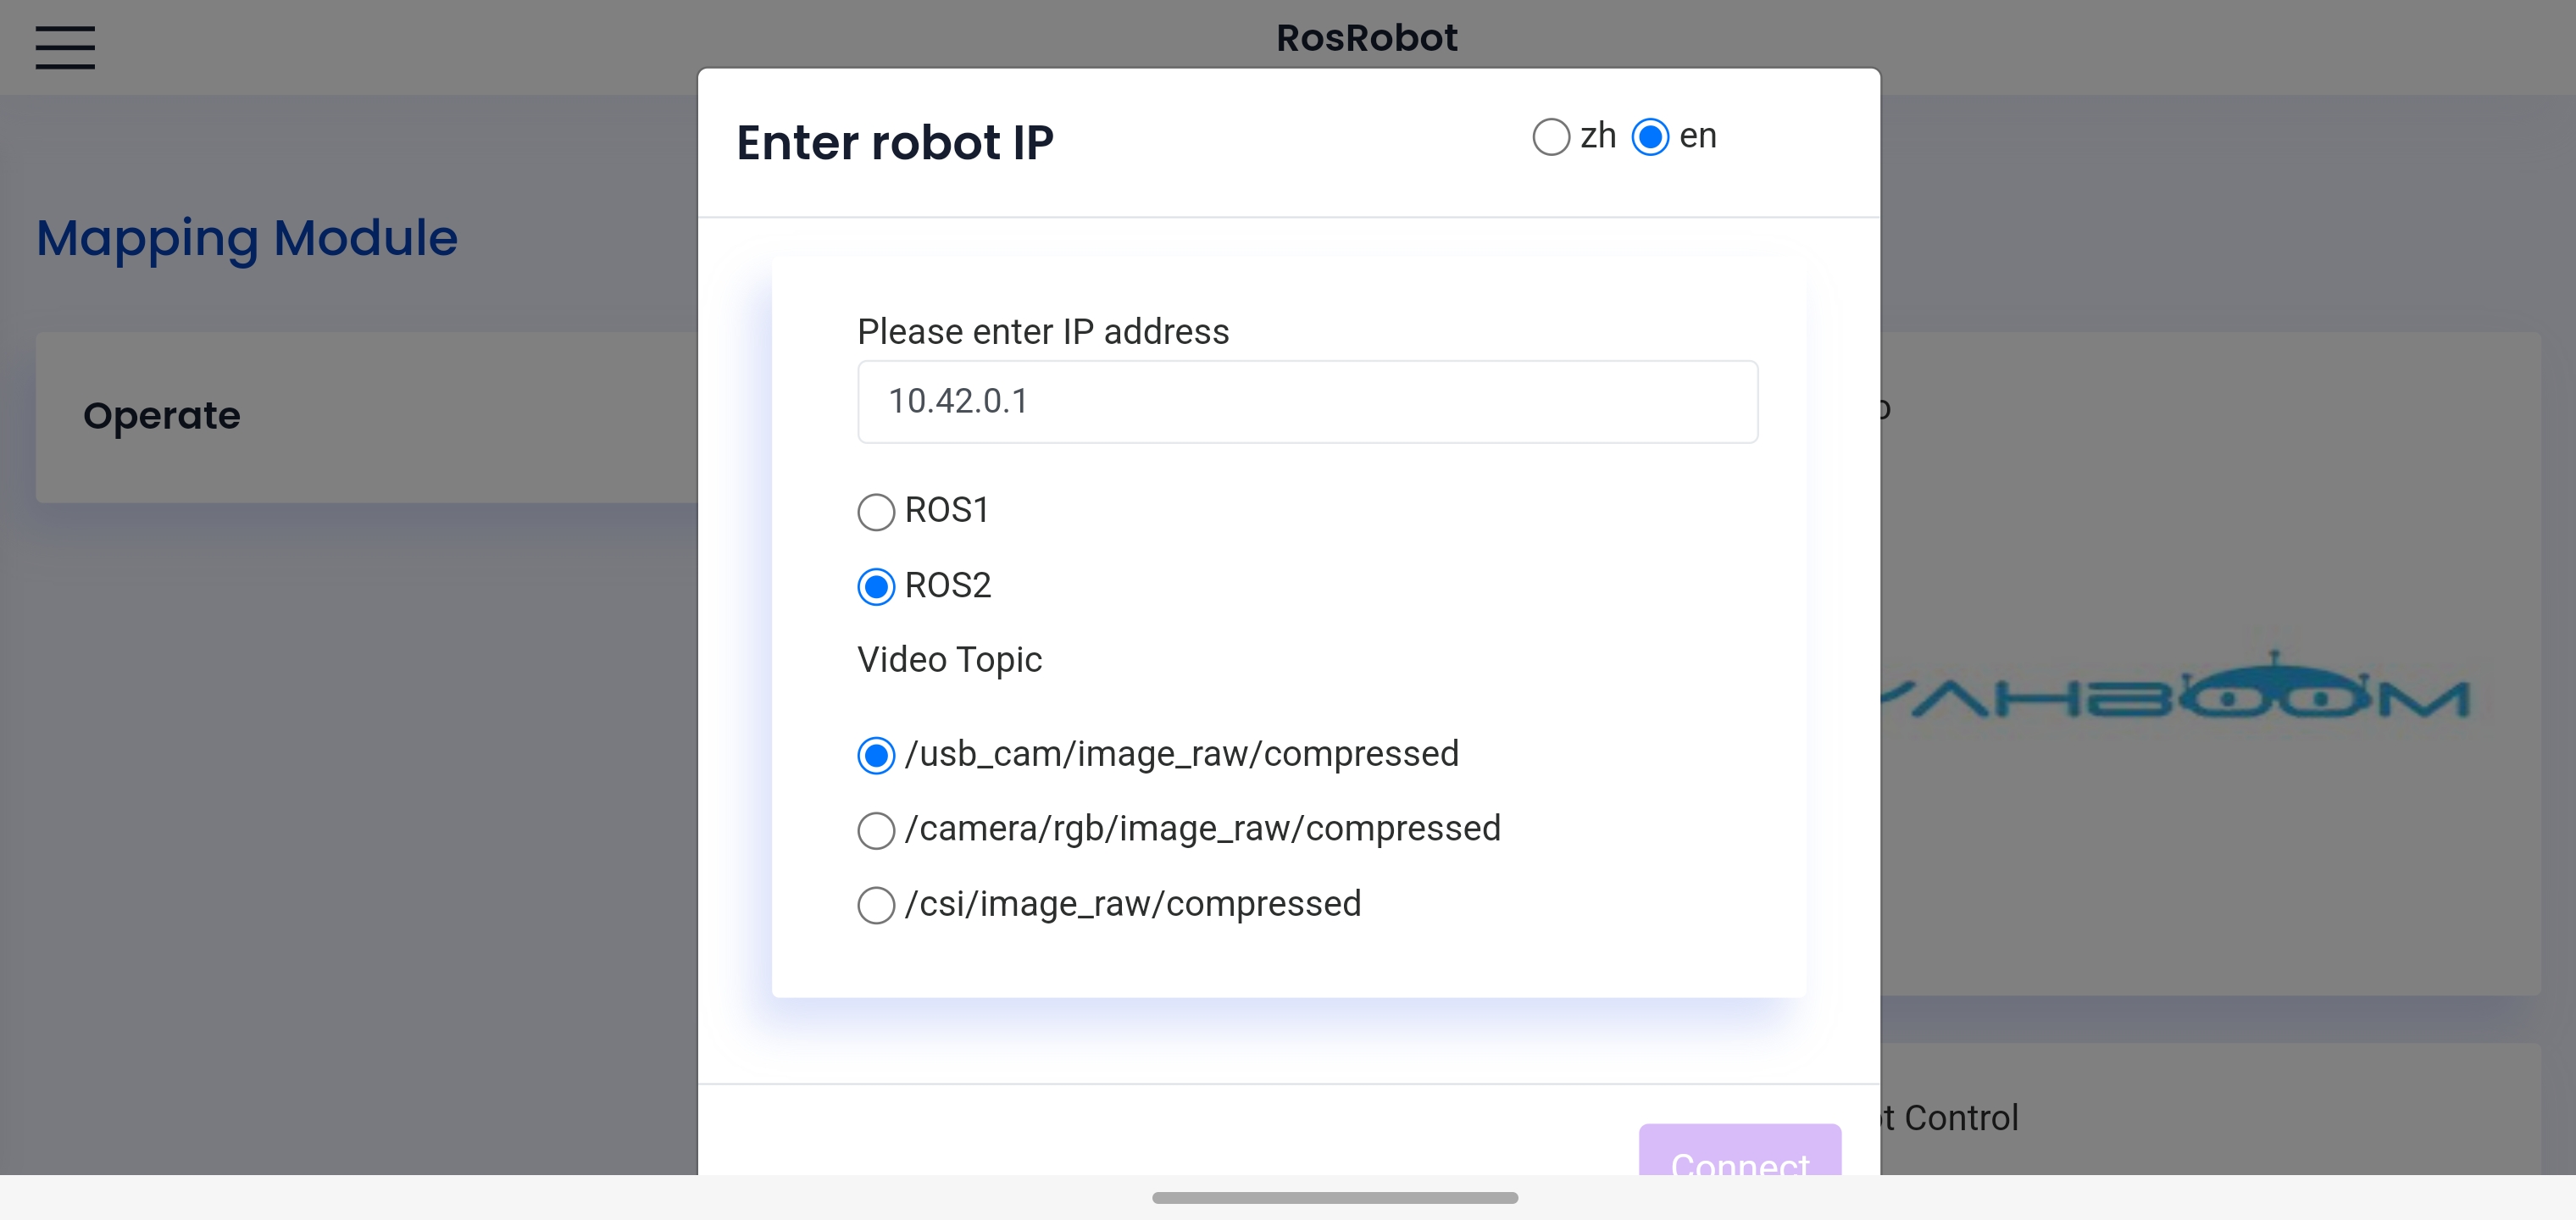
After the connection is successful, you will see the radar point cloud data and control stick on the main page.
SLAM Mapping
First open a terminal and execute the following command to open the agent program.
sh ~/start_agent.sh
If the program is stuck at the first two lines after you start the agent, press the reset button on the MicroROS controllor.
Then execute the following command to start the program that processes the underlying data.
ros2 launch yahboomcar_bringup yahboomcar_bringup_launch.py
Next, start rviz to visualize the map graph,mapping and keyboard-controlled nodes.
# Start rviz
ros2 launch yahboomcar_nav display_launch.py

# Start the mapping node
ros2 launch yahboomcar_nav map_gmapping_launch.py

# Enable keyboard control
ros2 run yahboomcar_ctrl yahboom_keyboard
Next, use the keyboard to control the car to slowly complete the path that needs to be mapped.
After the keyboard-controlled node is opened, use the u, i, o, j, k, l, m , ,, . keys to control the forward, backward and turning movements of the car chassis.
After the map is built, you need to execute the following command to save the map. After successful saving, the map will be saved in /home/openeuler/slam_ws/src/yahboomcar_nav/maps/yahboom_map.pgm and /home/openeuler/slam_ws/src/yahboomcar_nav/maps/yahboom_map.yaml.
ros2 launch yahboomcar_nav save_map_launch.py
Navigation and obstacle avoidance
Before you begin, please follow the SLAM mapping steps to build and save the map.
First you need to turn on the agent.
sh ~/start_agent.sh
If the program is stuck at the first two lines after you start the agent, press the reset button on the MicroROS controllor.
Next, start the program that processes the underlying data.
ros2 launch yahboomcar_bringup yahboomcar_bringup_launch.py
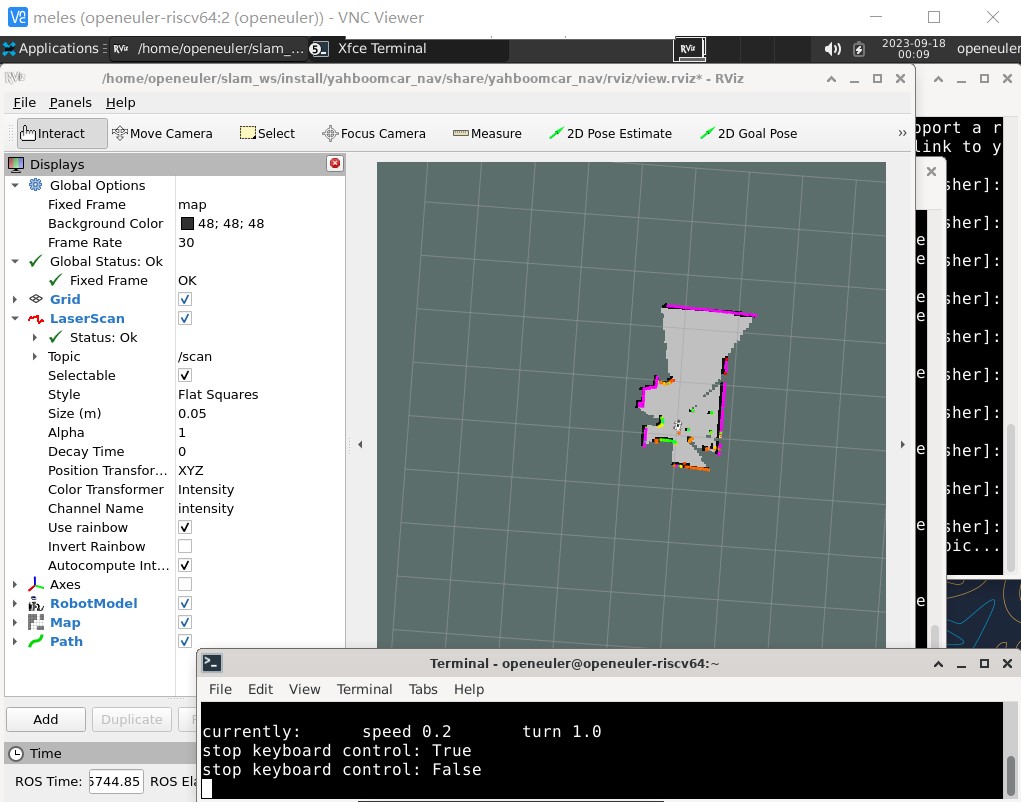
Run the following command to start rviz and load the map.
# Start rviz
ros2 launch yahboomcar_nav display_launch.py

# Load map
LD_PRELOAD=/opt/ros/humble/lib/liblayers.so ros2 launch yahboomcar_nav navigation_dwb_launch.py
Next you need to select the 2D Pose Estimate option on the rviz interface and drag in the map to determine the initial position and orientation of the robot.
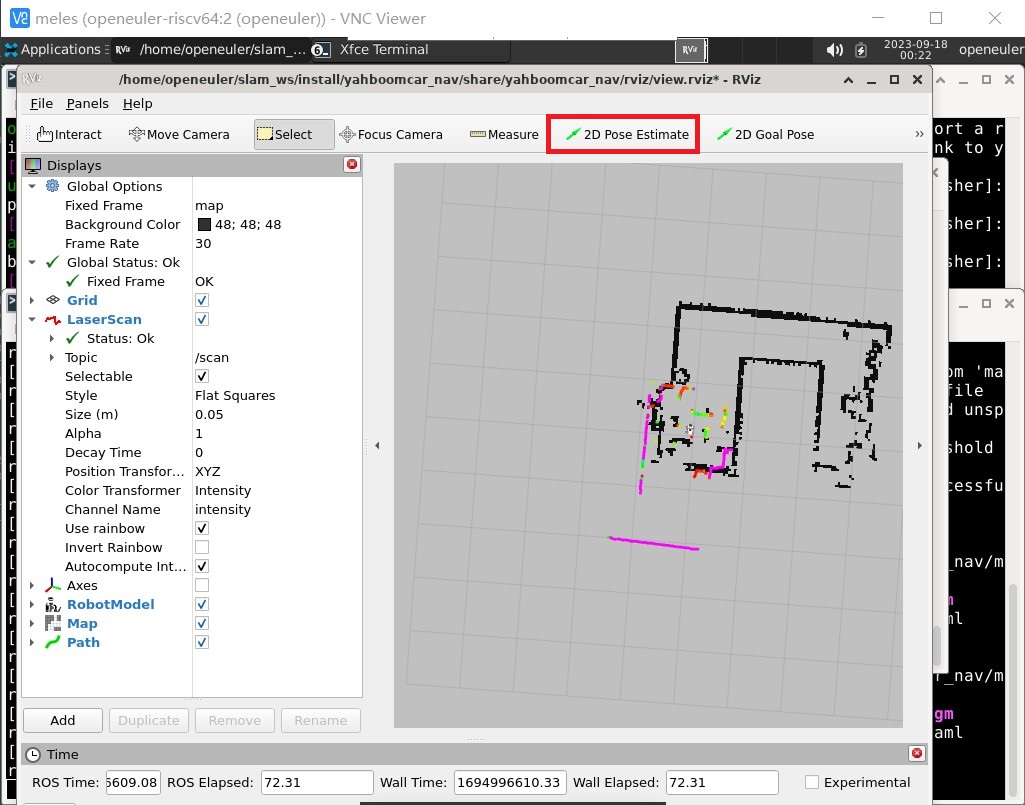
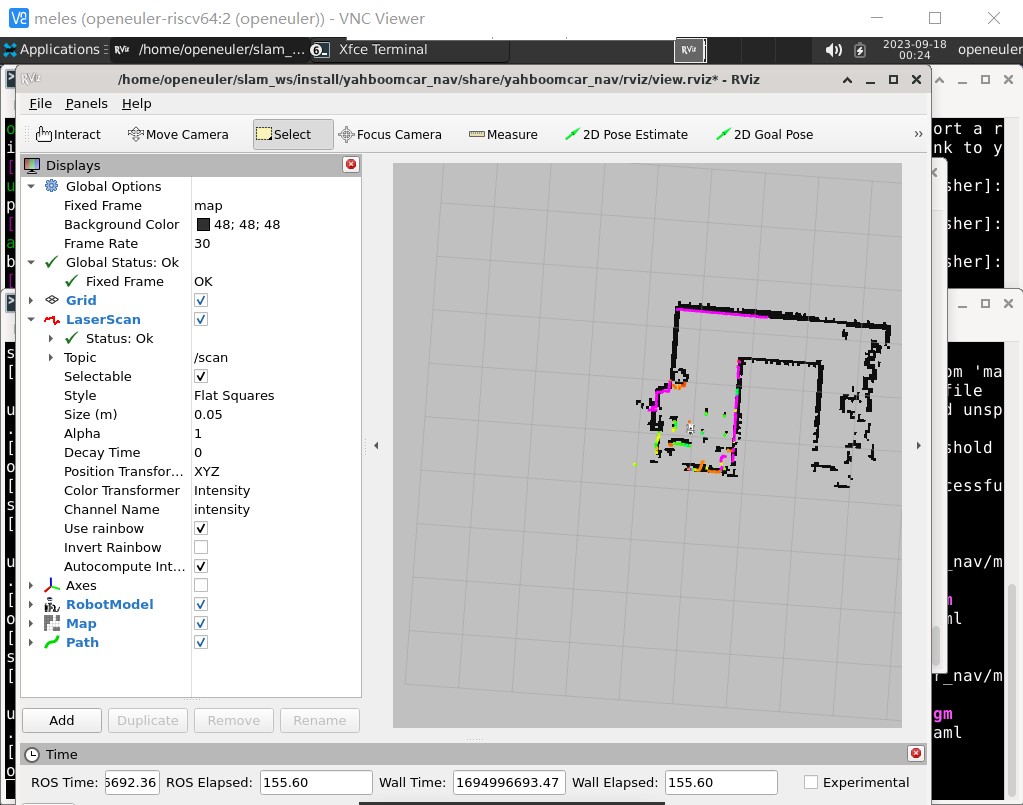
The rose-red line in the map represents the map boundary currently scanned by the robot, and the black part represents the built map. Use the 2D Pose Estimate option to make them roughly overlap.
Next, you can select points in the map for navigation, and use the 2D Goal Pose option to drag in the map to determine the location and direction the robot should move to.
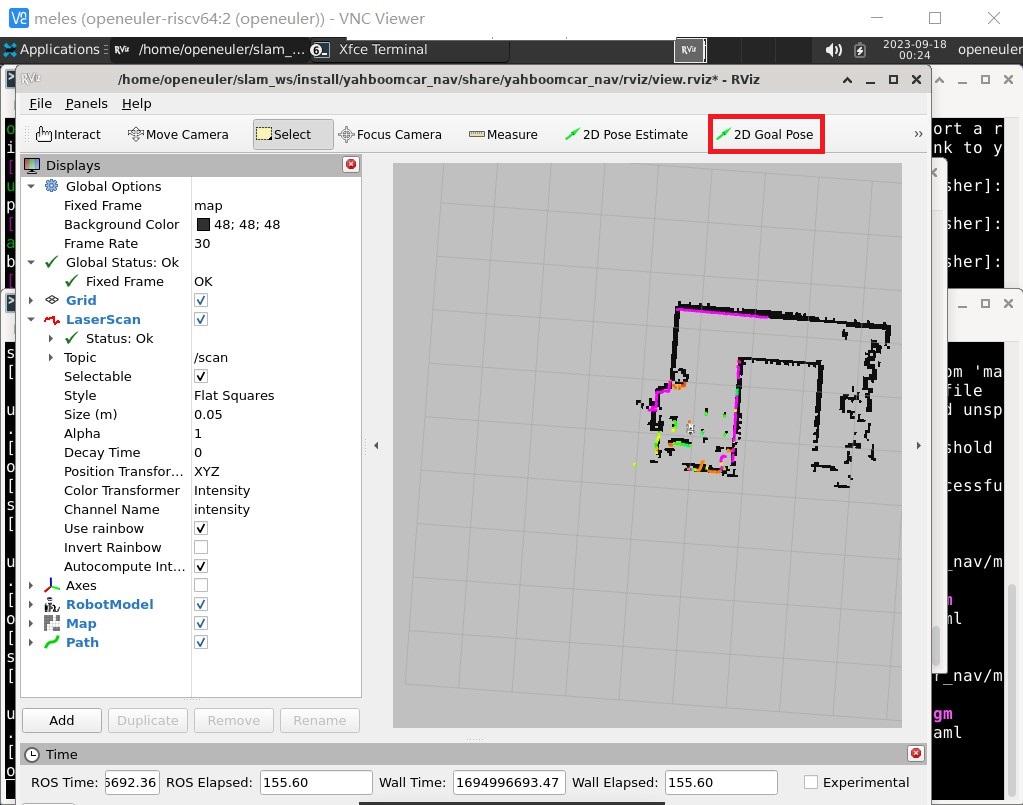
The robot will then start planning a path and head to the target location.
MicroROS board firmware burning
Get the burning tool and firmware
First download and unzip the MicroROS board firmware and burning tool.
We need to use the microROS_Robot_xxxx.bin firmware and the flashing tool in the flash_download_tool_3.9.5_0.zip compressed package.
In addition, the CP2102 serial port chip driver is included in the compressed package of the burning tool. If your PC lacks the chip driver, please run the CP210xVCPInstaller_xxx.exe in the CP2102-Windows驱动文件.zip compressed package to install the driver.
Start burning
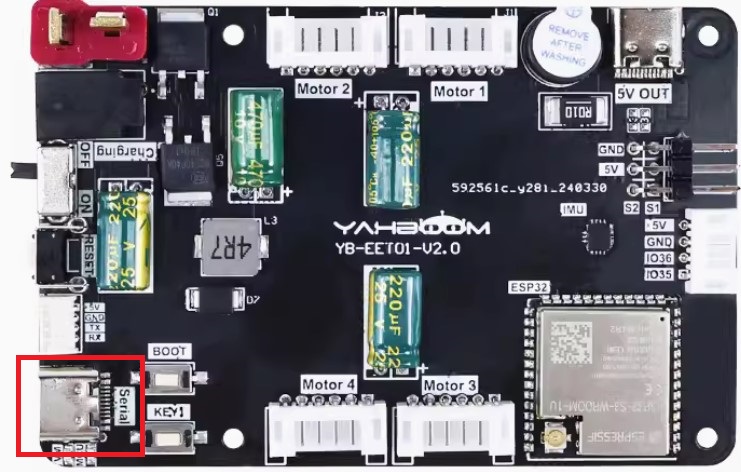
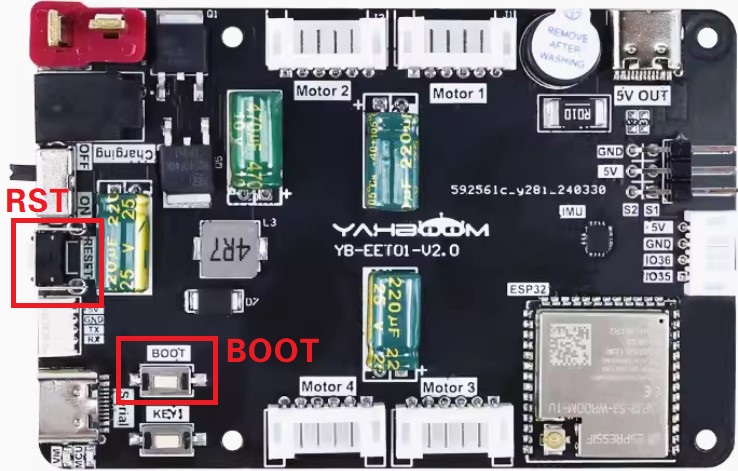
First, use a Type C data cable to connect the MicroROS serial port to the PC. The serial port location is shown in the figure below.
Then follow the next three steps to put the MicroRO control board into download mode.
- Press and hold the BOOT button
- Press the RST button
- Release the BOOT button
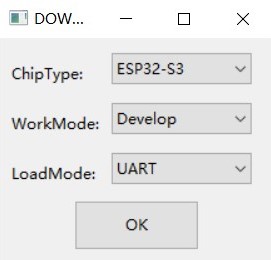
Unzip all files in flash_download_tool_3.9.5_0.zip and run flash_download_tool_3.9.5.exe .
In the new page, select the chip-type as ESP32-S3 and click OK.
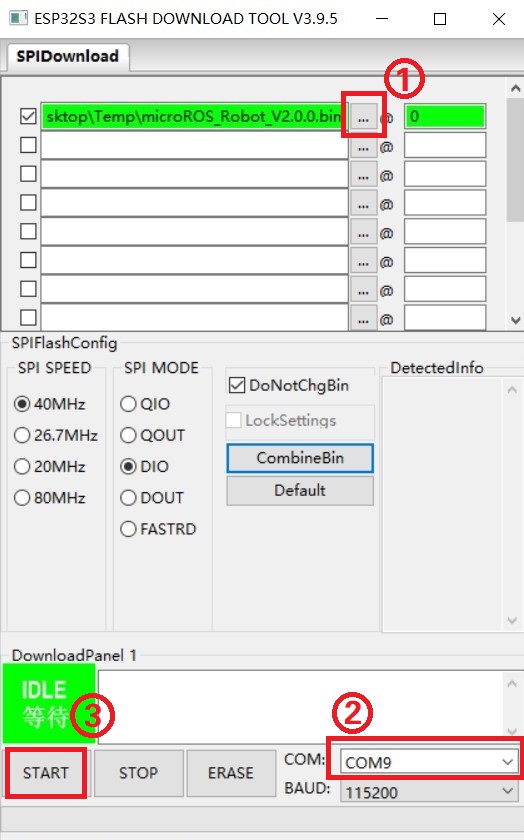
Then select the firmware microROS_Robot_xxxx.bin you want to burn at position 1, and fill 0 for the burning position. Select the serial port corresponding to the MicroROS control board at position 2, and finally click 3 to start burning.
After the burning is successful, Finish is displayed.
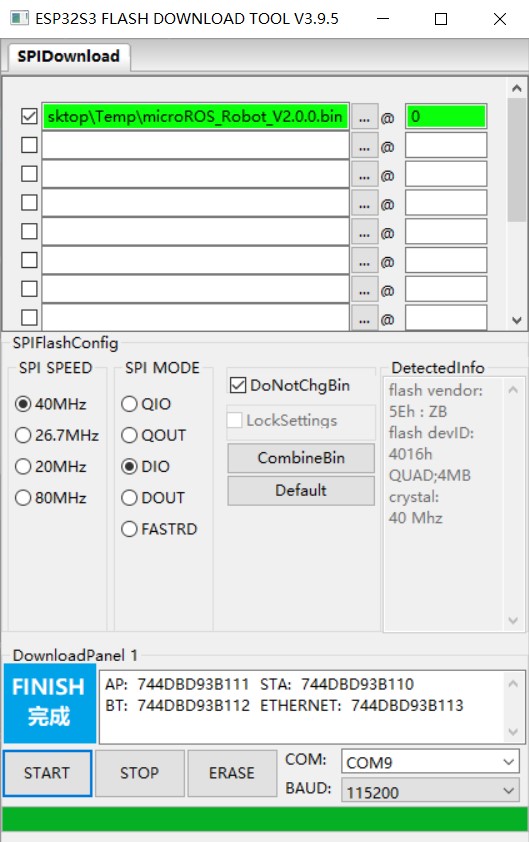
At this time, plug the data cable back into Meles and the burning is complete.
Configuration MicroROS Board
After the burning is completed, the parameters of the MicroROS board need to be configured to ensure normal communication between the MicroROS board and Meles.
First, run cat ~/.bashrc to confirm the DOMAIN_ID number.
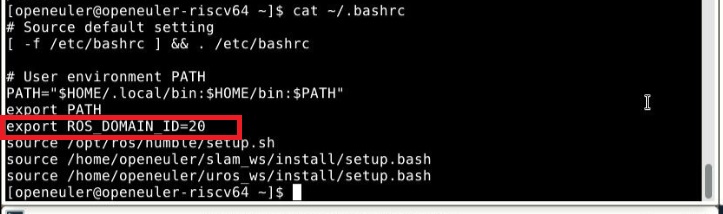
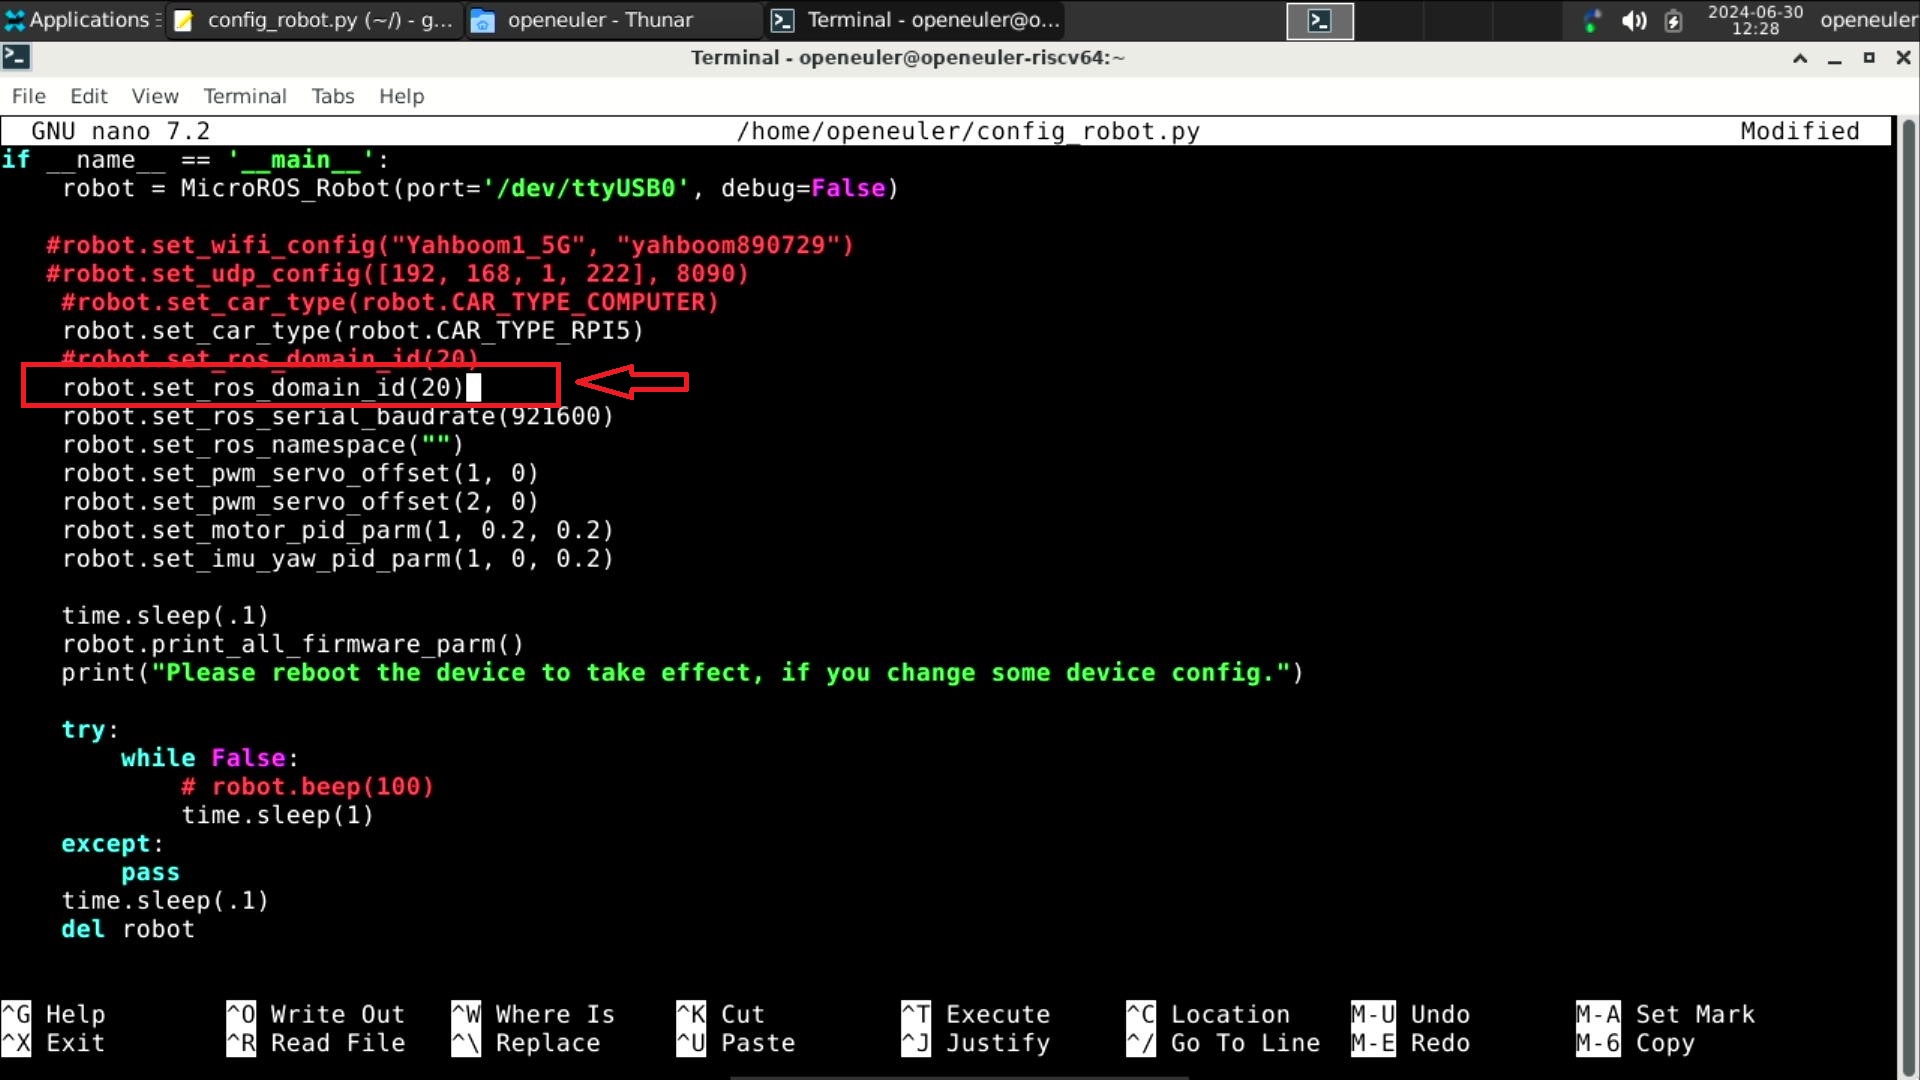
And execute nano ~/config_robot.py, edit the content at the end of the file, set robot.set_ros_domain_id() to the DOMAIN_ID number in .bashrc, press ctrl+O to save, and press ctrl+X to exit.
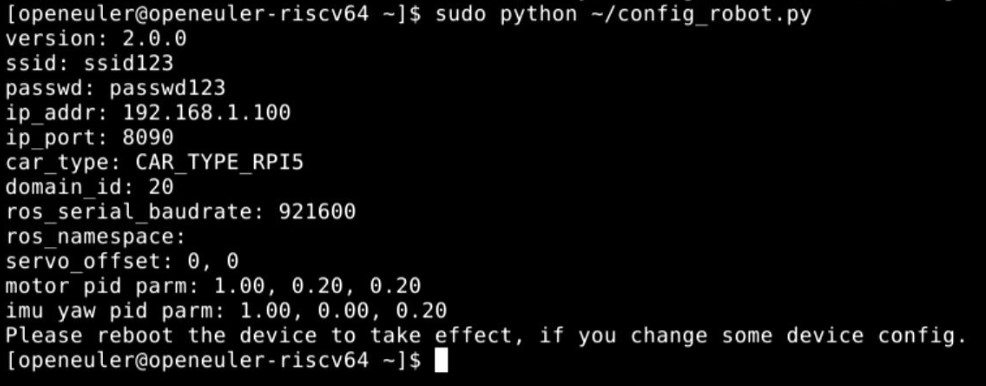
Finally, execute python ~/config_robot.py to configure the MicroROS board.
Install the image to Meles
First, you need to go to the "资料汇总下载" section under the Yahboom official website to obtain the image file.
Unzip the compressed package in the folder "5、出厂镜像" to any location, and use the method in Install an image to MicroSD Card to flash the image.
If the system cannot boot after flashing, please try to change the burning software to Win32DiskImager.
Appendix
ROS2 Relevant information
ROS getting Started:https://www.oerv.wiki/robot/quick_start.html
Install ROS2 on OpenEuler:https://www.oerv.wiki/robot/how_to_install.html
ROS2 compilation environment installation:https://www.oerv.wiki/robot/compiler_and_service.html
ROS2 common commands:https://www.oerv.wiki/robot/common_command.html
Multi-machine communication example:https://www.oerv.wiki/robot/bestofpractice/01.html


