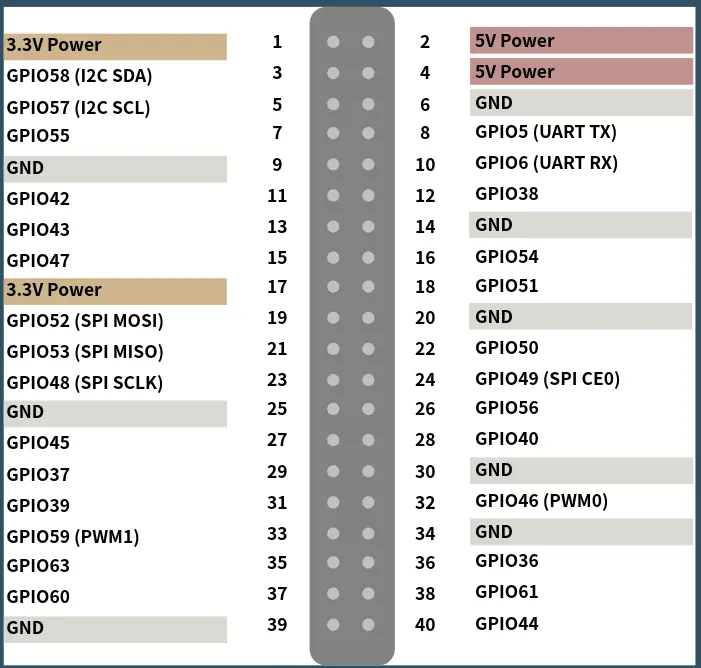
GPIO usage
GPIO pin assignment

GPIO Pin distribution
| SPI | PWM | I2C | LCD | GPIO NUM | NAME | PIN | PIN | NAME | GPIO NUM | UART | LCD | PWM | SPI |
|---|---|---|---|---|---|---|---|---|---|---|---|---|---|
| N/A | +3.3V | 1 | 2 | +5V | N/A | ||||||||
| I2C_SDA | 58 | GPIO58 | 3 | 4 | +5V | N/A | |||||||
| I2C_SCL | 57 | GPIO57 | 5 | 6 | GND | N/A | |||||||
| 55 | GPIO55 | 7 | 8 | GPIO5 | 5 | UART_TX | |||||||
| N/A | GND | 9 | 10 | GPIO6 | 6 | UART_RX | |||||||
| 42 | GPIO42 | 11 | 12 | GPIO38 | 38 | LCD_HSYNC | |||||||
| 43 | GPIO43 | 13 | 14 | GND | N/A | ||||||||
| 47 | GPIO47 | 15 | 16 | GPIO54 | 54 | ||||||||
| N/A | +3.3V | 17 | 18 | GPIO51 | 51 | ||||||||
| SPI_MOSI | 52 | GPIO52 | 19 | 20 | GND | N/A | |||||||
| SPI_MISO | 53 | GPIO53 | 21 | 22 | GPIO50 | 50 | |||||||
| SPI_SCLK | 48 | GPIO48 | 23 | 24 | GPIO49 | 49 | |||||||
| N/A | GND | 25 | 26 | GPIO56 | 56 | ||||||||
| 45 | GPIO45 | 27 | 28 | GPIO40 | 40 | ||||||||
| LCD_VSYNC | 37 | GPIO37 | 29 | 30 | GND | N/A | |||||||
| LCD_DE | 39 | GPIO39 | 31 | 32 | GPIO46 | 46 | PWM0 | ||||||
| PWM1 | 59 | GPIO59 | 33 | 34 | GND | N/A | |||||||
| 63 | GPIO63 | 35 | 36 | GPIO36 | 36 | LCD_CLK | |||||||
| 60 | GPIO60 | 37 | 38 | GPIO61 | 61 | ||||||||
| N/A | GND | 39 | 40 | GPIO44 | 44 |
If pin multiplexing is required, please refer to: https://milkv.io/zh/docs/mars/getting-started/gpio_full_multiplexing
Configure GPIO
- Perform the following operations to configure GPIO:
Take GPIO44 as an example.
$ cd /sys/class/gpio

$ echo 44 | sudo tee export
You can run the command ls /sys/class/gpio to list the GPIO directory, check whether gpio44 appears, and confirm that the export is successful.
The 44 in the command is the sys number, corresponding to GPIO44
- Set the direction of GPIO
Run the command echo "out" | sudo tee gpio44/direction to set the direction of GPIO44 to output.
Run the command echo "in" | sudo tee gpio44/direction to set the direction of GPIO44 to input.
You can check the set direction by running the command cat gpio44/direction .
- Set the voltage of GPIO44
Run the command echo "1" | sudo tee gpio44/value to set the voltage of GPIO44 to a high level.
Run the command echo "0" | sudo tee gpio44/value to set the voltage of GPIO44 to a low level.
You can view the set value through the command cat gpio44/value .
