YOLOv5 Object Detection
This program inference YOLOv5 model for object detection.
Cross-Compile YOLO Program for PC
Duo256M YOLOv5 code location: sample_yolov5.cpp
Compilation method
Refer to the previous section Introduction for compiling the sample program using the provided methods. After compilation is completed, the sample_yolov5 program we need will be generated in the sample/cvi_yolo/ directory.
Obtain cvimodel
You can download precompiled yolov5s INT8 symmetric quantized cvimodel models directly, or manually convert the models as described in Model Compilation.
Download Precompiled cvimodels
- Duo256M
# INT8 symmetric model
wget https://github.com/milkv-duo/cvitek-tdl-sdk-sg200x/raw/main/cvimodel/yolov5_cv181x_int8_sym.cvimodel
Model Compilation
Export yolov5s.onnx Model
- First, clone the YOLOv5 official repository. The repository link is: ultralytics/yolov5: YOLOv5 🚀 in PyTorch > ONNX > CoreML > TFLite
git clone https://github.com/ultralytics/yolov5.git - Configure the working environment
cd yolov5
pip3 install -r requirements.txt
pip3 install onnx - Obtain the .pt format model for yolov5, for example, download the yolov5s model: yolov5s
wget https://github.com/ultralytics/yolov5/releases/download/v7.0/yolov5s.pt - Copy cvitek-tdl-sdk-sg200x/sample/yolo_export/yolov5_export.py to the yolov5 repository directory.
Use yolov5_export.py to replace the forward function, allowing the RISC-V to handle post-processing and export the model in onnx format.
Parameter explanation: --weights: Path to the PyTorch model --img-size: Input image size
python3 yolov5_export.py --weights ./yolov5s.pt --img-size 640 640
TPU-MLIR Model Conversion
Please refer to TPU-MLIR documentation to set up the TPU-MLIR working environment. For parameter details, see TPU-MLIR documentation.
The specific implementation steps are divided into three parts:
-
model_transform.py: Converts the onnx model to the mlir intermediate format model. onnx -> model_transform.py -> mlir -
run_calibration.py: Generates the int8 quantization calibration table. calibration_set -> run_calibration.py -> calibration_table -
model_deploy.py: Generates the cvimodel for TPU inference using mlir and the int8 quantization table. mlir + calibration_table ->model_deploy.py -> cvimodel
onnx to MLIR
model_transform.py \
--model_name yolov5s \
--model_def yolov5s.onnx \
--input_shapes [[1,3,640,640]] \
--mean 0.0,0.0,0.0 \
--scale 0.0039216,0.0039216,0.0039216 \
--keep_aspect_ratio \
--pixel_format rgb \
--test_input ../image/dog.jpg \
--test_result yolov5s_top_outputs.npz \
--mlir yolov5s.mlir
After converting to the mlir file, a yolov5s_in_f32.npz file will be generated, which is the model's input file.
MLIR to INT8 Model (Supports INT8 Quantization Only)
Before quantizing to INT8 model, run calibration.py to get the calibration table. Prepare around 100~1000 images, in this case, 100 images from the COCO2017 dataset are used for demonstration.
run_calibration.py yolov5s.mlir \
--dataset ../COCO2017 \
--input_num 100 \
-o yolov5s_cali_table
Then use the calibration table to generate the int8 symmetric cvimodel
model_deploy.py \
--mlir yolov5s.mlir \
--quant_input --quant_output \
--quantize INT8 \
--calibration_table yolov5s_cali_table \
--processor cv181x \
--test_input yolov5s_in_f32.npz \
--test_reference yolov5s_top_outputs.npz \
--tolerance 0.85,0.45 \
--model yolov5_cv181x_int8_sym.cvimodel
After compilation, a file named yolov5_cv181x_int8_sym.cvimodel will be generated.
Inference on the Board
Copy the compiled sample_yolov5, cvimodel, and the image to be inferred to the board, and then execute the binary program.
scp sample_yolov5 yolov5_cv181x_int8_asym.cvimodel 000000000113.jpg [email protected]:/root/
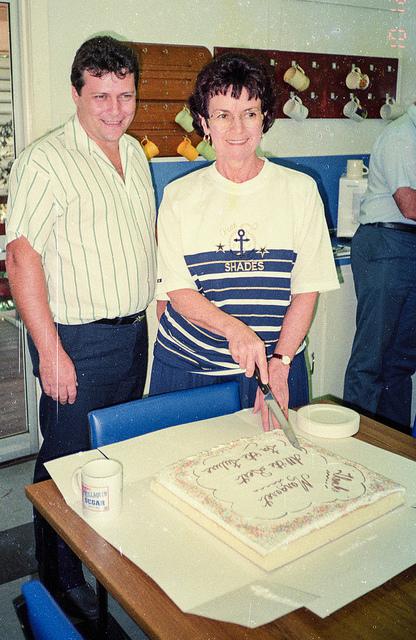
The image for inference is as follows:
Run the command:
export LD_LIBRARY_PATH='/mnt/system/lib'
./sample_yolov5 ./yolov5_cv181x_int8_asym.cvimodel  000000000113.jpg
result:
[root@milkv-duo]~/data/test_make# ./sample_yolov5 ./yolov5_cv181x_int8_asym.cvim
odel  000000000113.jpg
[ 5665.088539] vb has already inited, set_config cmd has no effect
version: 1.4.0
yolov5s Build at 2024-01-30 16:32:00 For platform cv181x
Max SharedMem size:5734400
model opened:./yolov5_cv181x_int8_asym.cvimodel
detect res: 340.399902 96.056824 415.000000 423.052612 0.866147 0
detect res: 149.599243 52.756699 344.154053 434.715759 0.864127 0
detect res: 165.295807 434.305786 389.069794 546.548950 0.739044 55
detect res: 5.554703 34.055344 161.554688 521.089905 0.718132 0
detect res: 79.427734 458.260071 124.559998 515.725830 0.677201 41
detect res: 256.286438 367.324158 303.713562 450.689941 0.598015 43
detect res: 282.405457 93.188477 309.046570 121.621582 0.555912 41
detect res: 281.694244 60.846092 309.968231 91.153908 0.520292 41
The program performs YOLOv5 model inference on the image, and the inference results are printed.
The output interpretation is in the format res: x y w h conf label, representing the top-left coordinates (x,y) of the recognized result box, the width and height (w,h) of the recognized result box, the confidence conf of the recognized result, and the object label label.
# Referring to the COCO2017 label file
0 person
55 cake
41 cup
43 knife


