Introduction
The default SDK for the Duo series boards is built based on buildroot and is used to generate Duo firmware. Currently, the SDK has two versions: V1 and V2.
- SDK V1 only supports RISC-V core. (This version is recommended for Duo 64M)
- SDK V2 supports both RISC-V and ARM cores. (This version is recommended for Duo256M and DuoS)
It is recommended that Duo 64M use the V1 version of the SDK, mainly because its memory is small. The related AI applications in the V2 version of the SDK cannot currently run normally in Duo 64M.
Buildroot SDK V1
The SDK mainly contains the following parts:
- u-boot: 2021.10
- linux kernel: 5.10.4
- buildroot: 2021.05
- opensbi: 89182b2
Source code: https://github.com/milkv-duo/duo-buildroot-sdk
SDK Directory Structure:
├── build                compilation scripts and board configs
├── build.sh             one-click compilation script
├── buildroot-2021.05    buildroot source code
├── freertos             freertos system
├── fsbl                 fsbl firmware in prebuilt form
├── install              temporary images stored here
├── isp_tuning           camera effect parameters
├── linux_5.10           linux kernel
├── middleware           self-developed multimedia framework
├── device               configuration files for milkv
├── opensbi              opensbi library
├── out                  image generated by Milk-V
├── ramdisk              prebuilt ramdisk
└── u-boot-2021.10       u-boot source code
Buildroot SDK V2
The SDK mainly contains the following parts:
- u-boot: 2021.10
- linux kernel: 5.10.4
- buildroot: 2025.02
- opensbi: 89182b2
Source code: https://github.com/milkv-duo/duo-buildroot-sdk-v2
Stable branches: main
SDK Directory Structure:
├── build                compilation scripts and board configs
├── build.sh             one-click compilation script
├── buildroot            buildroot source code
├── cvi_mpi              sophgo multimedia framework
├── device               configuration files for milkv
├── freertos             freertos system
├── fsbl                 fsbl firmware in prebuilt form
├── install              temporary images stored here
├── isp_tuning           camera effect parameters
├── linux_5.10           linux kernel
├── osdrv                some peripheral driver source code
├── opensbi              opensbi library
├── out                  image generated by Milk-V
├── tdl_sdk              sophgo turnkey deep learning sdk
└── u-boot-2021.10       u-boot source code
Build image
Prepare the Compilation Environment. Using a local Ubuntu system, the officially supported compilation environment is Ubuntu Jammy 22.04.x amd64 only!
If you are using other Linux distributions, we strongly recommend that you use the Docker environment to compile to reduce the probability of compilation errors.
The following describes the compilation methods in the two environments.
In addition, the compilation methods of the V1 and V2 SDKs are basically the same. The following takes the V2 SDK as an example to introduce the SDK compilation steps.
1. Compiled using Ubuntu 22.04
Packages to be installed
Install the packages that compile dependencies:
sudo apt install -y pkg-config build-essential ninja-build automake autoconf libtool wget curl git gcc libssl-dev bc slib squashfs-tools android-sdk-libsparse-utils jq python3-distutils scons parallel tree python3-dev python3-pip device-tree-compiler ssh cpio fakeroot libncurses5 flex bison libncurses5-dev genext2fs rsync unzip dosfstools mtools tcl openssh-client cmake expect python-is-python3
For duo-buildroot-sdk-v2, you also need to install the following tool packages:
sudo pip install jinja2
Get SDK Source Code
git clone https://github.com/milkv-duo/duo-buildroot-sdk-v2.git --depth=1
During the compilation process, Buildroot will automatically download some source packages. SDK V1 has integrated some common source packages and can be compiled directly. In SDK V2, to avoid download failures due to network reasons, you can download the dl.tar package in advance and extract it to the buildroot directory:
wget https://github.com/milkv-duo/duo-buildroot-sdk-v2/releases/download/dl/dl.tar
tar xvf ./dl.tar -C ./duo-buildroot-sdk-v2/buildroot/
After extraction, the dl directory structure in buildroot of duo-buildroot-sdk-v2 is as follows:
└── buildroot
    └── dl
        ├── acl
        ├── alsa-lib
        ├── alsa-utils
        ├── attr
        ├── ...
1). One-click Compilation
Execute one-click compilation script build.sh:
cd duo-buildroot-sdk/
./build.sh
You will see tips on how to use the compiled script:
$ ./build.sh
Usage:
./build.sh              - Show this menu
./build.sh lunch        - Select a board to build
./build.sh [board]      - Build [board] directly, supported boards as follows:
milkv-duo-musl-riscv64-sd
milkv-duo256m-glibc-arm64-sd
milkv-duo256m-musl-riscv64-sd
milkv-duos-glibc-arm64-emmc
milkv-duos-glibc-arm64-sd
milkv-duos-musl-riscv64-emmc
milkv-duos-musl-riscv64-sd
Listed at the bottom is the list of currently supported target versions.
As shown in the prompt, there are two ways to compile the target version.
The first method is to execute ./build.sh lunch to bring up the interactive menu, select the version number to be compiled, and press Enter:
$ ./build.sh lunch
Select a target to build:
1. milkv-duo-musl-riscv64-sd
2. milkv-duo256m-glibc-arm64-sd
3. milkv-duo256m-musl-riscv64-sd
4. milkv-duos-glibc-arm64-emmc
5. milkv-duos-glibc-arm64-sd
6. milkv-duos-musl-riscv64-emmc
7. milkv-duos-musl-riscv64-sd
Which would you like:
- Duo (64M-DDR) only has RISC-V core, and the default is the SD card image compiled based on musl libc.
- Duo256M supports RISC-V and ARM cores (choose one of the two). The RISC-V core firmware is compiled based on musl libc, and the ARM core firmware is compiled based on glibc. Only the SD card image is configured.
- DuoS supports RISC-V and ARM cores (choose one of the two). The RISC-V core firmware is compiled based on musl libc, and the ARM core firmware is compiled based on glibc. SD card and eMMC images are configured.
The second method is to put the name of the target version after the script and compile it directly. For example, if you need to compile the image of milkv-duos-musl-riscv64-sd, the command is as follows:
$ ./build.sh milkv-duos-musl-riscv64-sd
After successful compilation, you can see the generated image in the out directory. The image with the *.img suffix is the image burned to the SD card, and the image with the *.zip suffix is the image burned to the eMMC.
Note: The first compilation will automatically download the required toolchain, which is approximately 840MB in size. Once downloaded, it will be automatically extracted to the host-tools directory in the SDK directory. For subsequent compilations, if the host-tools directory is detected, the download will not be performed again.
2). Step-by-step Compilation
If you have not executed the one-click compilation script, you need to manually download the tool chain host-tools and then copy or move it to the SDK root directory:
git clone https://github.com/milkv-duo/host-tools.git
cp -a host-tools duo-buildroot-sdk-v2/
Source environment:
source build/envsetup_milkv.sh
If it is the first time to compile, you will be prompted to select the target to compile:
Select a target to build:
1. milkv-duo-musl-riscv64-sd
2. milkv-duo256m-glibc-arm64-sd
3. milkv-duo256m-musl-riscv64-sd
4. milkv-duos-glibc-arm64-emmc
5. milkv-duos-glibc-arm64-sd
6. milkv-duos-musl-riscv64-emmc
7. milkv-duos-musl-riscv64-sd
Which would you like:
After selecting the corresponding number, press Enter. After the environment variable is successfully loaded, some information about the current target will be displayed, such as:
Target Board: milkv-duos-musl-riscv64-sd
Target Board Storage: sd
Target Board Config: /build/duo-buildroot-sdk-v2/device/target/boardconfig.sh
Target Image Config: /build/duo-buildroot-sdk-v2/device/target/genimage.cfg
Build tdl-sdk: 1
Output dir: /build/duo-buildroot-sdk-v2/install/soc_sg2000_milkv_duos_musl_riscv64_sd
After the environment is loaded, a link named target will be created in the device directory, linking to the compilation target directory. The next time you source the environment, when the target link is detected, you will no longer be prompted to select a target. If you need to change the compilation target, you can add the lunch parameter to re-call the interactive menu for selection:
source build/envsetup_milkv.sh lunch
After the environment is loaded successfully, enter the following commands in sequence to complete the step-by-step compilation:
clean_all
build_all
If you are compiling an SD card image, you also need to execute the following command to generate the *.img image:
pack_sd_image
For example, if you need to compile the image of milkv-duos-musl-riscv64-sd, the step-by-step compilation commands are as follows:
source build/envsetup_milkv.sh milkv-duos-musl-riscv64-sd

clean_all
build_all
pack_sd_image
Generated firmware location:
install/soc_sg2000_milkv_duos_musl_riscv64_sd/milkv-duos-musl-riscv64-sd.img
Note that the SD card image is *.img and the eMMC image is upgrade.zip.
In addition to using build_all for a complete compilation, you can also compile a module separately. Generally speaking, you should first execute clean_xxx to clean the intermediate files, and then execute build_xxx to recompile. For supported modules, you can enter clean_ or build_ and then double-click the tab key to view them. The following lists some common module compilation methods:
- fsbl:
clean_fsbl,build_fsbl - uboot:
clean_uboot,build_uboot - kernel:
clean_kernel,build_kernel - osdrv:
clean_osdrv,build_osdrv - cvi_mpi:
clean_middleware,build_middleware - tdl-sdk:
clean_tdl_sdk,build_tdl_sdk
2. Compiled using Docker
Docker support is required on hosts running Linux systems. For how to use Docker, please refer to the official documentation or other tutorials.
We put the SDK source code on the Linux host system and call the Docker image environment provided by Milk-V to compile it.
Pull SDK code on Linux host
git clone https://github.com/milkv-duo/duo-buildroot-sdk-v2.git --depth=1
During the compilation process, Buildroot will automatically download some source packages. SDK V1 has integrated some common source packages and can be compiled directly. In SDK V2, to avoid download failures due to network reasons, you can download the dl.tar package in advance and extract it to the buildroot directory:
wget https://github.com/milkv-duo/duo-buildroot-sdk-v2/releases/download/dl/dl.tar
tar xvf ./dl.tar -C ./duo-buildroot-sdk-v2/buildroot/
After extraction, the dl directory structure in buildroot of duo-buildroot-sdk-v2 is as follows:
└── buildroot
    └── dl
        ├── acl
        ├── alsa-lib
        ├── alsa-utils
        ├── attr
        ├── ...
Enter the SDK code directory
cd duo-buildroot-sdk-v2
Pull the Docker image and run
docker run --privileged -itd --name duodocker -v "$(pwd)":/home/work milkvtech/milkv-duo:latest /bin/bash
Description of some parameters in the command:
--privilegedstarts the container in privileged mode.duodockerDocker name, you can use the name you want to use.$(pwd)The current directory, here is the duo-buildroot-sdk directory that was 'cd' to in the previous step.-v $(pwd):/home/workBind the current code directory to the /home/work directory in the Docker image.milkvtech/milkv-duo:latestThe Docker image provided by Milk-V will be automatically downloaded from hub.docker.com for the first time.
After Docker runs successfully, you can use the docker ps -a command to view the running status:
$ docker ps -a
CONTAINER ID   IMAGE                        COMMAND       CREATED       STATUS       PORTS     NAMES
8edea33c2239   milkvtech/milkv-duo:latest   "/bin/bash"   2 hours ago   Up 2 hours             duodocker
If the image on the Docker server is updated, you can use the docker pull milkvtech/milkv-duo:latest command to synchronize the latest image.
1). One-click compilation using Docker
docker exec -it duodocker /bin/bash -c "cd /home/work && cat /etc/issue && export FORCE_UNSAFE_CONFIGURE=1 && ./build.sh [board]"
Note that the ./build.sh [board] at the end of the command is the same as the previous usage in the one-click compilation instructions in Ubuntu 22.04. Use ./build.sh can see how to use the command, use ./ build.sh lunch can bring up the interactive selection menu, use ./build.sh [board] to directly compile the target version, [board] can be replaced with:
milkv-duo-musl-riscv64-sd
milkv-duo256m-glibc-arm64-sd
milkv-duo256m-musl-riscv64-sd
milkv-duos-glibc-arm64-emmc
milkv-duos-glibc-arm64-sd
milkv-duos-musl-riscv64-emmc
milkv-duos-musl-riscv64-sd
Description of some parameters in the command:
duodockerThe name of the running Docker must be consistent with the name set in the previous step."*"In quotes is the shell command to be run in the Docker image.cd /home/workSwitch to the /home/work directory. Since this directory has been bound to the host's code directory during runtime, the /home/work directory in Docker is the source code directory of the SDK.cat /etc/issueDisplays the version number of the image used by Docker. It is currently Ubuntu 22.04.3 LTS and is used for debugging.export FORCE_UNSAFE_CONFIGURE=1By default, Docker uses the root user to compile. You need to use this environment variable../build.sh [board]Execute one-click compilation script.
For example, if you need to compile the image of milkv-duos-musl-riscv64-sd, the command is as follows:
docker exec -it duodocker /bin/bash -c "cd /home/work && cat /etc/issue && export FORCE_UNSAFE_CONFIGURE=1 && ./build.sh milkv-duos-musl-riscv64-sd"
After successful compilation, you can see the generated SD card burning image *.img in the out directory.
2). Compile step by step using Docker
If you have not executed the one-click compilation script, you need to manually download the tool chain host-tools and then copy or move it to the SDK root directory:
git clone https://github.com/milkv-duo/host-tools.git
cp -a host-tools duo-buildroot-sdk-v2/
Step-by-step compilation requires logging into Docker to operate. Use the command docker ps -a to view and record the ID number of the container, such as 8edea33c2239.
If duodocker is not in the list, the container may have been stopped. You need to rerun it and then check the ID number in the window:
cd duo-buildroot-sdk-v2/
docker run --privileged -itd --name duodocker -v $(pwd):/home/work milkvtech/milkv-duo:latest /bin/bash
docker ps -a
Enter Docker:
docker exec -it 8edea33c2239 /bin/bash
Enter the code directory bound in Docker:
root@8edea33c2239:/# cd /home/work/
Set environment variables. By default, Docker is compiled as the root user. You need to configure the environment variables:
export FORCE_UNSAFE_CONFIGURE=1
Source environment:
source build/envsetup_milkv.sh
If it is the first time to compile, you will be prompted to select the target to compile:
Select a target to build:
1. milkv-duo-musl-riscv64-sd
2. milkv-duo256m-glibc-arm64-sd
3. milkv-duo256m-musl-riscv64-sd
4. milkv-duos-glibc-arm64-emmc
5. milkv-duos-glibc-arm64-sd
6. milkv-duos-musl-riscv64-emmc
7. milkv-duos-musl-riscv64-sd
Which would you like:
After selecting the corresponding number, press Enter. After the environment variable is successfully loaded, some information about the current target will be displayed, such as:
Target Board: milkv-duos-musl-riscv64-sd
Target Board Storage: sd
Target Board Config: /build/duo-buildroot-sdk-v2/device/target/boardconfig.sh
Target Image Config: /build/duo-buildroot-sdk-v2/device/target/genimage.cfg
Build tdl-sdk: 1
Output dir: /build/duo-buildroot-sdk-v2/install/soc_sg2000_milkv_duos_musl_riscv64_sd
After the environment is loaded, a link named target will be created in the device directory, linking to the compilation target directory. The next time you source the environment, when the target link is detected, you will no longer be prompted to select a target. If you need to change the compilation target, you can add the lunch parameter to re-call the interactive menu for selection:
source build/envsetup_milkv.sh lunch
After the environment is loaded successfully, enter the following commands in sequence to complete the step-by-step compilation:
clean_all
build_all
If you are compiling an SD card image, you also need to execute the following command to generate the *.img image:
pack_sd_image
For example, if you need to compile the image of milkv-duos-musl-riscv64-sd, the step-by-step compilation commands are as follows:
source build/envsetup_milkv.sh milkv-duos-musl-riscv64-sd

clean_all
build_all
pack_sd_image
Generated firmware location:
install/soc_sg2000_milkv_duos_musl_riscv64_sd/milkv-duos-musl-riscv64-sd.img
Note that the SD card image is *.img and the eMMC image is upgrade.zip.
In addition to using build_all for a complete compilation, you can also compile a module separately. Generally speaking, you should first execute clean_xxx to clean the intermediate files, and then execute build_xxx to recompile. For supported modules, you can enter clean_ or build_ and then double-click the tab key to view them. The following lists some common module compilation methods:
- fsbl:
clean_fsbl,build_fsbl - uboot:
clean_uboot,build_uboot - kernel:
clean_kernel,build_kernel - osdrv:
clean_osdrv,build_osdrv - cvi_mpi:
clean_middleware,build_middleware - tdl-sdk:
clean_tdl_sdk,build_tdl_sdk
After compilation is completed, you can use the exit command to exit the Docker environment:
root@8edea33c2239:/home/work# exit
The generated firmware can also be seen in the host code directory.
Stop Docker
After compilation is completed, if the above Docker running environment is no longer needed, you can stop it first and then delete it:
docker stop 8edea33c2239
docker rm 8edea33c2239
3. Other compilation considerations
If you want to try to compile this SDK in an environment other than the above two environments, the following are things you may need to pay attention to, for reference only.
cmake version
Note:cmake minimum version requirement is 3.16.5.
Check the version of cmake in the system:
cmake --version
For example, the version of cmake installed using apt in the Ubuntu 20.04 is:
cmake version 3.16.3
The minimum requirement of this SDK is not met. Manual installation of the latest version 3.27.6 is needed:
wget https://github.com/Kitware/CMake/releases/download/v3.27.6/cmake-3.27.6-linux-x86_64.sh
chmod +x cmake-3.27.6-linux-x86_64.sh
sudo sh cmake-3.27.6-linux-x86_64.sh --skip-license --prefix=/usr/local/
When manually installed, cmake is located in /usr/local/bin. To check its version, use the command cmake --version, which should display:
cmake version 3.27.6
Compiling with Windows Linux Subsystem (WSL)
If you wish to perform the compilation with WSL, there's an small issue building the image. The $PATH, due Windows interoperability, has Windows environment variables which include some spaces between the paths.
To solve this problem you need to change the /etc/wsl.conf file and add the following lines:
[interop]
appendWindowsPath = false
After that, you need to reboot the WSL with wsl.exe --reboot. Then you able to run the ./build.sh script or the build_all line in the step-by-step compilation method.
To rollback this change in /etc/wsl.conf file set appendWindowsPath as true. To reboot the WSL, can you use the Windows PowerShell command wsl.exe --shutdown then wsl.exe, after that the Windows environment variables become avaliable again in $PATH.
4. Add application packages
Buildroot is a lightweight embedded Linux system building tool. The system it generates does not have the apt package management tool like the Ubuntu system to download and use application packages. Duo's default SDK has added some commonly used tools or commands. If you need to add your own applications, you need to make some modifications to the SDK and recompile to generate the required system firmware.
The following introduces several common methods for adding application packages in Buildroot.
Enable commands in Busybox
In a system built using Buildroot, some basic commands are provided by busybox. You can check whether the configuration file of busybox contains the commands you need, enable it and recompile. The location of the configuration file of busybox is:
buildroot/package/busybox/busybox.config
For example, the timeout command, how to enable it:
diff --git a/buildroot/package/busybox/busybox.config b/buildroot/package/busybox/busybox.config
index d7d58f064..b268cd6f8 100644
--- a/buildroot/package/busybox/busybox.config
+++ b/buildroot/package/busybox/busybox.config
@@ -304,7 +304,7 @@ CONFIG_TEST=y
 CONFIG_TEST1=y
 CONFIG_TEST2=y
 CONFIG_FEATURE_TEST_64=y
-# CONFIG_TIMEOUT is not set
+CONFIG_TIMEOUT=y
 CONFIG_TOUCH=y
 # CONFIG_FEATURE_TOUCH_NODEREF is not set
 CONFIG_FEATURE_TOUCH_SUSV3=y
Refer to this commit: busybox: add timeout command
Configure application packages preset in Buildroot
In addition, a large number of application packages are preset in Buildroot. The required programs are generated by downloading the source code and compiling them. The preset application packages of Buildroot can be viewed in the buildroot/package directory.
Configuring to enable or disable an application package is implemented in the target board's configuration file. Taking the milkv-duos-musl-riscv64-sd target as an example, its buildroot configuration file is:
buildroot/configs/milkv-duos-musl-riscv64-sd_defconfig
We can compile the SDK as a whole on the host (such as Ubuntu), and then go to the Buildroot compilation directory to configure the relevant application packages through command line menu interaction.
-
Enter the Buildroot compilation directory
cd buildroot/output/milkv-duos-musl-riscv64-sd/You can use the
make show-targetscommand to view the currently used application packages:$ make show-targets
busybox coreutils dhcpcd dnsmasq dropbear duo-pinmux e2fsprogs evtest expat fio freetype gdb host-acl host-attr host-autoconf host-automake host-e2fsprogs host-fakeroot host-genimage host-libtool host-libzlib host-m4 host-makedevs host-mkpasswd host-patchelf host-pkgconf host-skeleton host-util-linux host-xz host-zlib htop ifupdown-scripts initscripts iperf3 json-c kmod libevent libffi libnl libopenssl libxml2 libxslt libzlib musl-compat-headers ncurses ntp openssl python-cffi python-evdev python-freetype python-lxml python-modbus-tk python-pillow python-pinpong python-pip python-psutil python-pycparser python-serial python-setuptools python-smbus-cffi python-spidev python3 skeleton skeleton-init-common skeleton-init-sysv spidev_test strace stress-ng tar toolchain toolchain-external toolchain-external-custom urandom-scripts util-linux wpa_supplicant zlib rootfs-ext2 rootfs-tar -
Configure Buildroot
Execute the
make menuconfigcommand to bring up the interactive menu: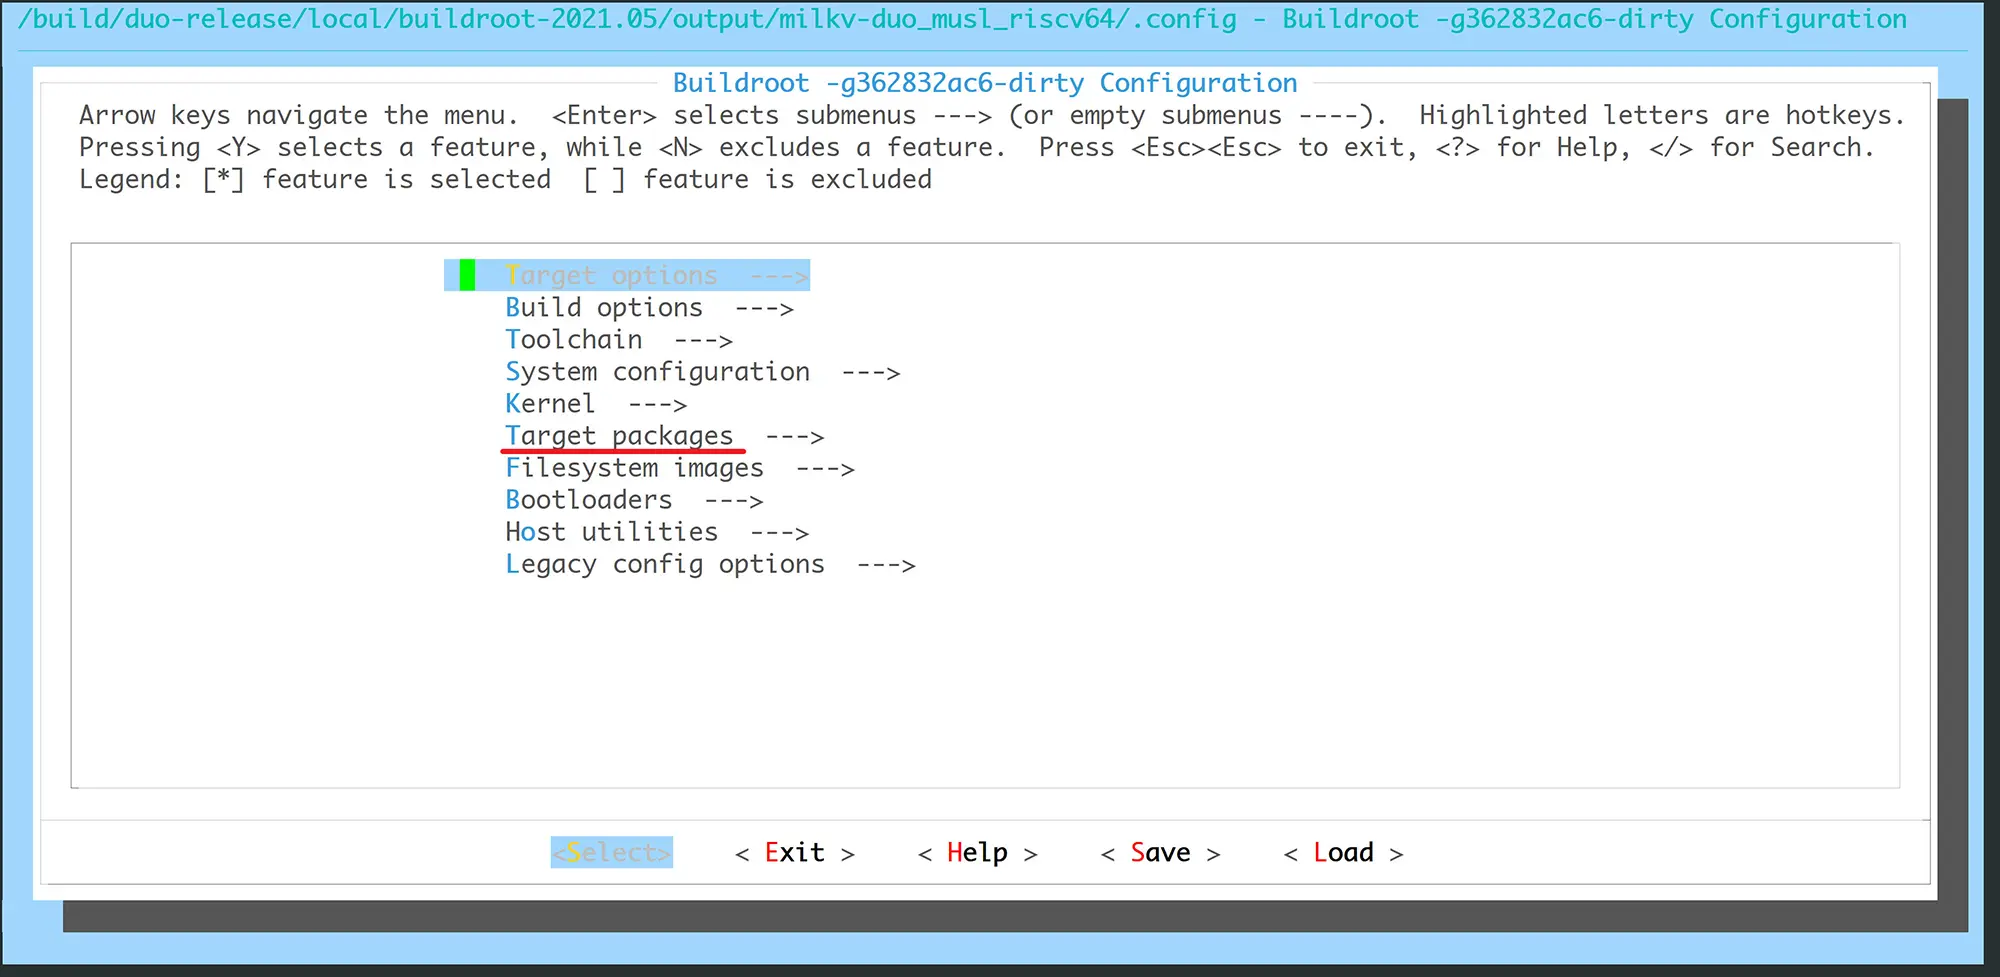
Find the required application package according to the classification in
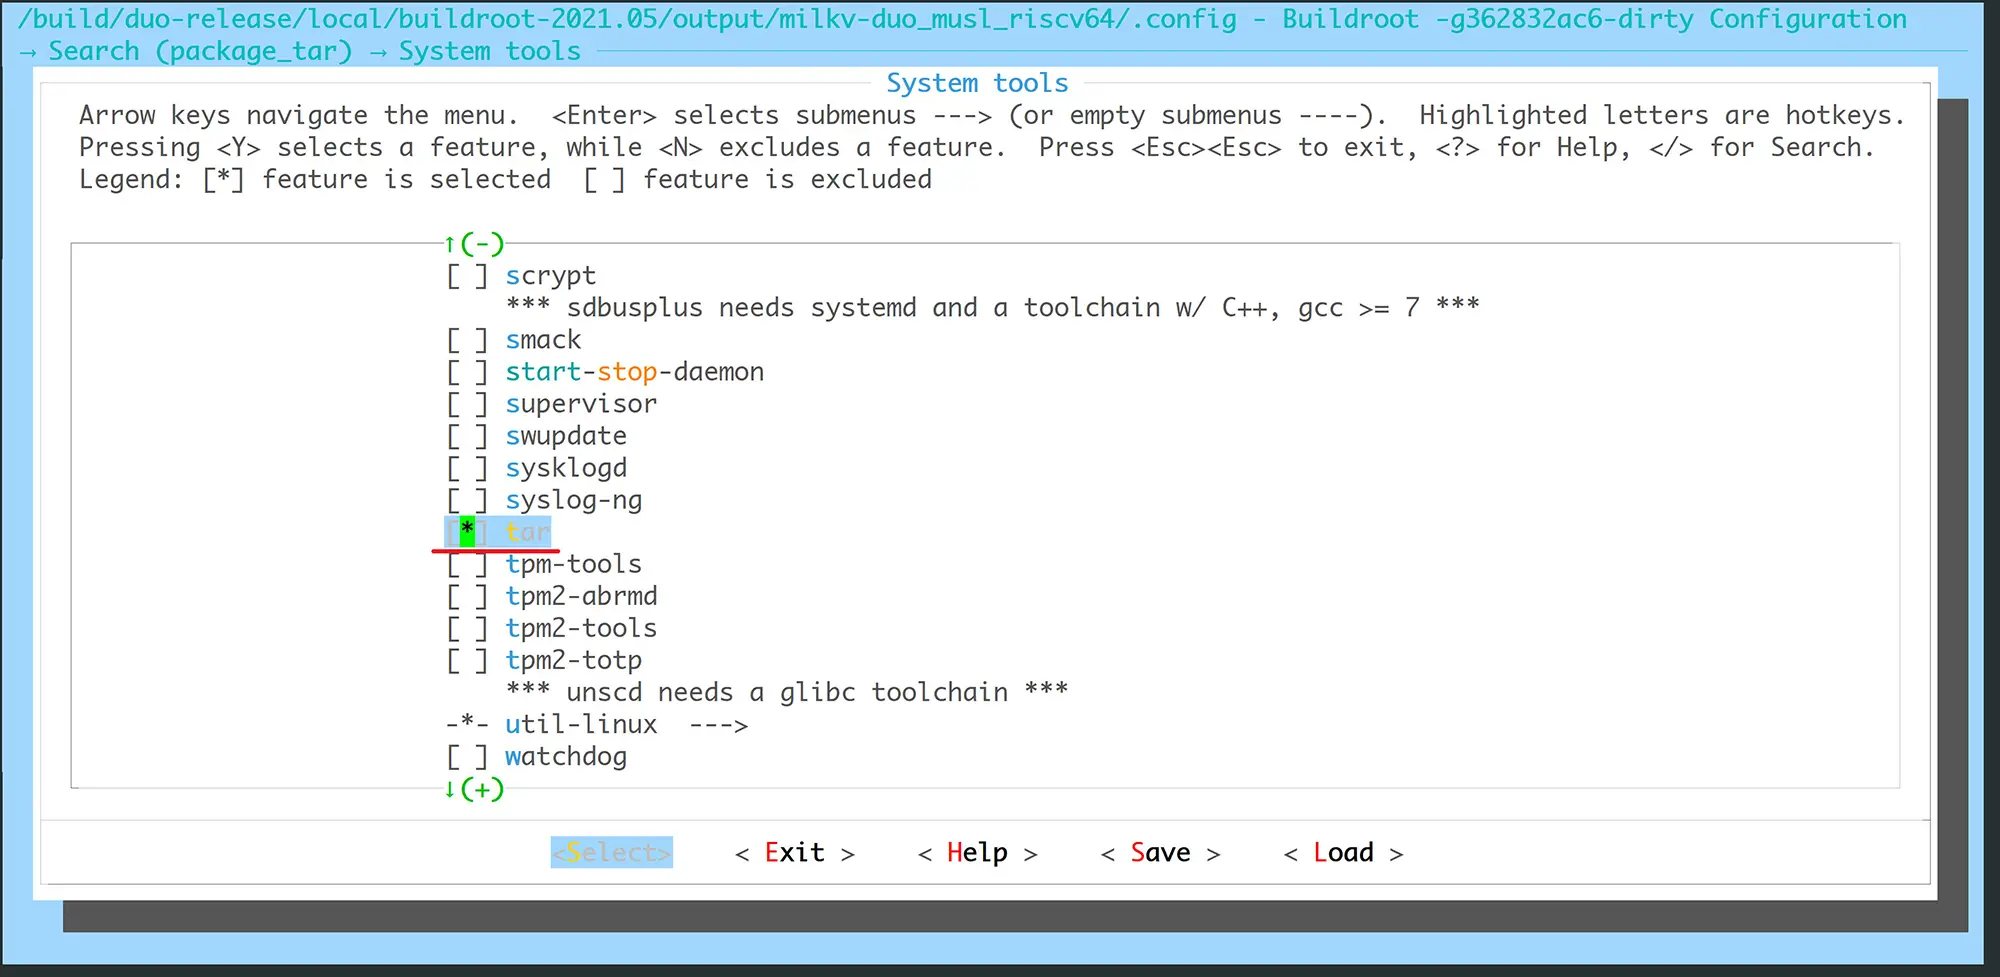
Target packages. If you don't know the specific location of the application package, you can press the/key to search for the package name. For example, if you want to install thetarcommand, since searching fortarwill bring up too many other irrelevant content, you can search forpackage_tar. And see that=nis currently disabled. Its location is in theSystem toolscategory ofTarget packages. You can double-click theESCkey to return to the main page. Then enter the corresponding position on the interface, or you can directly enter the position according to the number prompted earlier: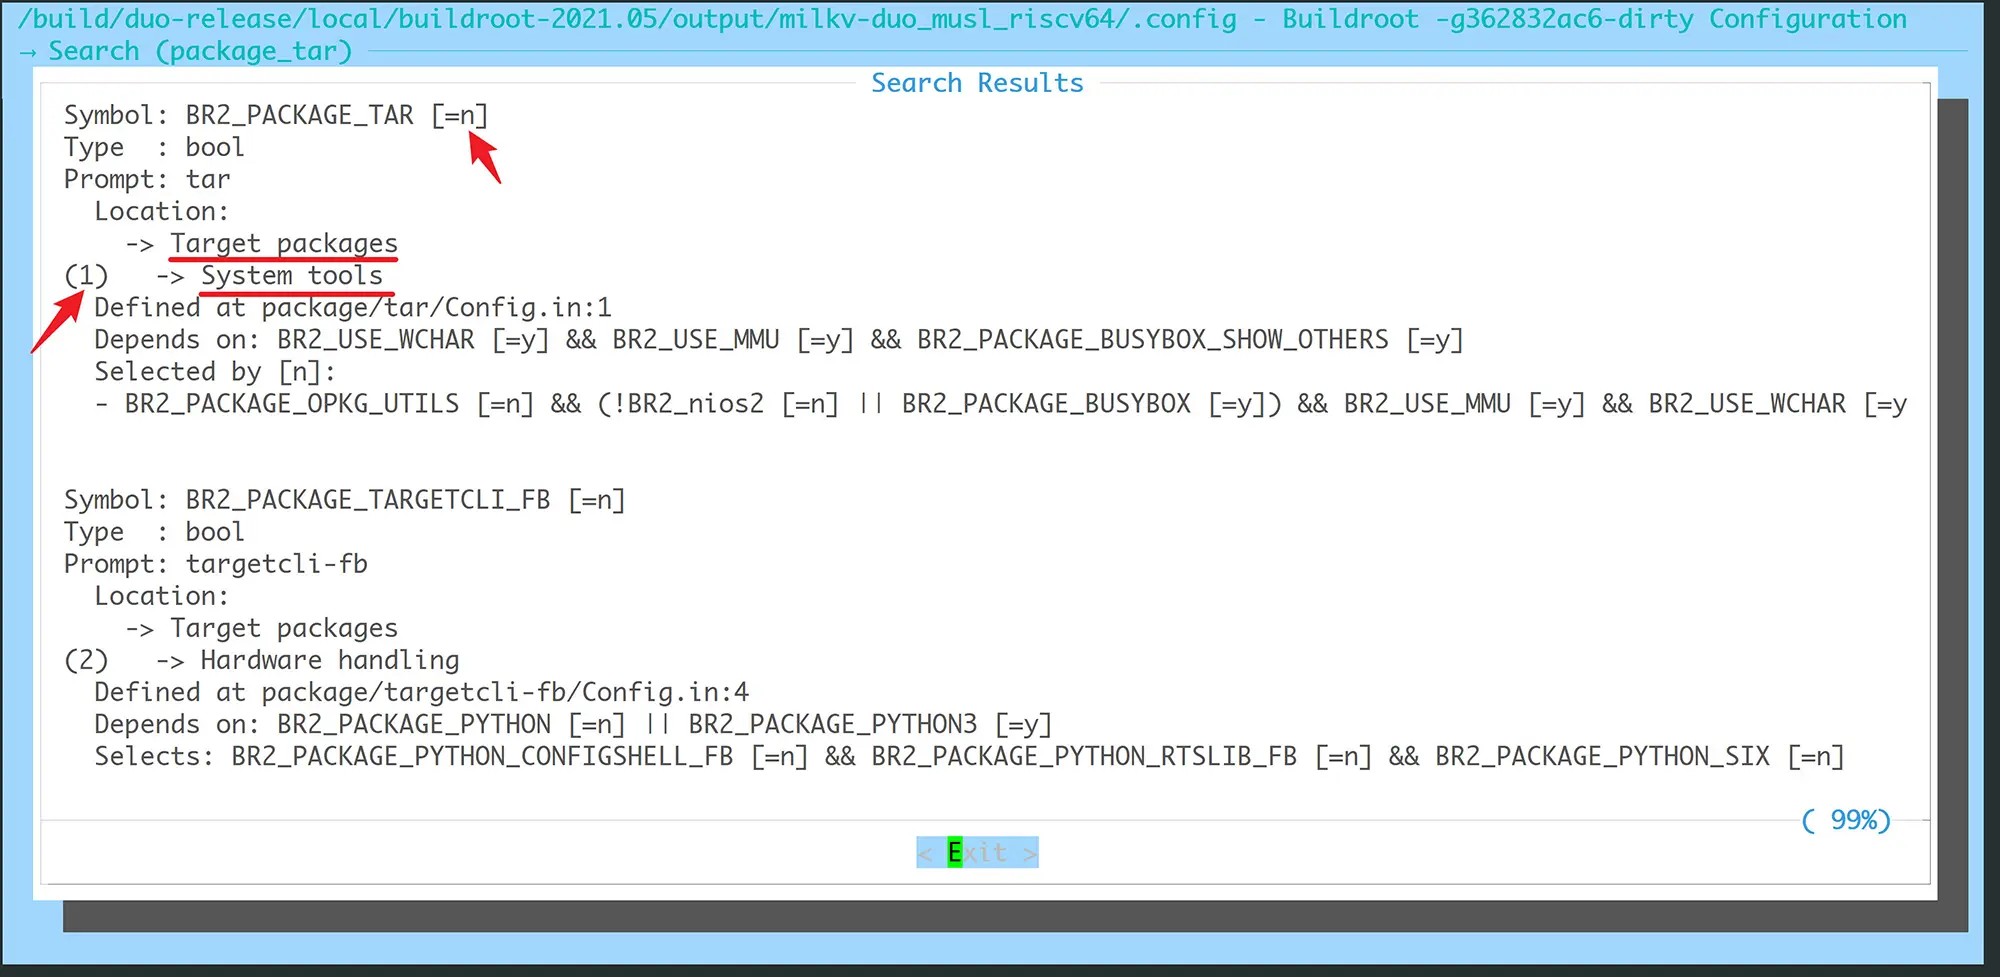
Press the space bar to enable:
Double-click the
ESCkey continuously to exit the main interface. When prompted whether to save, the default is YES. Just press Enter to save and exit: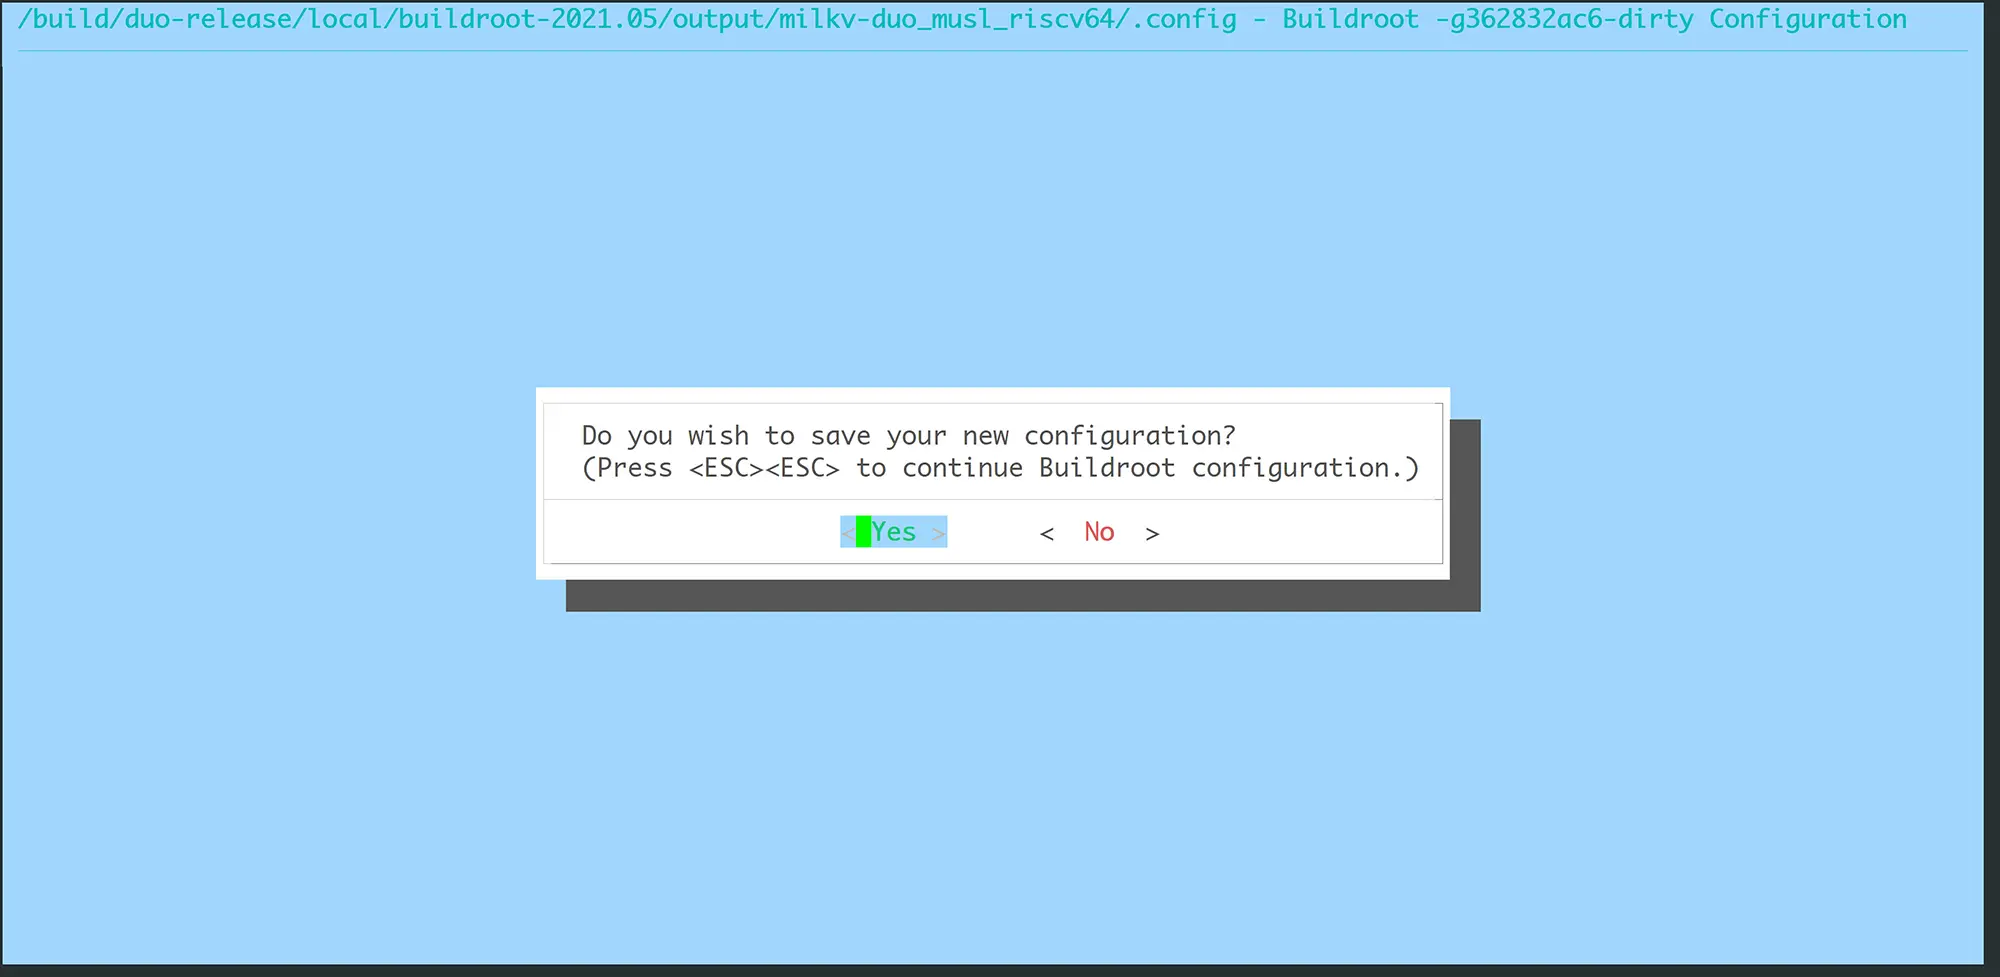
Execute the
make savedefconfigcommand to save the modified configuration to the original configuration file. Use thegit statuscommand to confirm. You can see that the original configuration file has been modified:
At this point, go back to the SDK root directory and recompile.
tipHere you can also compare the differences between the old configuration file and the new configuration file in the compilation directory, and manually modify the parts that need to be changed directly into the original configuration file
milkv-duos-musl-riscv64-sd_defconfig:diff -u .config.old .configAfter starting with the newly compiled image, test the newly added command on the Duo device. If a
not founderror occurs, it may be that the.mkconfiguration file of the package needs to be supplemented with gcc parameters, mainlyTARGET_CFLAGSand The two parameters ofTARGET_LDFLAGSneed to be added. You can refer to the following commits:
Add your own application package
Compile and test your own application. The method of integrating it into the Buildroot project is not recommended. It is recommended to use method duo-examples.
If you really need to compile your application in Buildroot package mode, you can refer to the configuration of the preset package in Buildroot to add it. Here are a few reference links:
- buildroot: add python-evdev required by the pinpong library
- buildroot: add python-freetype required by the pinpong library
Mainly refer to the content added in buildroot-2021.05/package.
5. Delete application packages
If you need to delete some unnecessary application packages to speed up compilation, or disable some unnecessary packages when compiling the firmware by yourself, you can use the make menuconfig method of opening the Buildroot application package mentioned above to disable related packages.
You can also delete the corresponding package name in the Buildroot configuration file. Take the milkv-duos-musl-riscv64-sd target as an example. For example, if you do not need to compile Python-related libraries, you can make the following modifications and recompile to generate firmware.
diff --git a/buildroot/configs/milkv-duos-musl-riscv64-sd_defconfig b/buildroot/configs/milkv-duos-musl-riscv64-sd_defconfig
index 2bc8cd5e3..e78901afb 100644
--- a/buildroot/configs/milkv-duos-musl-riscv64-sd_defconfig
+++ b/buildroot/configs/milkv-duos-musl-riscv64-sd_defconfig
@@ -330,25 +330,6 @@ BR2_PACKAGE_EVTEST=y
 # BR2_PACKAGE_FCONFIG is not set
 BR2_PACKAGE_FLASHROM_ARCH_SUPPORTS=y

-BR2_PACKAGE_PYTHON3=y
-BR2_PACKAGE_PYTHON3_PY_PYC=y
-BR2_PACKAGE_PYTHON_LXML=y
-BR2_PACKAGE_PYTHON_PIP=y
-BR2_PACKAGE_PYTHON_SETUPTOOLS=y
-BR2_PACKAGE_PYTHON3_SSL=y
-
-BR2_PACKAGE_PYTHON_SERIAL=y
-BR2_PACKAGE_PYTHON_PILLOW=y
-BR2_PACKAGE_PYTHON_SMBUS_CFFI=y
-BR2_PACKAGE_PYTHON_SPIDEV=y
-BR2_PACKAGE_PYTHON_MODBUS_TK=y
-BR2_PACKAGE_PYTHON_EVDEV=y
-BR2_PACKAGE_PYTHON_FREETYPE=y
-
-BR2_PACKAGE_PYTHON_PINPONG=y
-
-BR2_PACKAGE_PYTHON_PSUTIL=y
-
 #
 # Compression and decompression
 #
6. Frequently Asked Questions
Buildroot troubleshooting method
Buildroot in the SDK enables top-level parallel compilation by default to speed up compilation. However, when a compilation error occurs, it is inconvenient to analyze the error log, so we can delete it in the config file first, and then reopen it after the problem is solved.
Take the milkv-duos-musl-riscv64-sd target as an example. After deleting the line in its configuration file, delete the buildroot/output directory and recompile:
BR2_PER_PACKAGE_DIRECTORIES=y
When a compilation error occurs, in addition to checking the error information of the compilation terminal, you can also check the complete log in build/br.log for troubleshooting.
Buildroot package download failed
During the compilation process, Buildroot will automatically download some source packages. SDK V1 has integrated some common source packages and can be compiled directly. In SDK V2, to avoid download failures due to network problems, you can download the dl.tar package in advance and extract it to the buildroot directory before recompiling:
rm -rf ./buildroot/output ./buildroot/dl
wget https://github.com/milkv-duo/duo-buildroot-sdk-v2/releases/download/dl/dl.tar
tar xvf ./dl.tar -C ./buildroot/
After decompression, the dl directory structure in buildroot is as follows:
└── buildroot
    └── dl
        ├── acl
        ├── alsa-lib
        ├── alsa-utils
        ├── attr
        ├── ...


