设置工作环境
USB Net 设置
为了使用 USB 网络,我们在系统上默认启用了 CDC-NCM 和 DHCP。
V1.1.2 之前的固件使用的 USB 网络是 RNDIS,如果您使用的是旧的版本,请更新到 V1.1.2 或更新的系统镜像。
CDC-NCM 在 Linux,macOS,以及最新的 Windows 系统上都免驱的,您可以直接使用 ssh [email protected] 登陆到 Duo 的终端。
Windows
如果您的 Windows 系统比较旧,需要手动安装 CDC-NCM 驱动,方法如下:
-
通过 Type-C 线将 Duo,Duo256M 或者 DuoS 与电脑连接。
-
CDC NCM设备出现在设备管理器中,显示为黄色的感叹号表示未安装驱动。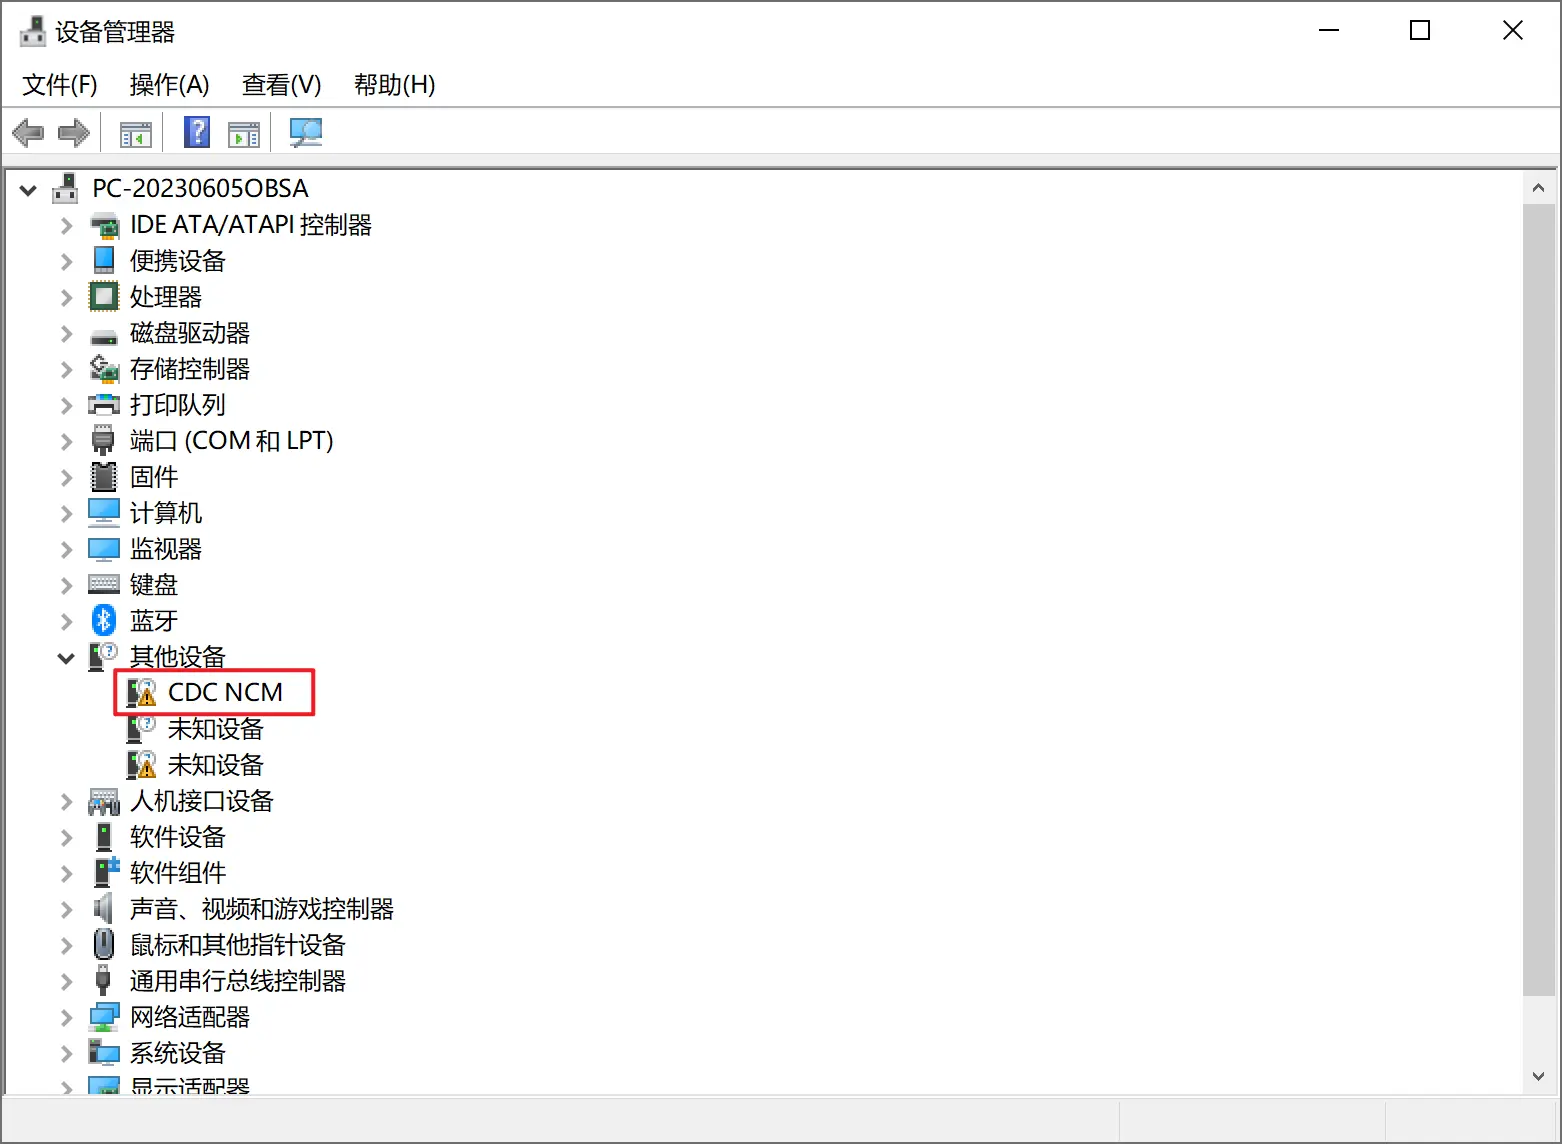
-
选择
CDC NCM后右键选择更新驱动程序。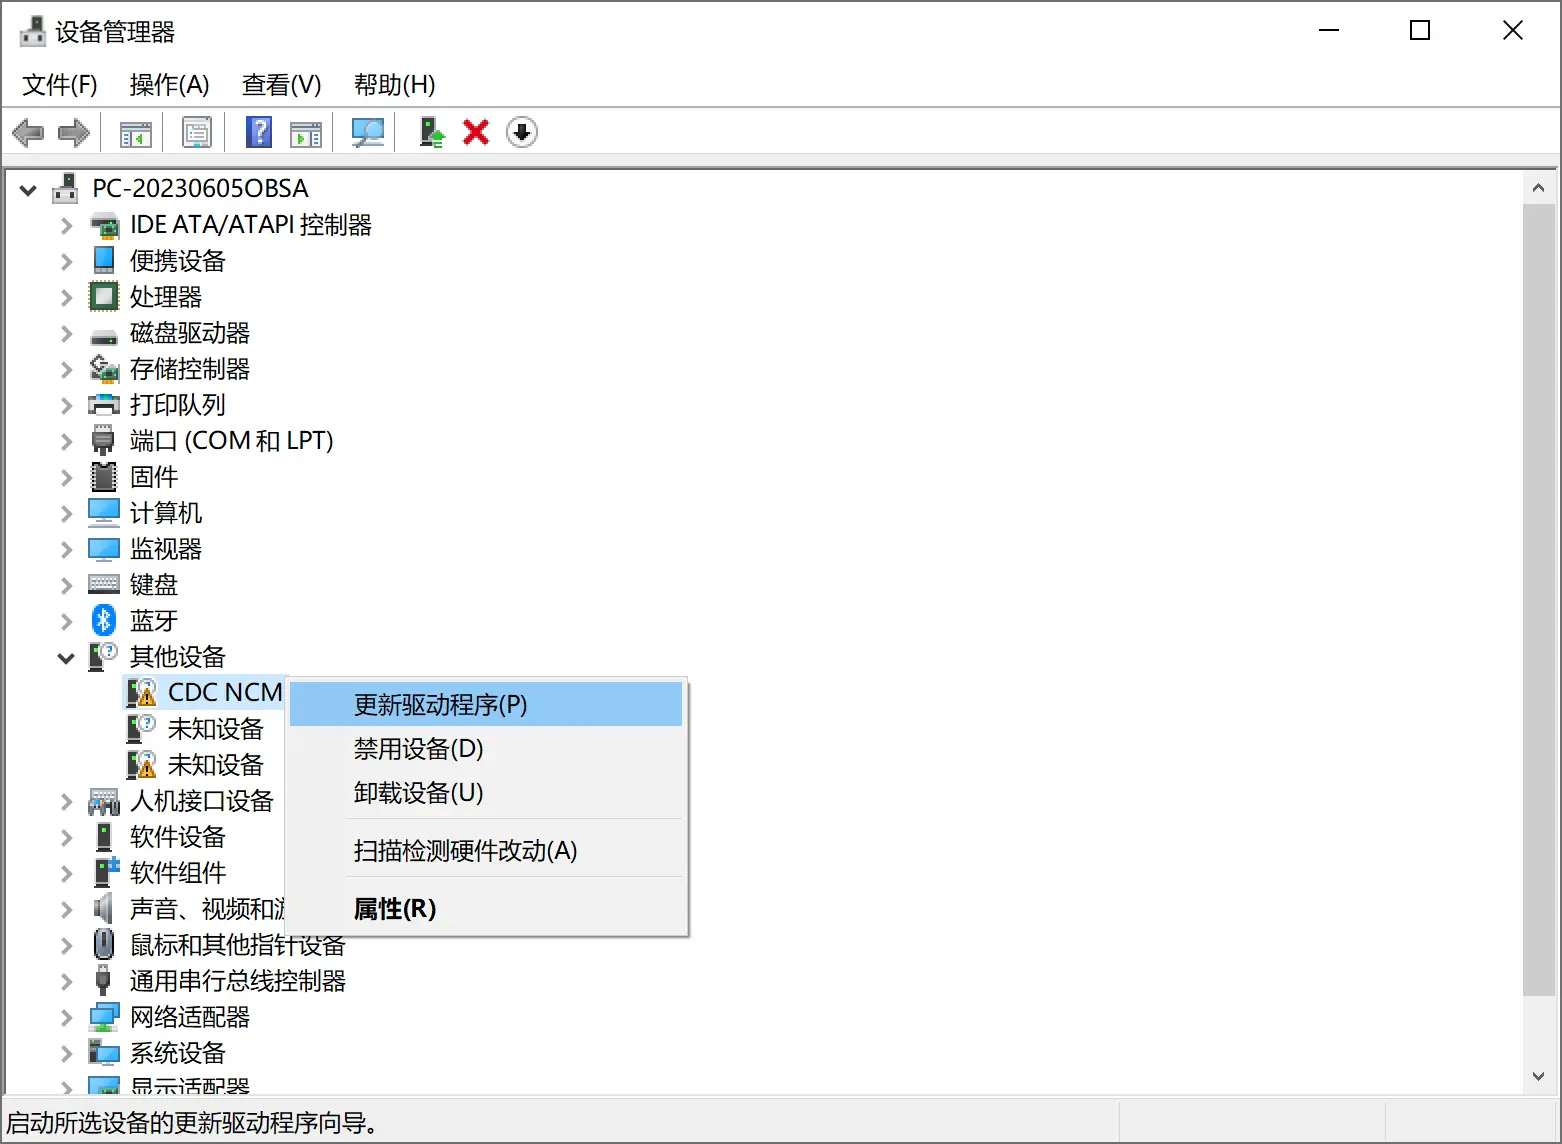
-
选择
浏览我的电脑以查找驱动程序。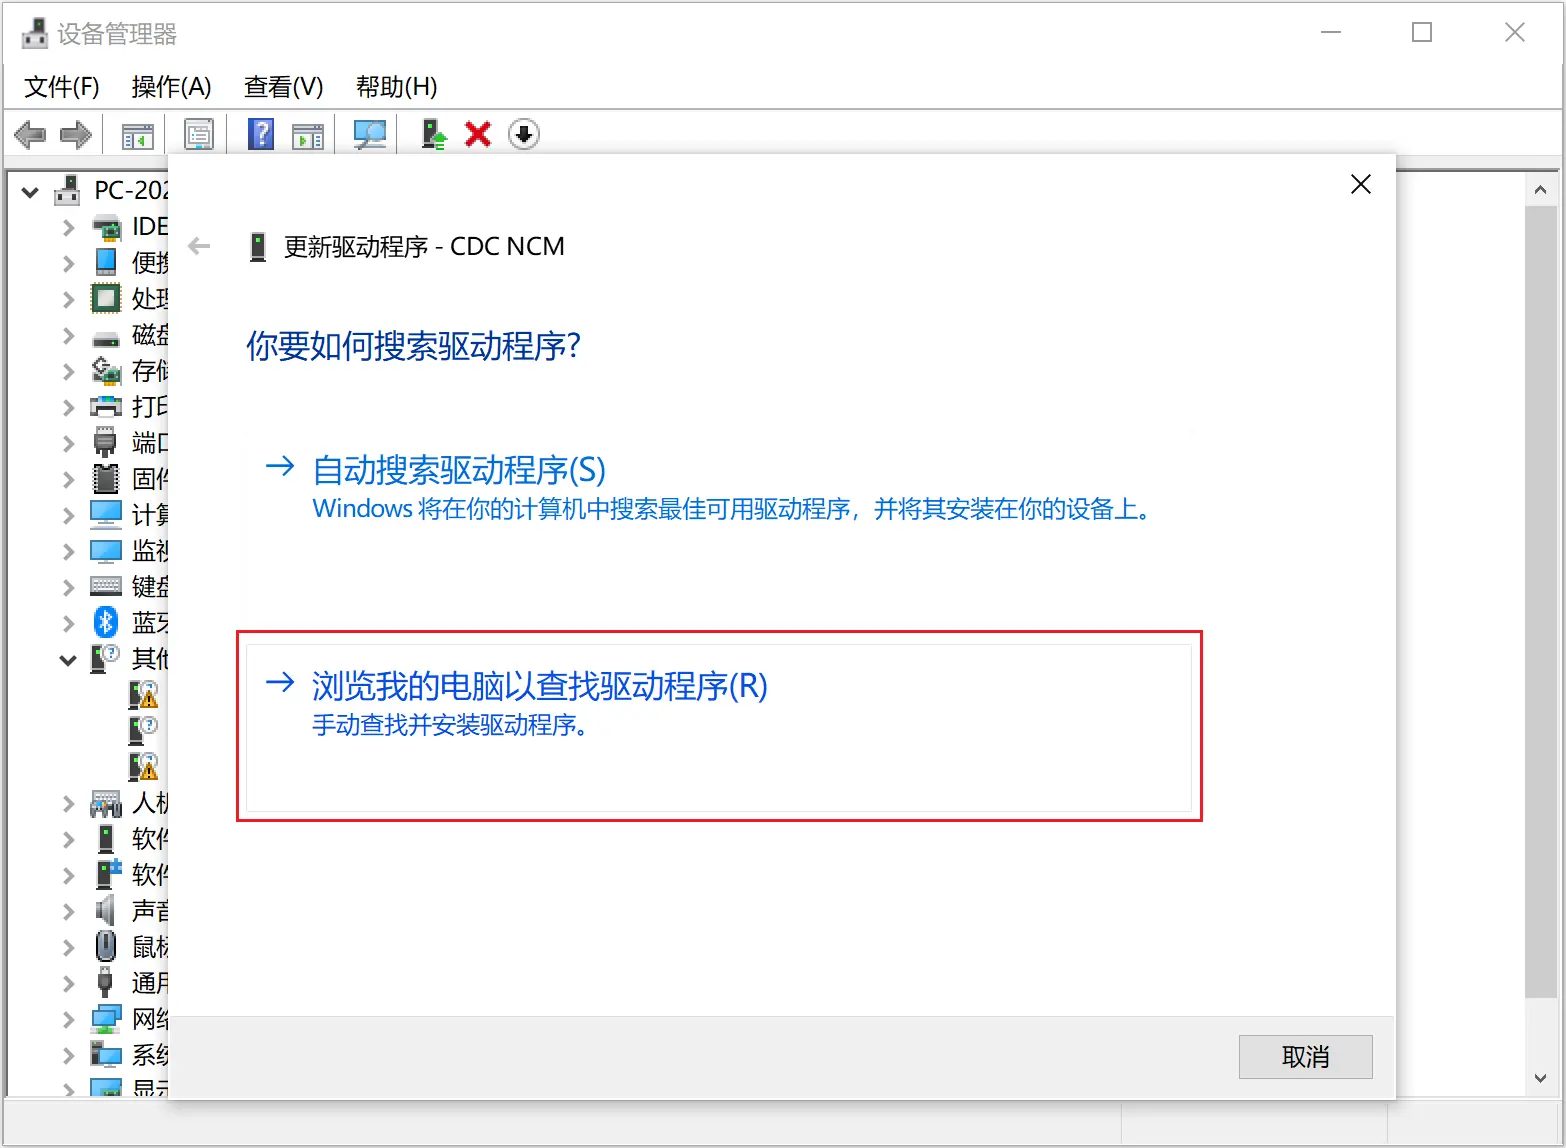
-
选择
让我从计算机上的可用驱动程序列表中选取。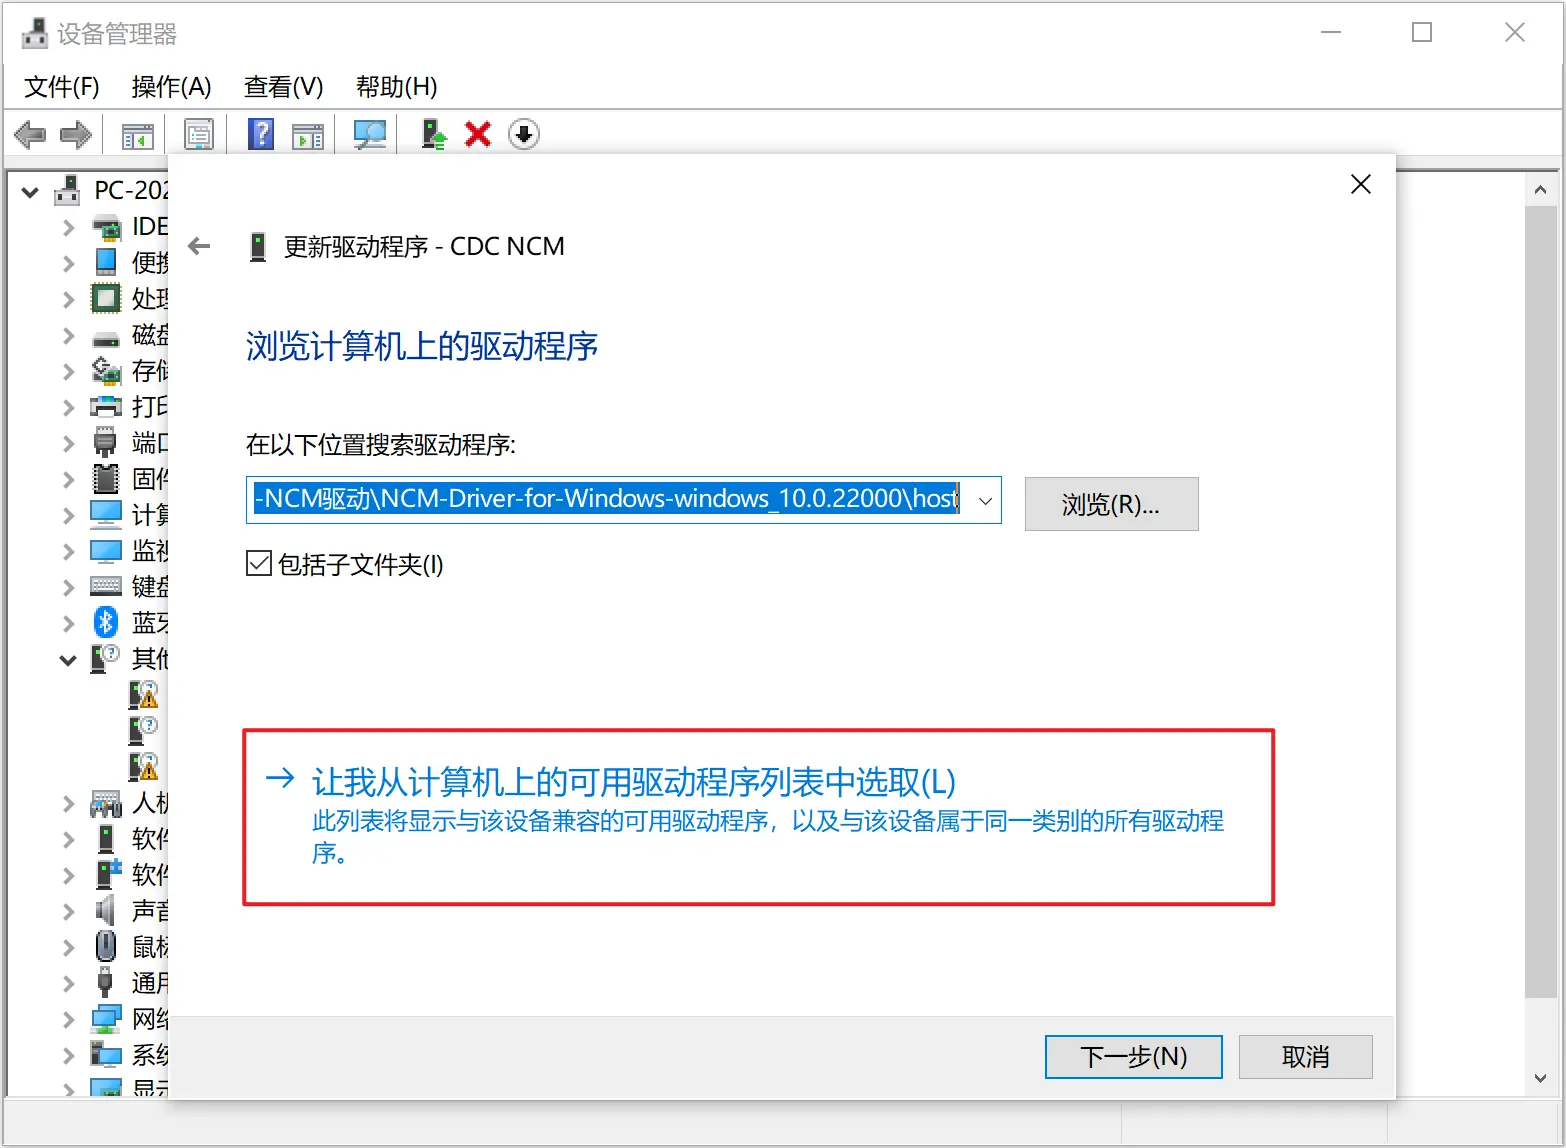
-
选择
网络适配器。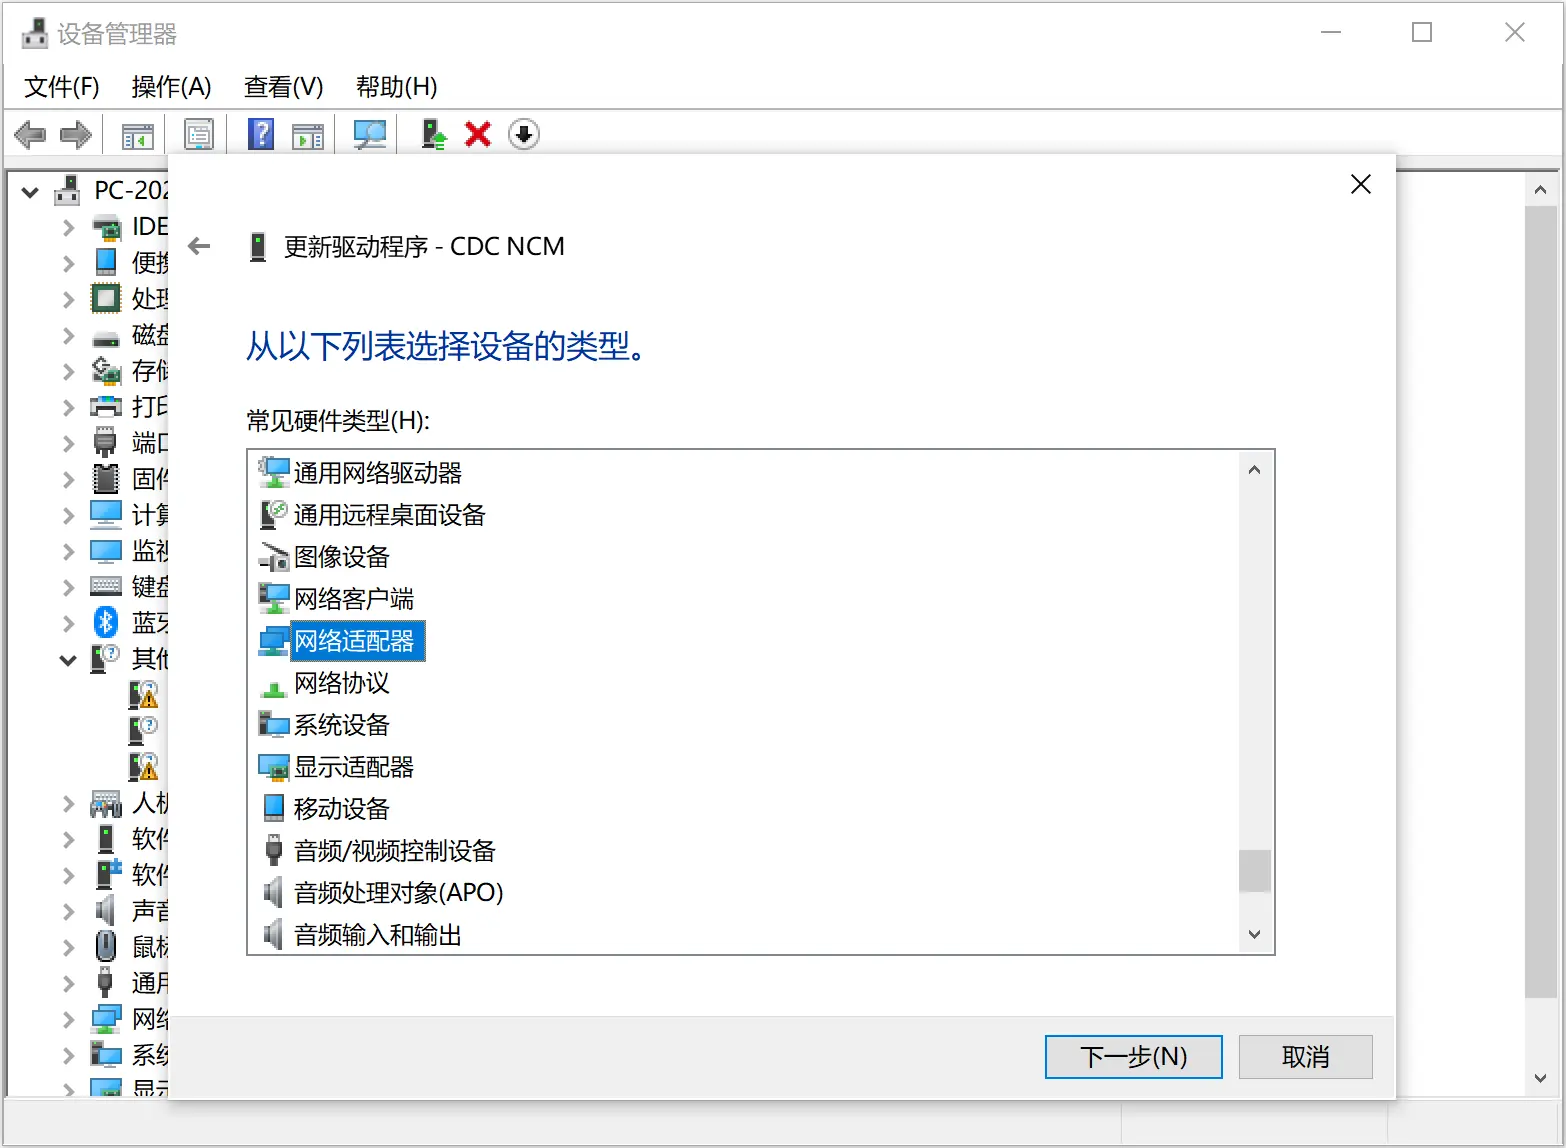
-
在
厂商中选择Microsoft,型号中选择UsbNcm Host Device。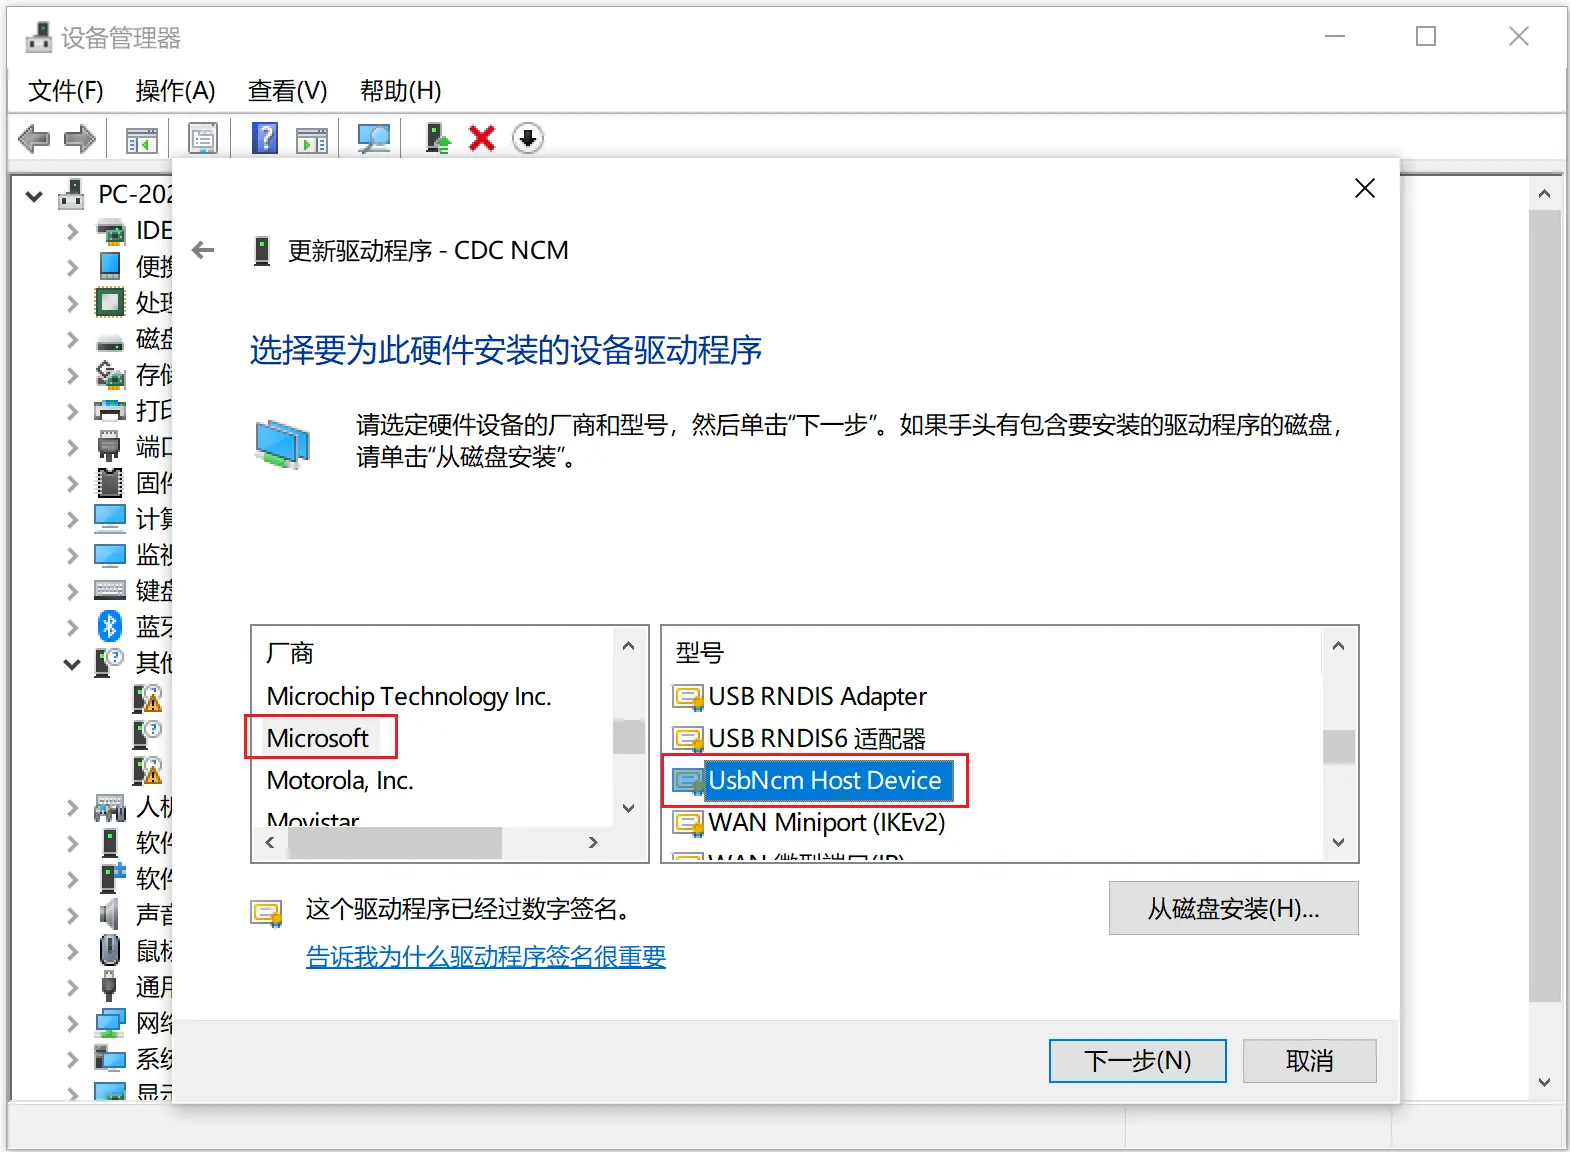
-
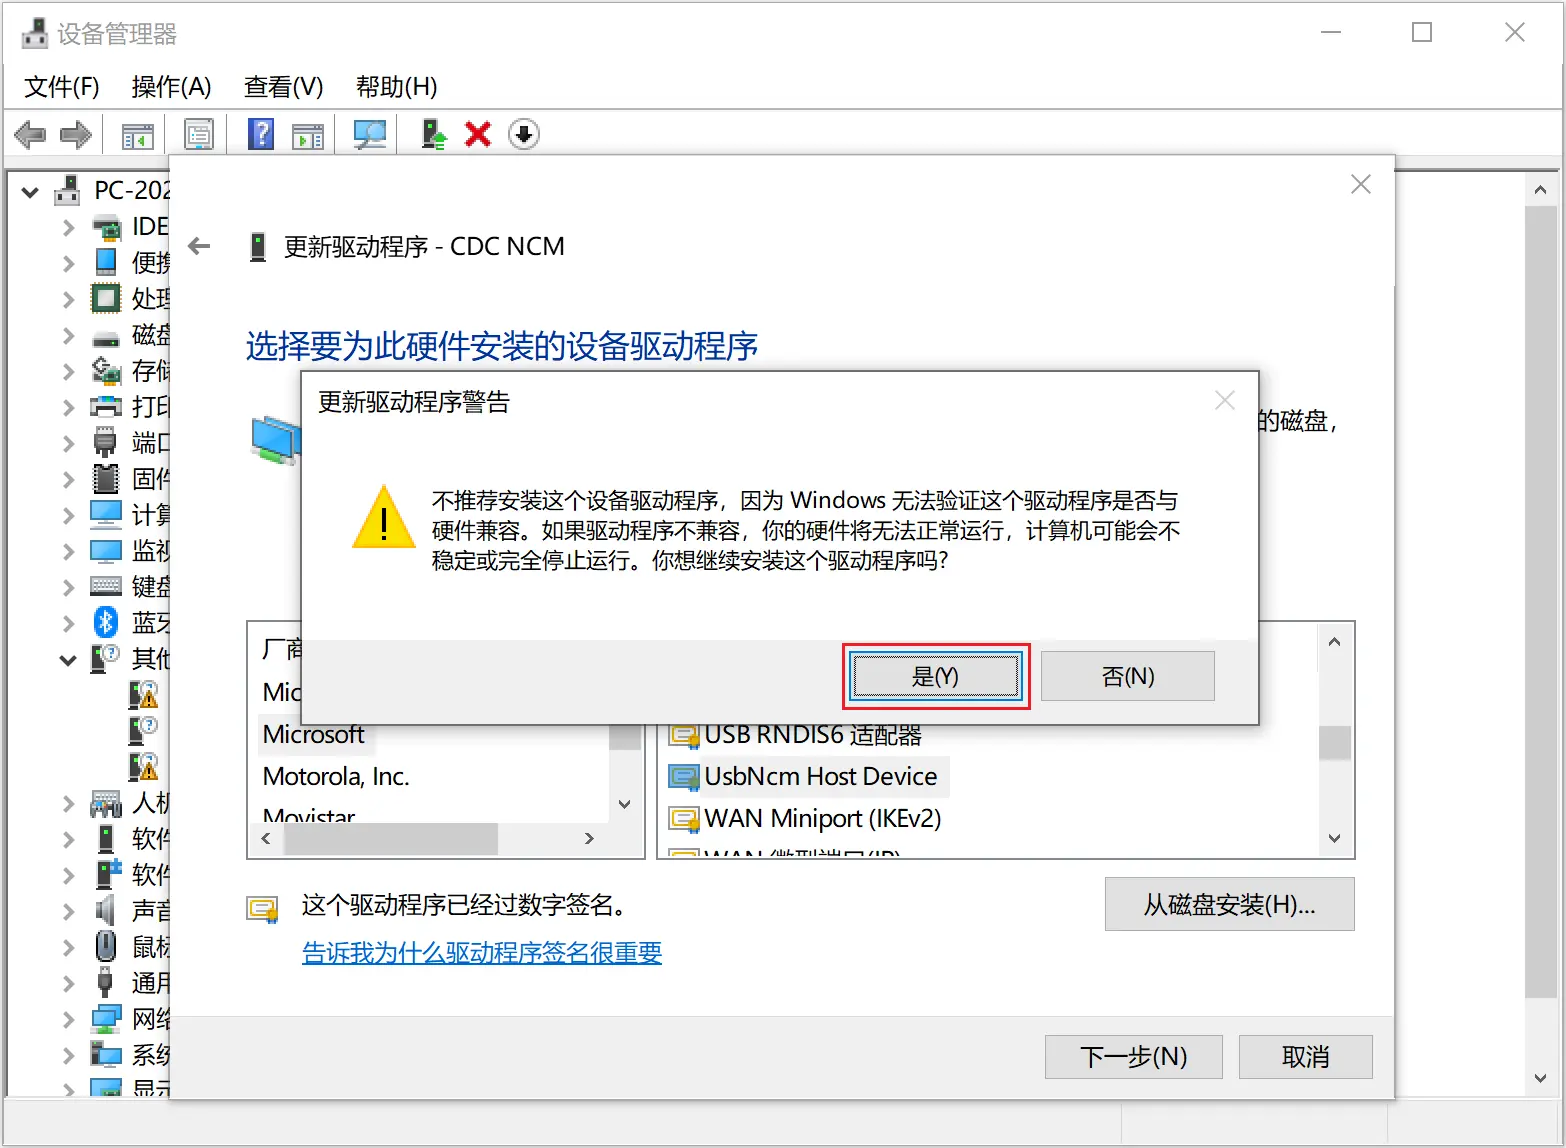
忽略警告信息。
-
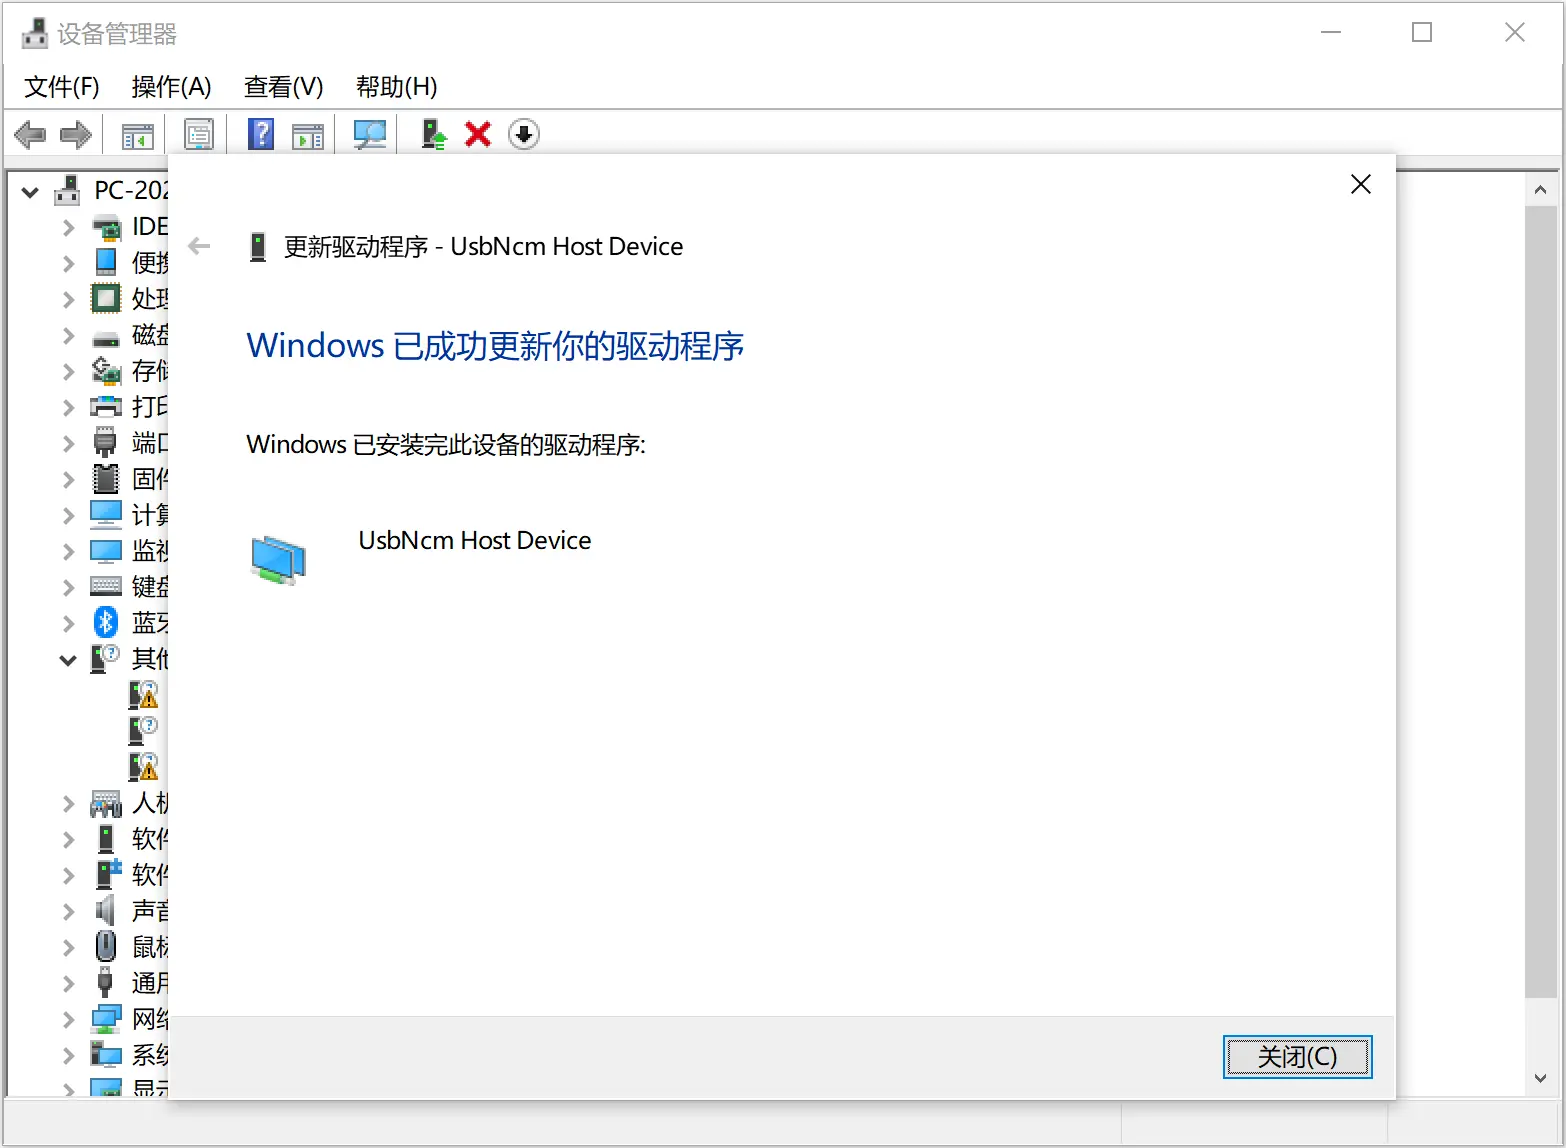
驱动程序安装成功。
-
检查
网络适配器,UsbNcm Host Device已经正常显示。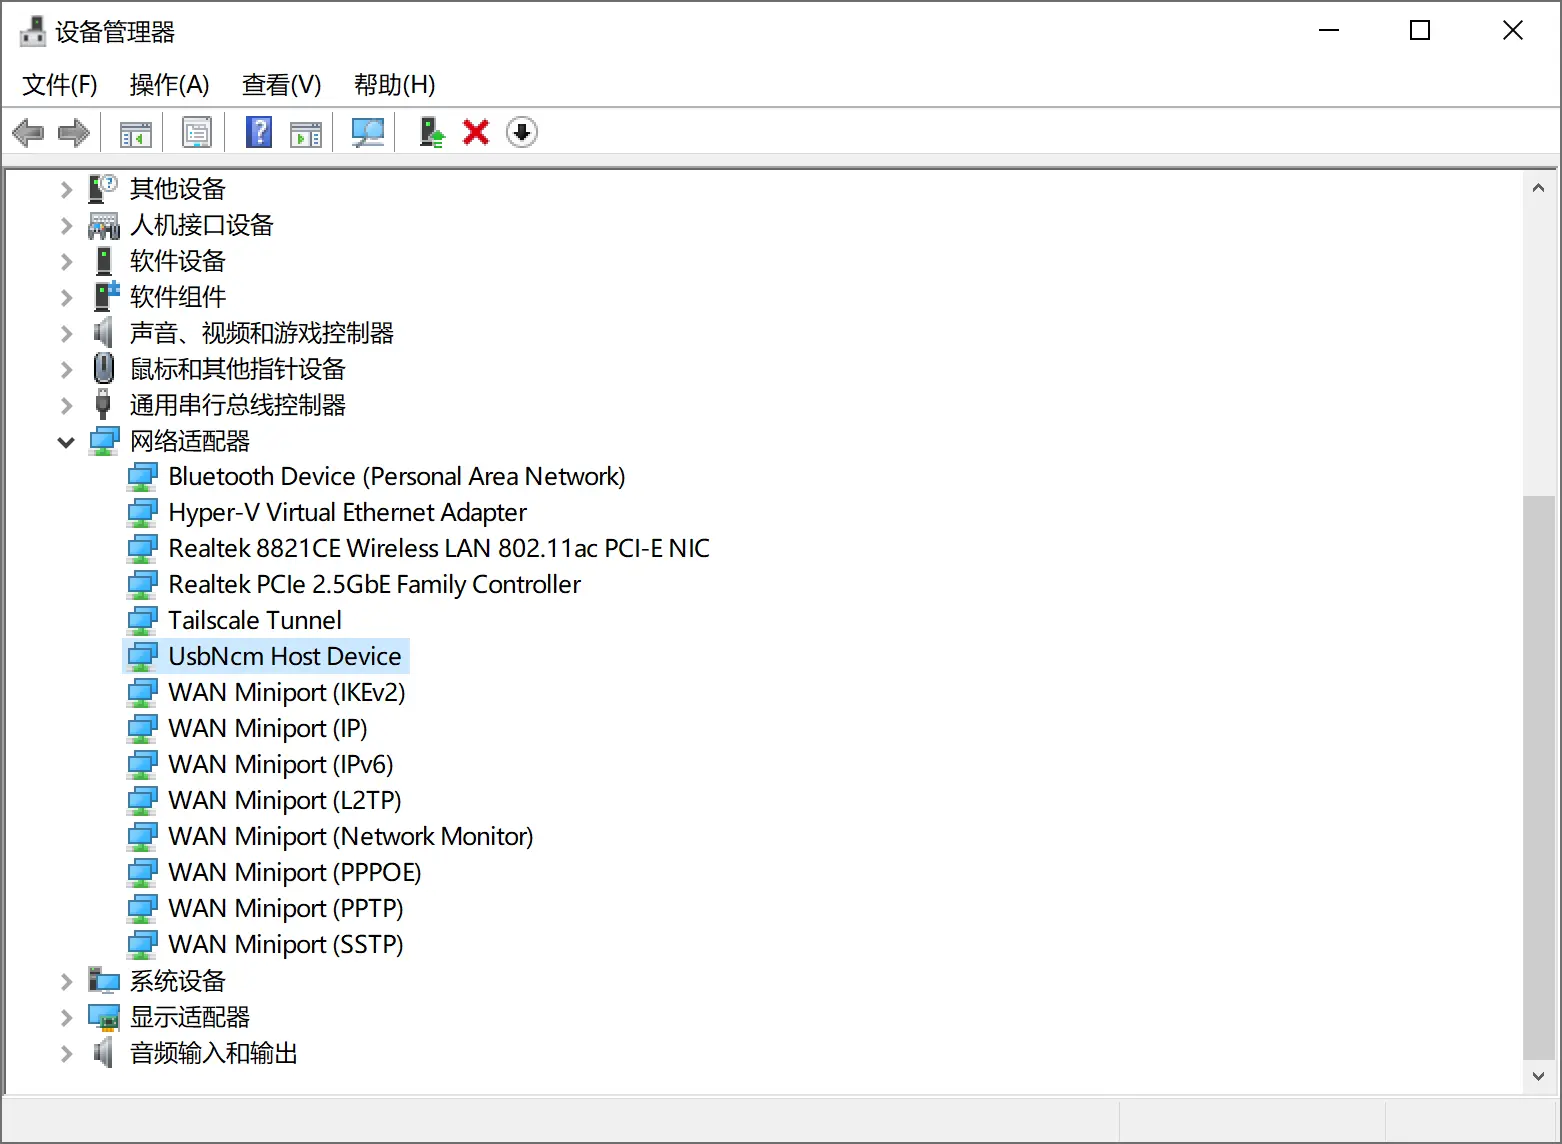
-
使用
ping命令测试。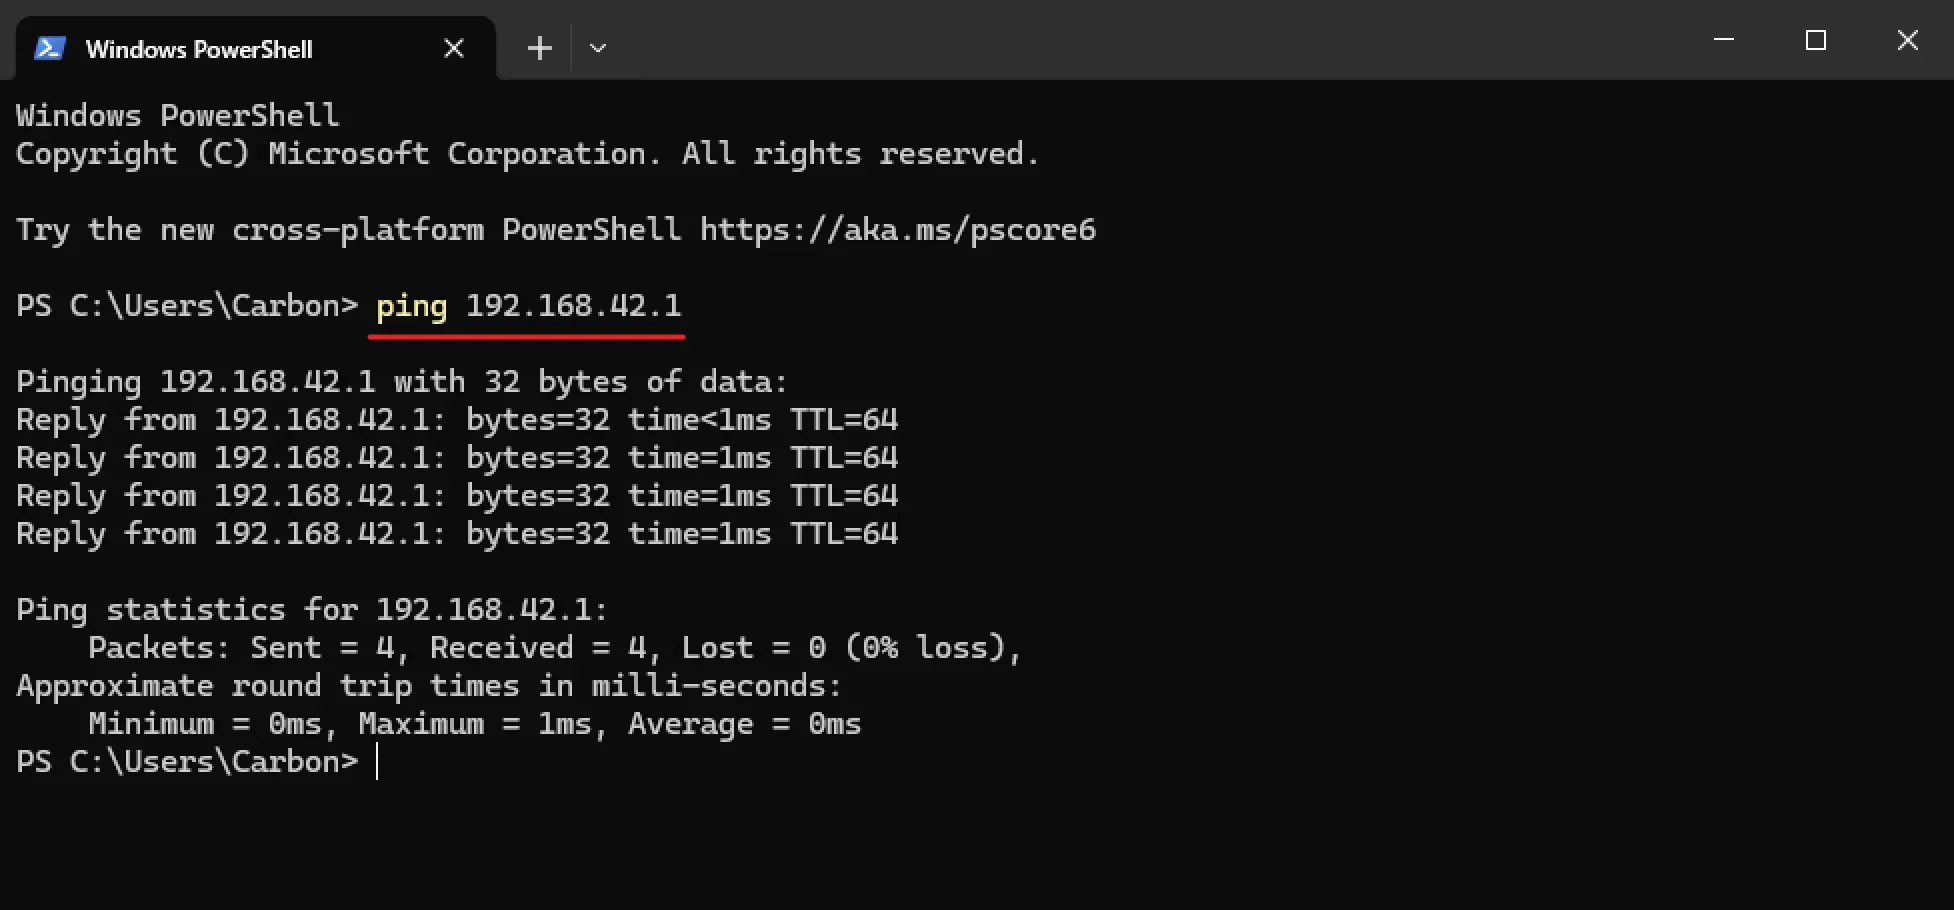
Linux & macOS
打开终端,使用 ping 命令测试:
ubuntu@linux:~$ ping 192.168.42.1 -c 5
PING 192.168.42.1 (192.168.42.1) 56(84) bytes of data.
64 bytes from 192.168.42.1: icmp_seq=1 ttl=64 time=2.00 ms
64 bytes from 192.168.42.1: icmp_seq=2 ttl=64 time=2.13 ms
64 bytes from 192.168.42.1: icmp_seq=3 ttl=64 time=2.13 ms
64 bytes from 192.168.42.1: icmp_seq=4 ttl=64 time=2.01 ms
64 bytes from 192.168.42.1: icmp_seq=5 ttl=64 time=2.13 ms

--- 192.168.42.1 ping statistics ---
5 packets transmitted, 5 received, 0% packet loss, time 4006ms
rtt min/avg/max/mdev = 2.003/2.081/2.132/0.059 ms
SSH
Windows
-
打开终端,输入
ssh [email protected], 首次连接会有如下提示,直接输入yes。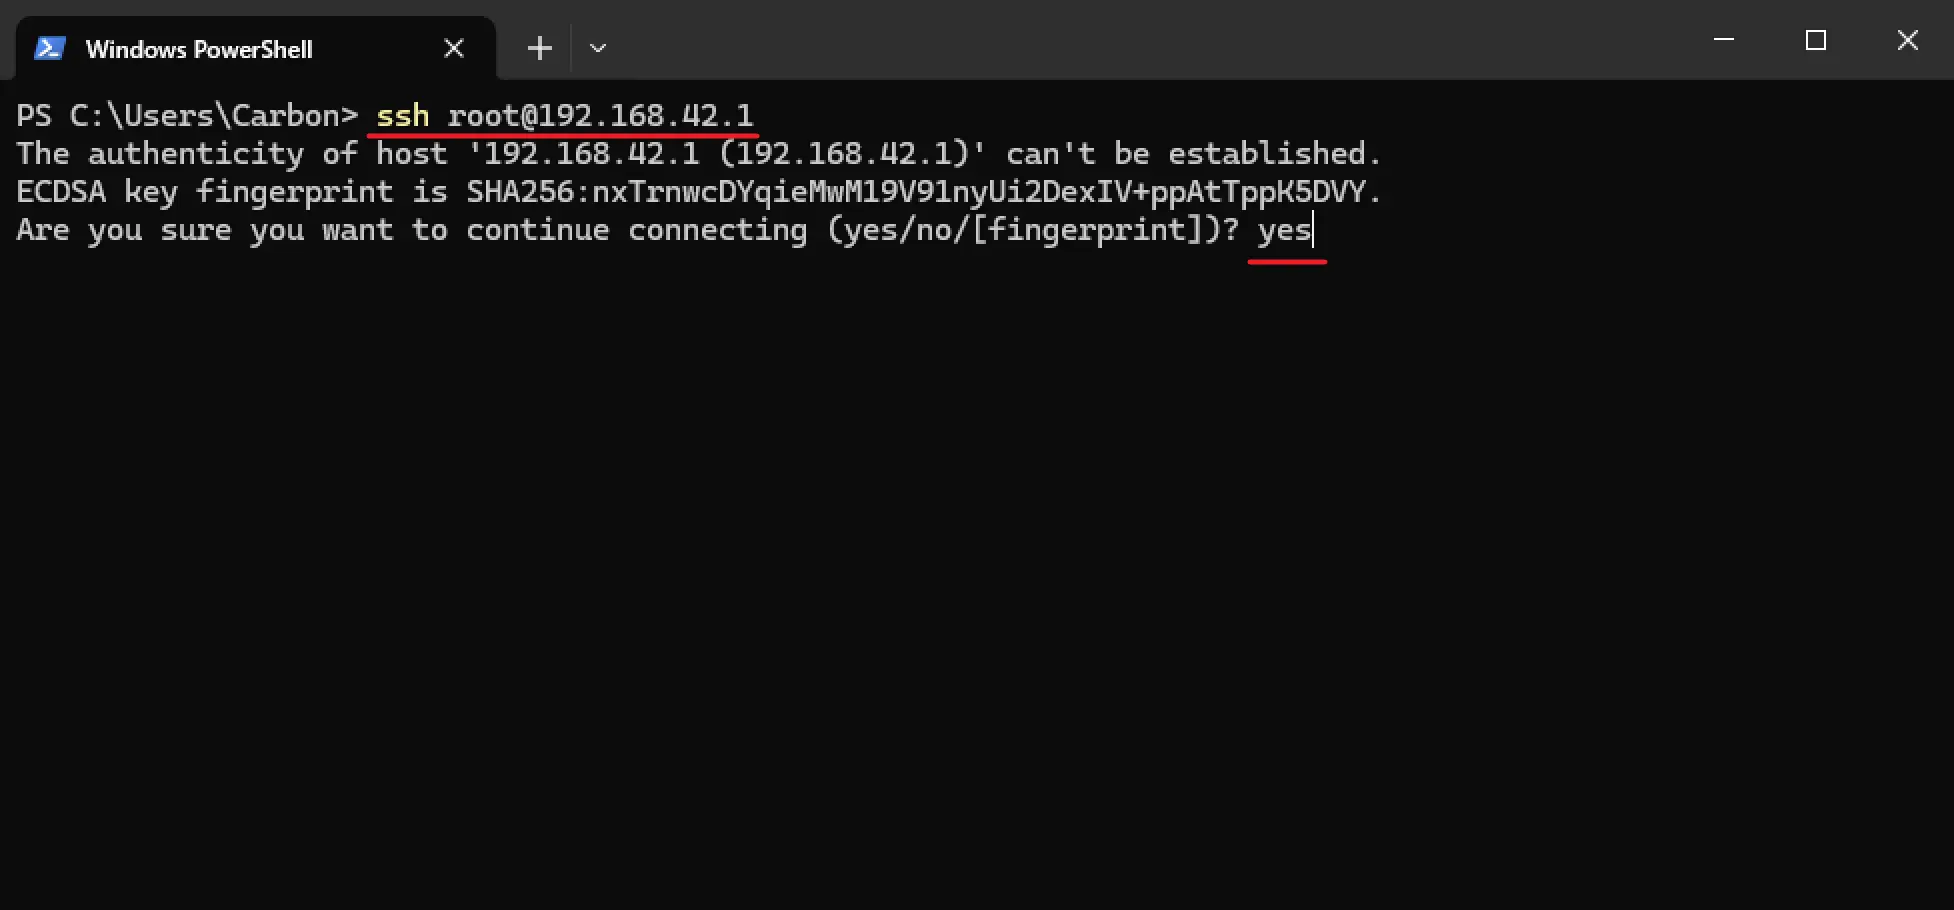
-
输入密码
milkv(密码将不会显示),登陆成功。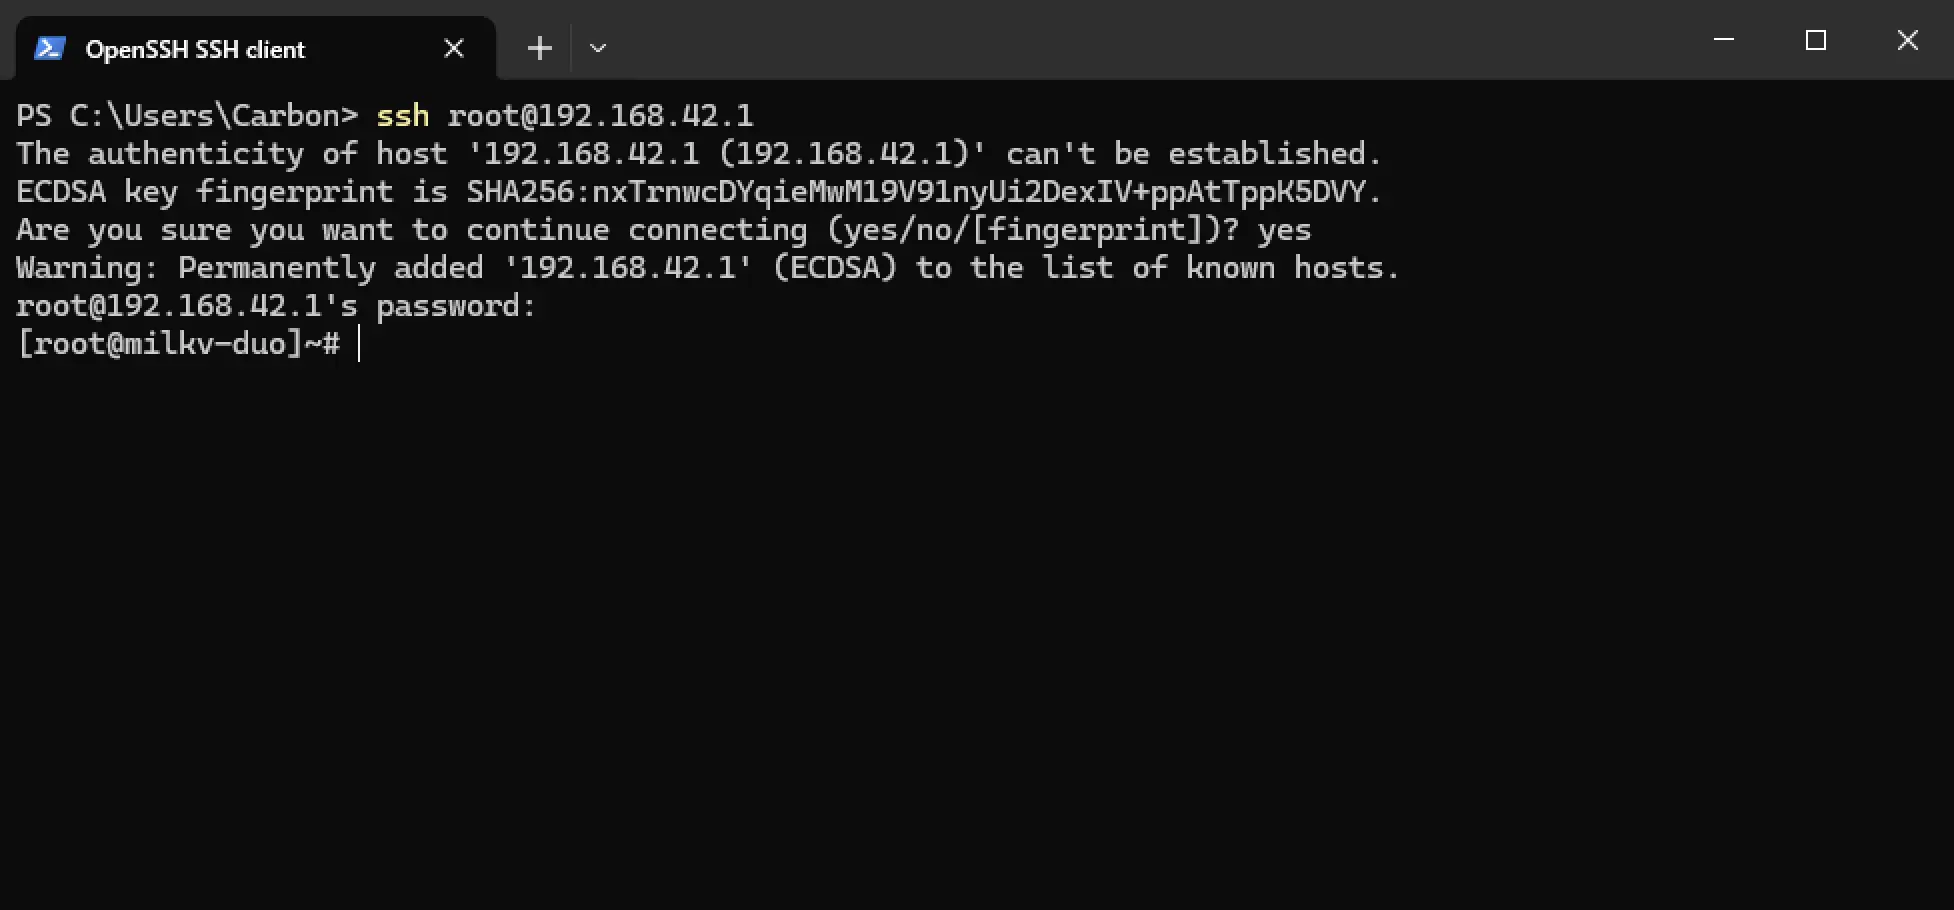
扩展根分区
SD卡启动方式的拓展根分区
检查当前磁盘使用情况
运行命令df- h查看当前磁盘分区和使用情况。
[root@milkv-duo]~# df -h
Filesystem      Size  Used Avail Use% Mounted on
/dev/root       752M  185M  526M  26% /
devtmpfs        159M     0  159M   0% /dev
tmpfs           159M     0  159M   0% /dev/shm
tmpfs           159M  116K  159M   1% /tmp
tmpfs           159M   36K  159M   1% /run
/dev/mmcblk0p1  128M  3.6M  125M   3% /boot
根分区 (/dev/root):752M,已用185M,剩余526M。
运行命令fdisk -l查看磁盘和分区的详细信息。
[root@milkv-duo]~# fdisk -l
Disk /dev/mmcblk0: 29.54 GiB, 31719424000 bytes, 61952000 sectors
Units: sectors of 1 * 512 = 512 bytes
Sector size (logical/physical): 512 bytes / 512 bytes
I/O size (minimum/optimal): 512 bytes / 512 bytes
Disklabel type: dos
Disk identifier: 0x00000000

Device         Boot  Start     End Sectors  Size Id Type
/dev/mmcblk0p1 *         1  262144  262144  128M  c W95 FAT32 (LBA)
/dev/mmcblk0p2      262145  266240    4096    2M  0 Empty
/dev/mmcblk0p3      266241 1839104 1572864  768M 83 Linux
磁盘名称:/dev/mmcblk0 总大小:29.54 GiB (31719424000 bytes) 总扇区数:61952000 sectors 扇区大小:512 bytes 分区表类型:DOS(MBR)
我们要扩展的根分区就是 /dev/mmcblk0p3 ,要记住此分区的起始扇区 266241 。
注意:/dev/mmcblk0p1 是 boot 分区,不要动。
使用 fdisk 扩展根分区
- 运行命令
fdisk /dev/mmcblk0启动 fdisk 。
[root@milkv-duo]~# fdisk /dev/mmcblk0

Welcome to fdisk (util-linux 2.36.2).
Changes will remain in memory only, until you decide to write them.
Be careful before using the write command.


Command (m for help):
-
删除当前根分区
- 输入 d 以删除分区。
- 输入分区号(按照自己的实际情况)以删除分区 /dev/mmcblk0p3。删除当前根分区。
[root@milkv-duo]~# fdisk /dev/mmcblk0

Welcome to fdisk (util-linux 2.36.2).
Changes will remain in memory only, until you decide to write them.
Be careful before using the write command.


Command (m for help): d
Partition number (1-3, default 3): 3

Partition 3 has been deleted.
-
创建新分区
- 输入 n 以创建新分区。
- 选择 p 创建主分区。
- 输入分区号 3(如果系统提示选择分区号,输入 3)。
- 输入起始扇区(此为 266241),然后按 Enter。
- 输入结束扇区(可以输入 1839104 或直接按 Enter 以扩展到最大空间)。
注意:分区号,起始扇区,结束扇区根据实际情况来定。
[root@milkv-duo]~# fdisk /dev/mmcblk0

Welcome to fdisk (util-linux 2.36.2).
Changes will remain in memory only, until you decide to write them.
Be careful before using the write command.


Command (m for help): d
Partition number (1-3, default 3): 3

Partition 3 has been deleted.

Command (m for help): n
Partition type
   p   primary (2 primary, 0 extended, 2 free)
   e   extended (container for logical partitions)
Select (default p): p
Partition number (3,4, default 3): 3
First sector (266241-61951999, default 268288): 266241
Last sector, +/-sectors or +/-size{K,M,G,T,P} (266241-61951999, default 61951999):

Created a new partition 3 of type 'Linux' and of size 29.4 GiB.
Partition #3 contains a ext4 signature.

Do you want to remove the signature? [Y]es/[N]o: N
注意:要是出现 Do you want to remove the signature? [Y]es/[N]o ,选择 N 。
- 保存更改
输入 w 保存更改并退出 fdisk。
Command (m for help): w

The partition table has been altered.
Syncing disks.
- 扩展文件系统
在 fdisk 操作完成后,您需要扩展文件系统以使用新的分区大小。
[root@milkv-duo]~# resize2fs /dev/mmcblk0p3
resize2fs 1.46.2 (28-Feb-2021)
Filesystem at /dev/mmcblk0p3 is mounted on /; on-line resizing required
old_desc_blocks = 3, new_desc_blocks = 118
- 查看扩展后的根分区
[root@milkv-duo]~# df -h
Filesystem      Size  Used Avail Use% Mounted on
/dev/root        30G  178M   28G   1% /
devtmpfs        159M     0  159M   0% /dev
tmpfs           159M     0  159M   0% /dev/shm
tmpfs           159M  116K  159M   1% /tmp
tmpfs           159M   36K  159M   1% /run
/dev/mmcblk0p1  128M  3.6M  125M   3% /boot
根分区 (/dev/root):30G,已用178M,剩余28G。
创建扩展根分区脚本
内容如下:
#!/bin/bash
# 确��保脚本以root身份运行
if [ "$EUID" -ne 0 ]; then
echo "请以root用户运行此脚本"
exit
fi
# 设置设备名称
DEVICE="/dev/mmcblk0"
# 使用fdisk进行分区操作
{
echo d # 删除分区
echo 3 # 删除分区3
echo n # 创建新分区
echo p # 主分区
echo 3 # 分区号3
echo 266241 # 起始扇区
echo # 结束扇区,使用默认值(最大空间��)
echo N # 不移除签名
echo w # 保存更改
} | fdisk "$DEVICE"
# 检查文件系统并扩展
resize2fs "${DEVICE}p3"
# 显示扩展后的磁盘使用情况
df -h
注意:此脚本中的 删除分区,分区号,起始扇区,结束扇区要根据自己的实际情况来决定。
将脚本命名为 resize.sh ,运行命令 chmod + x resize.sh 获取权限。
运行命令 ./resize.sh,便可成功扩展根分区。
其他
修改 USB 网络的 IP 地址
USB 网络 CDC-NCM 默认的 IP 地址是 192.168.42.1,如果您需要修改这个地址,比如同一台电脑接入多台 Duo 设备时,每一台 Duo 的 IP 需要设置为不同,可以通过在 Duo 设备内修改如下两个文件实现:
#!/bin/sh

/etc/uhubon.sh device >> /tmp/ncm.log 2>&1
/etc/run_usb.sh probe ncm >> /tmp/ncm.log 2>&1
if test -e /usr/bin/burnd; then
  /etc/run_usb.sh probe acm >> /tmp/ncm.log 2>&1
fi
/etc/run_usb.sh start ncm >> /tmp/ncm.log 2>&1

sleep 0.5
ifconfig usb0 192.168.42.1

count=`ps | grep dnsmasq | grep -v grep | wc -l`
if [ ${count} -lt 1 ] ;then
  echo "/etc/init.d/S80dnsmasq start" >> /tmp/ncm.log 2>&1
  /etc/init.d/S80dnsmasq start >> /tmp/ncm.log 2>&1
fi
interface=usb0
dhcp-range=192.168.42.2,192.168.42.242,1h
dhcp-option=3
dhcp-option=6
开启虚拟内存 Swap
什么是 Swap
Swap,又叫做虚拟内存,用于在物理内存(RAM)已满时支持将数据存储在硬盘中。有时即使物理内存尚未用完,Swap也被用于增加缓存容量。在Duo上面,可以理解为,将部分TF卡的空间分配出来当做内存(RAM)使用。
打开 Swap 功能可能会导致 TF 卡磨损加快,缩短其使用寿命!强烈建议仅在内存不足时启用虚拟内存!
在 Duo 中如何开启 Swap
开启 Swap 有两种方法,一种是使用 Swap 分区,一种是使用 Swap 文件。在 v1.1.3 以前的版本中,Duo 的镜像预留了一个 256M 的分区做为 Swap 分区,在 v1.1.3 以及之后版本中,统�一使用 Swap 文件的方式。
使用最新的系统镜像:
https://github.com/milkv-duo/duo-buildroot-sdk/releases
在 Duo 终端中执行以下命令,创建一个 256M 的 Swap 文件(文件的大小和位置可以自定义):
fallocate -l 256M /mnt/swapfile
chmod 600 /mnt/swapfile
mkswap /mnt/swapfile
swapon /mnt/swapfile
然后运行 swapon --show 或者 free -h 命令来查看 swap 是否已经启用 (256M):
[root@milkv-duo]~# swapon --show
NAME          TYPE   SIZE USED PRIO
/mnt/swapfile file 255.8M   0B   -2
[root@milkv-duo]~# free -h
              total        used        free      shared  buff/cache   available
Mem:          28.3M       14.3M        3.7M       76.0K       10.3M       11.2M
Swap:        255.8M           0      255.8M
如果需要开机自动加载 Swap,可以使用这个命令配置:
echo "/mnt/swapfile swap swap defaults 0 0" >> /etc/fstab && sync
重启后直接使用 swapon --show 或者 free -h 命令查看,Swap 已经自动加载了。
